Interaction System
This section will go through everything you need to set up the Interaction System in your project, check out the following guides to learn more about the system. It is recommended to follow these sections in order
Setup of the Interaction Inputs
- To get started with the interaction system, open the Input Mapping Context that you use to handle all your gameplay inputs
-
In this IMC, define all the inputs you will want to use for interactions, if you already have inputs defined for interactions, you can skip this step.
If you don’t already have such inputs, you can use the demo input actions included in the pack:
IA_InteractionandIA_SecondaryInteractionand associate any keys to them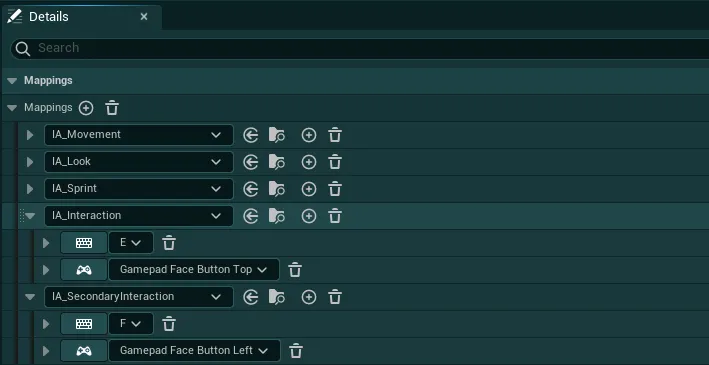
You can see an example of this setup in the
IMC_EGUI_DemoInputslocated underEasyGameUI/DemoContent/Inputs/Important Note on input Triggers
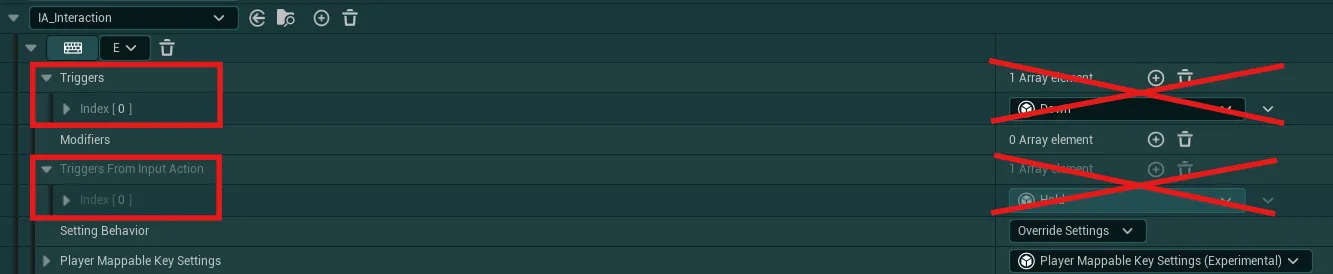
The Input Actions used for interactions must not have any triggers either inside the Input Mapping Context, or inside the input action itself. Make sure to remove any trigger on those inputs.
-
Then, you will need to define those inputs inside the Interaction Manager, to do so go to
EasyGameUI/EasyInteractionSystem/Coreand open theAC_EasyInteractionManager -
In here, you will find several predefined Interaction Input Events, those use the demo input actions. If you added those input actions
IA_InteractionandIA_SecondaryInteractionto your IMC, then you don’t have to change anything and can skip this step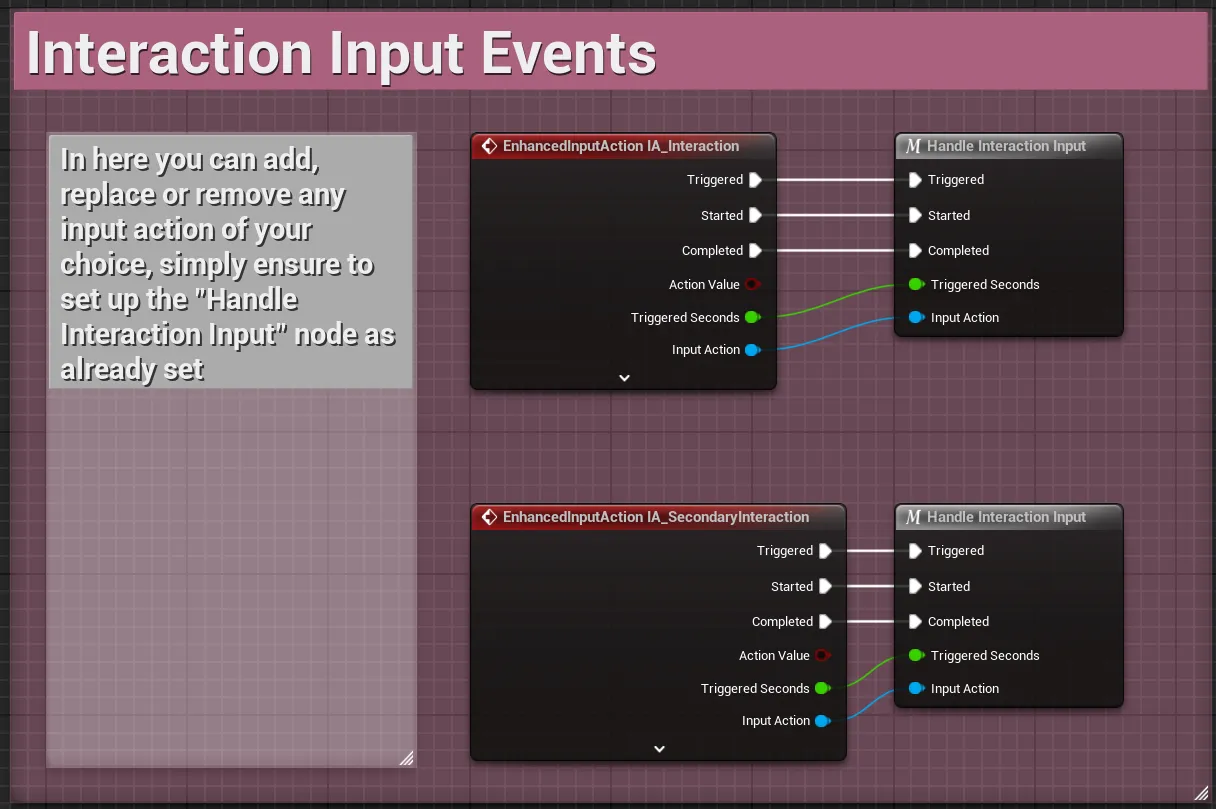
How to use your own input actions or add additional inputs
-
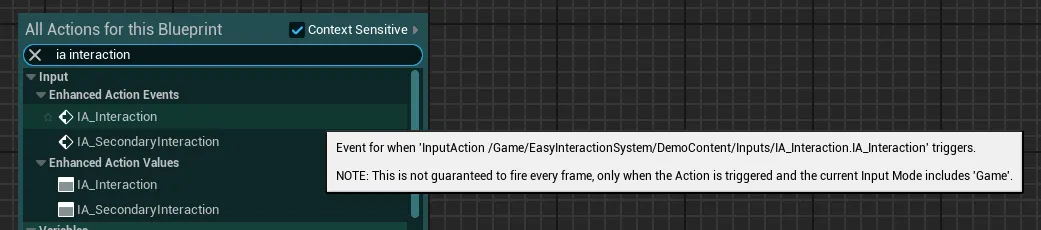
If you use your own input actions or want to add more inputs, first add your interaction input event inside the graph
-
Then, add the node
Handle Interaction Input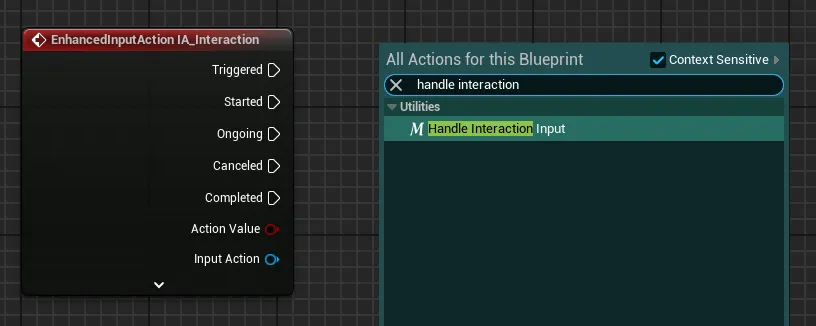
-
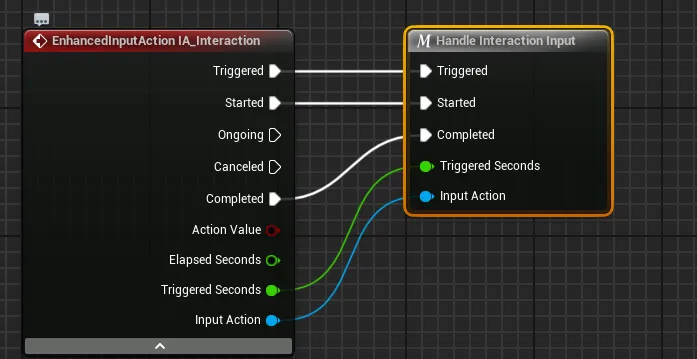
Then, connect all the pins with associated names:
TriggeredStartedCompletedTriggered SecondsandInput ActionIf you don’t see all the pins, click on the dropdown arrow at the bottom of the input event node
-
At the end of this process, make sure to leave only the input events that you actively use and remove all the unused input events
-
-
Once all your inputs are defined, open your Global Config Data Asset and locate the
Interaction Inputs Definitionsetting.In this variable, you must define all the input actions that you are using for your interactions, including the IMC they are contained in. The most important part is the definition of the Input Action, the rest is used to display the input prompts in the interaction widget.
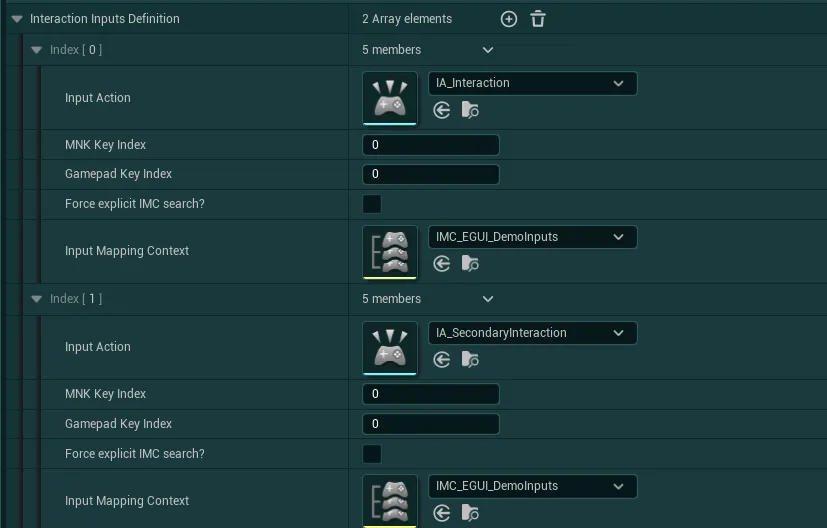
Key Index
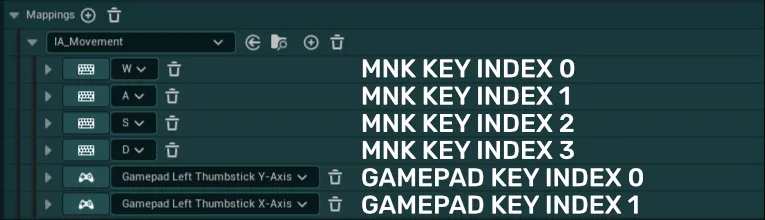
If the selected Input Action has more than 1 key per device in the mapping context, then you need to identify which key index you wish to display.
In the example below, there are 4 indexes for keyboard keys and 2 indexes for gamepad keys. If for example you want to display
DandThumbstick X-Axis, you need to enter the indexes 3 and 1 in the respective fields.
Once this is done, you can also tweak any of the other Interaction Settings inside the Global Config such as radius, trace origin, detected object types, etc.
Switching Pawn during gameplay
If during gameplay you ever switch pawn for the same player controller, you might need to call the function Refresh References for New Pawn on the interaction manager component (you can get the component with the Get Easy Interaction Manager function).
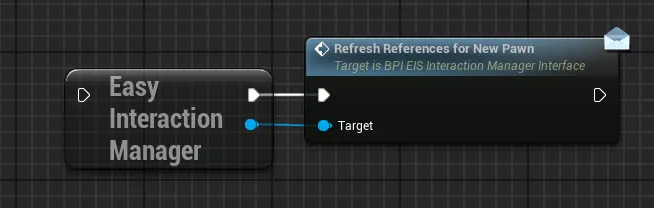
This will ensure the new pawn works and is considered properly by the interaction system.
Setup of the Interaction Widgets
To display interaction prompts to the player, the system uses a dynamic widget component that is automatically attached to any interactable actor.
You can configure which widget is used by each interactable individually as you will see in the following section (this also means that you can have multiple interaction widgets based on your needs).
Tip
The default widget used by the system (WBP_EIS_DefaultInteractionDisplayer) can be found in the EasyGameUI/EsyInteractionSystem/Core/Widgets folder
You can also find additional demo interaction widgets in the EasyGameUI/EsyInteractionSystem/DemoContent folder
To get started setting up your widget, there are 3 methods:
A. Setting up a brand new interaction widget
-
To setup a brand new interaction widget, go in your Content Browser and create a new widget blueprint
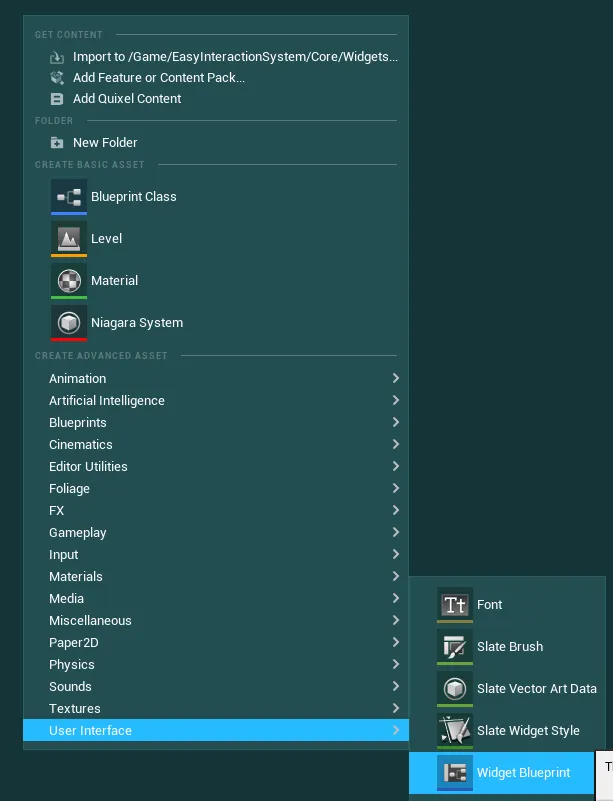
-
In the creation window, under
All Classessearch and selectWBP_EIS_InteractionDisplayerMaster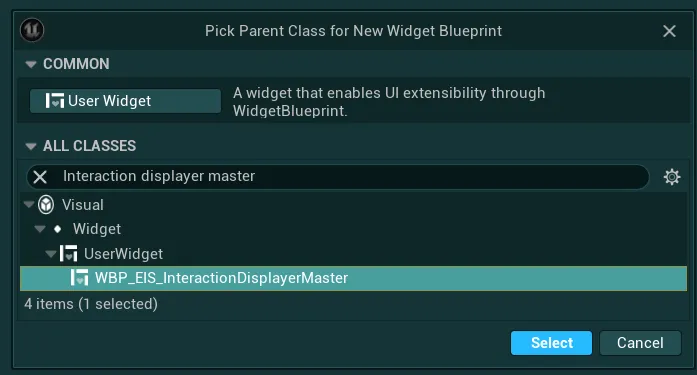
-
Open the newly created widget and go to the Designer tab
-
Inside the
Palette, search for theWBP Easy Input Prompt Displayerwidget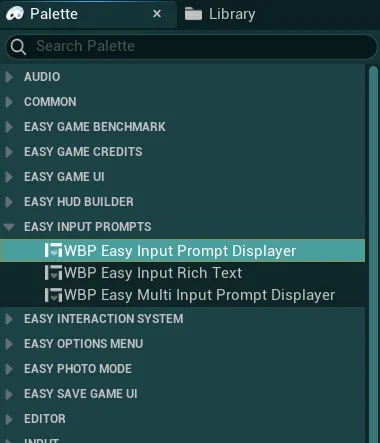
-
Drag it in the container of your choice inside your widget. You must add as many input widgets as interaction inputs defined in the interaction manager component, so if you have 2 interaction inputs you will need 2 Easy Input Prompt widgets. You can then setup the layout as you need.
-
Inside the Details panel, make sure to set each input prompt widget as variable and you can then modify the
Styling Definitionsection of theEasy Configcategory to your likingYou don’t need to make any modifications to the
Keys Definitionsection and theAdditional Textvariable because they will be dynamicly defined by the system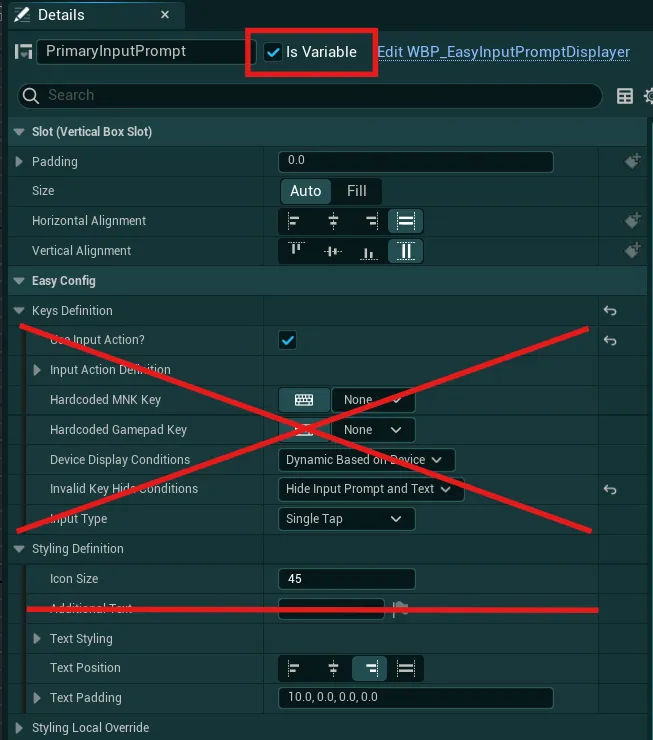
-
Go back to the Graph tab of the widget and override the function
Get Input Prompt References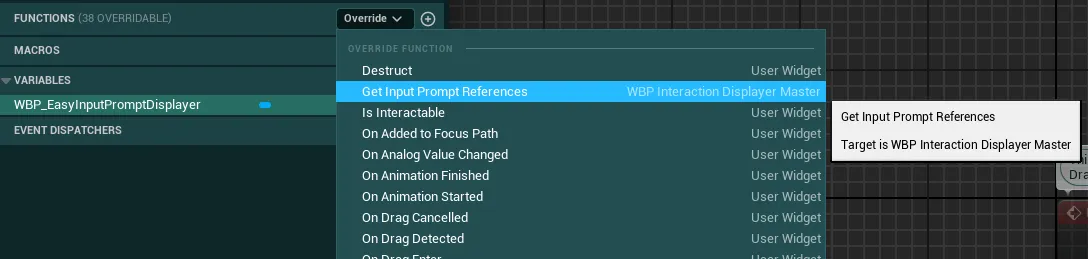
-
In this function, delete the “Parent” node and add a
Make Arraynode in which you need to plug all the Input Prompts widget variables. The final function should look similar to this (with your own number of input prompt widgets)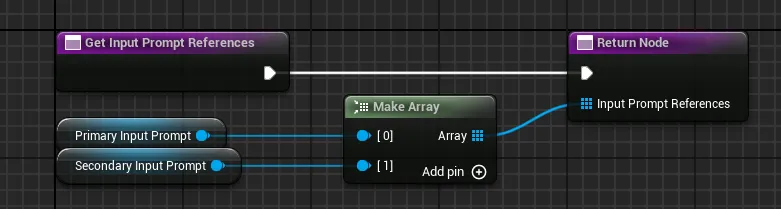
Your widget is now ready to be used with the interaction system, check out the next section to setup interactions on your actors!
B. Using an existing interaction widget
To use an existing interaction widget you will need to reparent it to the existing system:
-
To do so, open the widget and first ensure that it doesn’t have a different parent than
User Widget. You can see this on the top right corner of the widget:Parent Class: User Widget
If you see anything else it means that this widget already has a non-standard parent, in which case you must go to the topmost parent class to apply the changes there.
-
Once you have the correct widget opened, go to
Class Settingsand check out the Details panel
-
Click on the
Parent Classdropdown and selectWBP_EIS_InteractionDisplayerMaster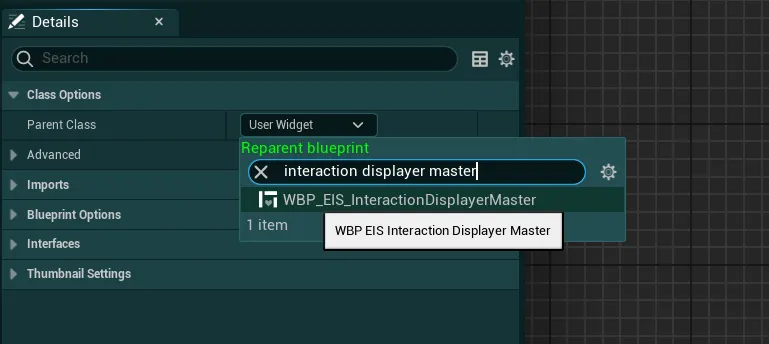
-
Once this is done, go to the Designer tab of the widget
-
Inside the
Palette, search for theWBP Easy Input Prompt Displayerwidget -
Drag it in the container of your choice inside your widget. You must add as many input widgets as interaction inputs defined in the interaction manager component, so if you have 2 interaction inputs you will need 2 Easy Input Prompt widgets. You can then setup the layout as you need.
-
Inside the Details panel, make sure to set each input prompt widget as variable and you can then modify the
Styling Definitionsection of theEasy Configcategory to your likingYou don’t need to make any modifications to the
Keys Definitionsection and theAdditional Textvariable because they will be dynamicly defined by the system -
Go back to the Graph tab of the widget and override the function
Get Input Prompt References -
In this function, delete the “Parent” node and add a
Make Arraynode in which you need to plug all the Input Prompts widget variables. The final function should look similar to this (with your own number of input prompt widgets)
Your widget is now ready to be used with the interaction system, check out the next section to setup interactions on your actors!
C. Using the provided default interaction widget
If you wish to use the Default Interaction widget as a starting base, you only need to modify it to contain the needed input prompts depending on your input setup
To do so, go to EasyGameUI/EsyInteractionSystem/Core/Widgets and open the WBP_EIS_DefaultInteractionDisplayer.
Then inside the Designer tab, you will find two already set up input prompts, the following instructions will then depend on the number of interaction inputs you have defined in the previous steps
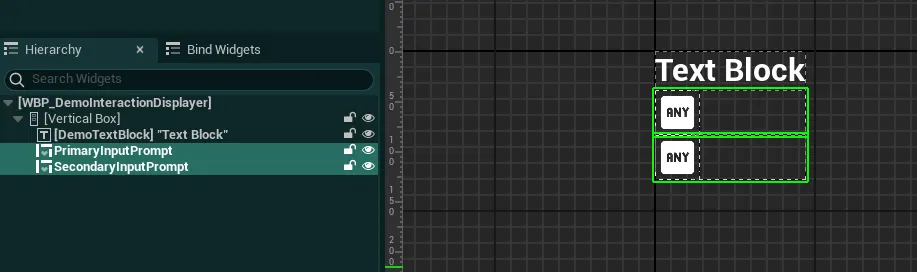
2 Interaction Inputs
With 2 interaction inputs, you don’t need to modify anything in the default widget.
1 Interaction Input
- Delete the
Secondary Input Promptfrom the Designer tab -
Go back to the Graph tab and locate the function
Get Input Prompt References, in here, delete theSecondary Input Promptvariable and remove the second pin in theMake Arraynode (you can do so by right clicking on it and selecting “Remove Array Element Pin”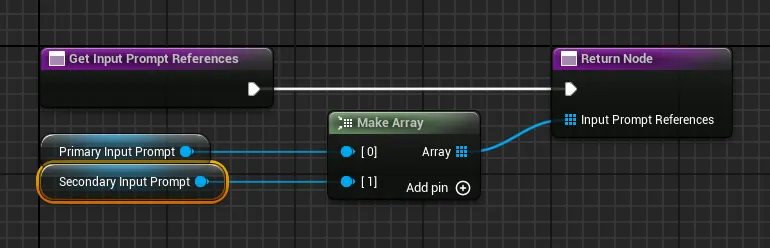
More than 2 Interaction Inputs (3+)
- Select any of the two existing Input Prompt Widget and duplicate it (Ctrl+D)
-
Inside the Details panel, make sure to set each input prompt widget as variable and you can then modify the
Styling Definitionsection of theEasy Configcategory to your likingYou don’t need to make any modifications to the
Keys Definitionsection and theAdditional Textvariable because they will be dynamicly defined by the system -
Go back to the Graph tab and locate the function
Get Input Prompt References, in here, add as many missing pins as needed on theMake Arraynode and plug the newly added widget variables to those pins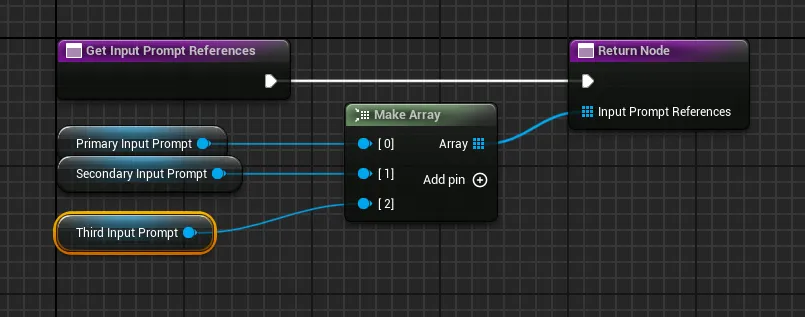
Your widget is now ready to be used with the interaction system, check out the next section to setup interactions on your actors!
Additional Interaction Datas System
Additional Interaction Datas System
The Additional Interaction Datas is a system that allow you to easily pass variables from the Interactable Actor Component to the Interaction Widget. It can be used to pass datas specific to your game like if you wish to display the rarity when interacting with an item or the amount of ammunitions that a pickup interactable has, etc.
-
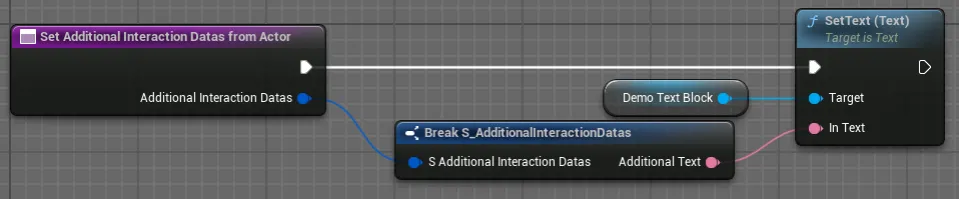
To retrieve those additional datas inside your Interaction Widget, you simply have to override the function
Set Additional Interaction Datas from Actor. If you are using the Demo Interaction Widget, this function is already overidden and can be found in the functions list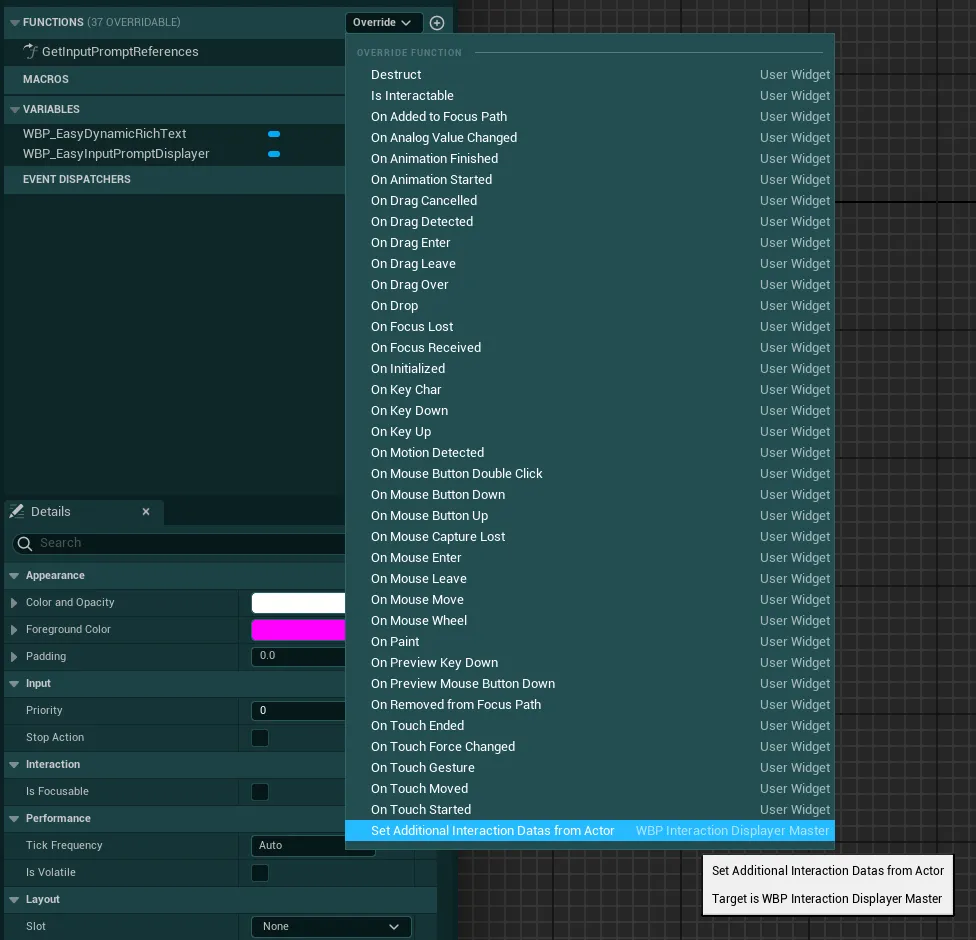
-
In the function, you can then delete the “Parent” node and access the structure of additional datas to do anything, by default this structure only contain an additional text
-
To add new datas, first make sure to save all your current progress, then go to the folder
EasyGameUI/EasyInteractionSystem/Datasand open the structureF_AdditionalInteractionDatas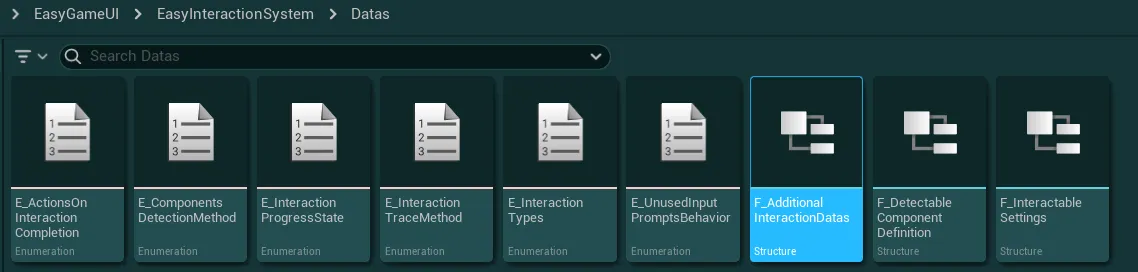
-
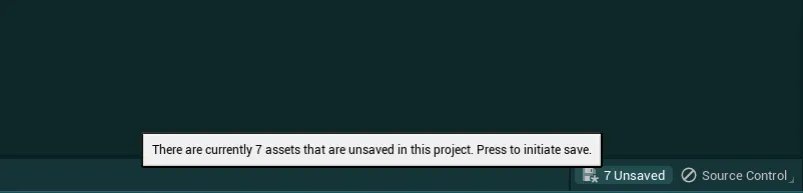
In here you can then add any variable of your choice, the engine might be somewhat unstable when editing structures which is why I would recommend making all you changes at once then save all the modified BPs immediately in case the engine crashes.
-
Once you are done adding variables and saving everything, you should now be able to access it from the widget
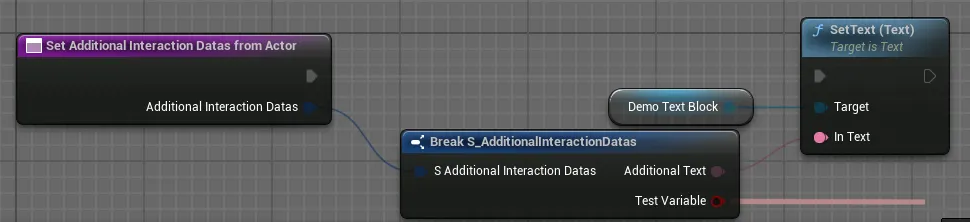
In the following section you can see how you can define those additional datas inside your interactable actor
Interactions Integration in your actors
Once your inputs and widgets are set up, you are all good to start adding interactions to any of your actors. To get started, open the actor in which you want to add an interaction
Tip
If you wish to see a full interaction setup, you can check out the Demo Interaction Actors in the EasyGameUI/EasyInteractionSystem/DemoContent/ folder
Interactable Component integration
In the Components tab of your actor, click on Add and add the AC Easy Interactable Actor component
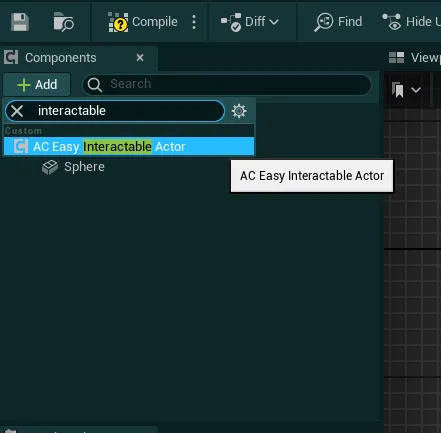
Then, select the component and go to the Details tab, search for the Easy Config section, in here you will find several settings to tweak the interaction for this actor
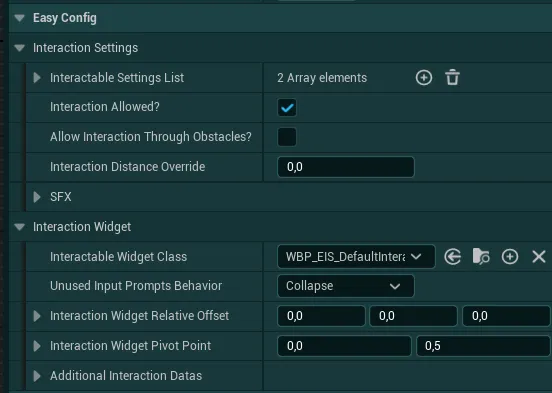
-
Interactable Settings ListIn this array, you can define as many interactions as available interaction inputs and tweak all the parameters of this interaction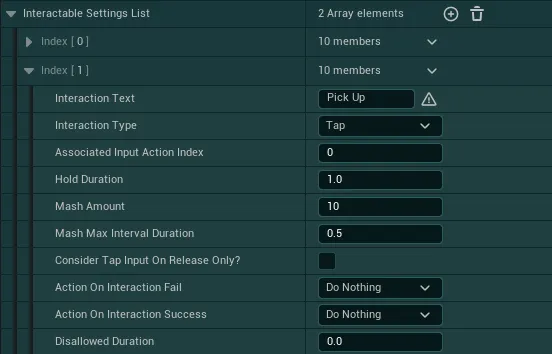
Interaction TextThe text display beside the input prompts of the widgetInteraction TypeThe kind of interaction that must be performed by the user, eitherSingle Tap,HoldorMash-
Associated Input Action IndexThis setting will define which input is associated with that specific interaction.This can be the index of any of the input defined in the
Interaction Inputs Definitionvariable of the Global Config. Only one of each index can be defined on an interactable. -
Hold DurationIf the Interaction Type isHold, this will define how long the input must be held for the interaction to be successful Mash AmountIf the Interaction Type isMash, this will define how many times the input must be pressed for the interaction to successfulMash Max Interval DurationIf the Interaction Type isMash, this duration define how fast the user need to repeat the presses to not fail the interaction (for example, the user has 0.5s to retrigger a press to “progress” the mash counter)Consider Tap Input On Release OnlyIf the Interaction Type isTap, you can enable this if you wish to receive the interaction trigger only when the key is released, if False the trigger will be sent immediately when the player start pressing the key-
Action on Interaction Fail&Action on Interaction SuccessThis setting define what the component needs to do if the interaction has failed (Input not held long enough or Mash amount not reached, etc) or succeeded. There are 4 options:Do NothingThe component will trigger the “On Interaction Failed Event” but won’t do anything elseRestore All Interactions ImmediatelyOn Interaction Fail, this option behave identically to the “Do Nothing” option. On Interaction Success this will allow interactions to be triggered immediately after the first interactionDisallow InteractionsThe component won’t allow any interactions until they are manually allowed again through codeDisallow Interactions for DurationThe component will disallow interactions for the duration specified in the followingDisallowed Durationvariable
-
Disallowed DurationThe interactions will be disallowed for this specified duration if requested on the previous variables
-
Interaction Allowed?Set this to True if the interactions should be allowed initiallyAvailable functions to control interaction activation during gameplay
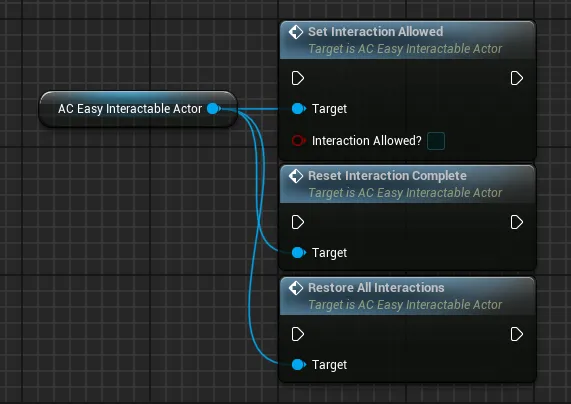
Set Interaction AllowedAllow you to enable or disable interactions on this component if the interaction has not been completed yetReset Interaction CompleteAllow you to reset the completion state after the player has interacted with the actor, does not affect the “Interaction Allowed” variableRestore All InteractionsWill both reset the completion state and ensure the interaction is reenabled on the component
-
Allow Interaction Through ObstaclesIf True, the actor will be interactable from anywhere, even if hidden behind a blocking actor in the world. If False, the actor must be in direct line of sight to be interactable -
Interaction Distance OverrideIf you wish to restrict the distance at which this actor is interactable, you can set this value to anything higher than 0.This variable doesn’t allow to go beyond the maximum interaction distance, it can only be lower than this value
-
SFXIn this category you can define various sound effects to play at different stages of the interaction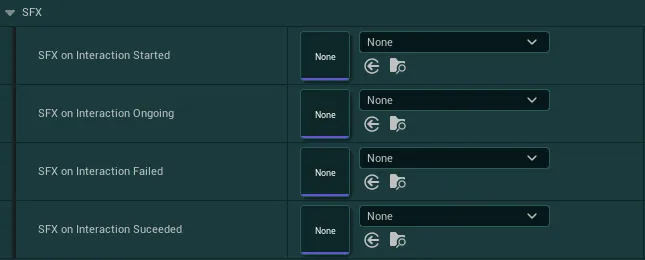
SFX On Interaction StartedSFX played when the interation has started, the sound is “fire and forget”SFX On Interaction OngoingSFX played when the interaction is ongoing, it is triggered when the first “Ongoing” event is triggered, the sound will be stopped if the interaction fail or succeedSFX On Interaction Failed&SFX On Interaction SuceededSFX played when the interaction has failed or succeeded, both are “fire and forget”
-
Interactable Widget ClassThe class of any widget that you set up in the previous section and that must be displayed by the actor when focused for interaction -
Unused Input Prompts BehaviorThis selector allow you to define how the unused input prompts on the widget are handled. This will vary depending on your needs for your widget:HideThe input prompt will only be hidden but will retain its occupied space which means the widget layout won’t be affectedCollapsedThe input prompt will be hidden and won’t occupy any space, which means that the widget layout can be affected (spacing changes, etc)
-
Interaction Widget Relative OffsetIf you wish to offset the origin location of the widget from the actor origin, you can change this value -
Interaction Widget Pivot PointThis setting define where the widget is “anchored” to its origin location and how it will pivot to follow the camera.0-0 means it is anchored from the top left corner, 1-1 means it is anchored from the bottom right corner of the widget
-
Additional Interaction DatasAny additional datas that must be passed to the widget, more details about this system and how to add new variables can be found in the previous sectionThis can for example be used if you want to send rarity datas in order for the widget to display the rarity of the object. You can update this variable at runtime if you need to, it will be updated every time the object is focused for interaction
Interactable Detection Parameters
Once you have defined your component parameters, you now need to define which meshes in your actor will be responsible for detection, attaching the widget, be outlined, etc.
To do so, define where you wish to initialize this logic (like in a Begin Play event), then, from the Interactable Actor component, call the function Register New Detection Parameters
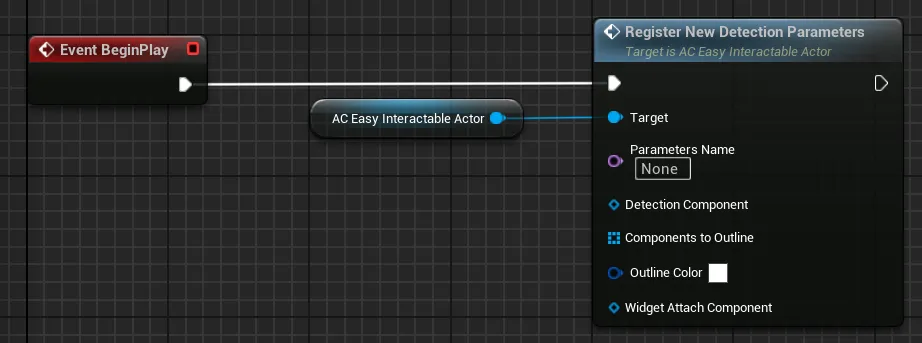
Multi-Components Detection
If you wish to have multiple components in your actor being independently detected (like drawers in a cabinet), simply add multiple Register New Detection Parameters, one for each component to be detected
You can also remove any registered detection paramater with the Remove Detection Parameters function
-
Parameters NameIf you wish to have multiple detection parameters, input a unique name in this variable, you can leave it as default if you only have a single parameter -
Detection ComponentReference in here the Primitive Component that will be reponsible for the detection when the player is in range. You can leave it empty to allow any Primitive Component in your actor to be detectedThis component need to have collisions enabled and be of an
Interactable Object Type. It can reference a component local to the actor or any other component in the world depending on your needs. -
Components To OutlineArray of components that will be outlined whenever the Detection Component is detected. The array can contain references to components local to the actor or any other components in the world depending on your needs.Outline effect conflict
In some situations you may notice that other elements in your world are being outlined while focusing an interactable, that may be due to those other elements using Custom Depth effects. You can fix this with the following steps:
-
Open your Project Settings and search for the setting
Custom Depth-Stencil Pass. Set this variable toEnabled with Stencil
-
Then, open the material
MI_OutlineMaterialfrom the interaction system (EasyInteractionSystem/Core/OutlineMaterial) and set the variableUse Stencil for Outlineto True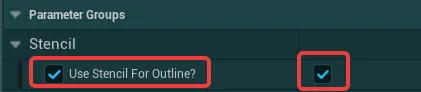
-
-
Outline ColorColor of the outline for theComponents To Outlinewhen the Detection Component is detected. -
Widget Attach ComponentReference in here the Scene Component to which the Interaction Widget will be attached when the Detection Component is detected. If empty, the widget will be attached to the root component of the actor.The
Widget Relative Offsetthat is configured in the Interactable Component variables will then be calculated from this attach location
Basic example setup with a global detection:
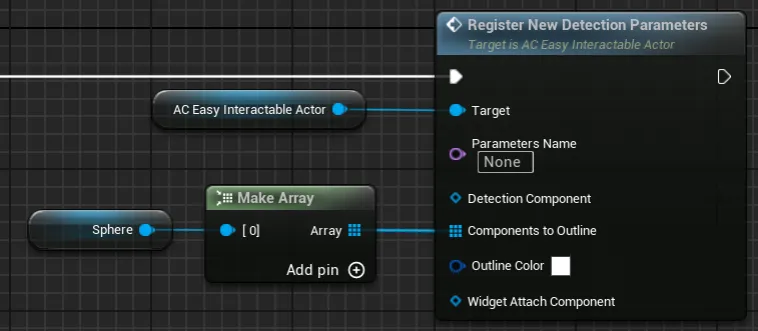
Any component in the actor can be detected, when detected it will outline the Sphere object and the widget will attach to the root of the actor
More advanced example setup with 3 detectable components:
 3 distinct sphere objects can be detected independently and will be outlined when detected, the widget will attach to the detected sphere
Interaction Events
In addition to these settings, the component also has several events that will be triggered on different states of the interaction
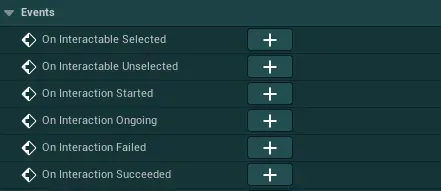
All of the following events have a few variables in common that give you context over the interaction that is ongoing:
Interacting PawnReference to the Pawn (usually the player character) that is actively interacting with this actorDetection ParametersDefines theDetection Parameters Presetthat is responsible for the detection and is currently handling the interactionInteraction IndexDefines which interaction has been triggered from theInteractable Settings Listof the component (based on the array indexes)
-
On Interactable Selected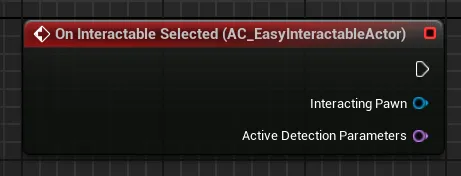
Triggered every time this actor is selected/focused and can be interacted with (interactions enabled, not blocked, etc). It also gives you the context of which parameter has triggered the detection
Parameters Modifications on Interactable Selected
This event is called just before the interaction inputs and widget are initialized for the actor, which means you can safely update the
Interactable Settings Listand Widget parameters on this event and they will be reflected immediately.For example on the following image, we are disabling the first interaction and setting the second one to Tap if we detected our parameters A or B, and setting both interactions to Hold if detecting parameters C. (if Interaction Type = None, that specific interaction input will be fully disabled for this actor)
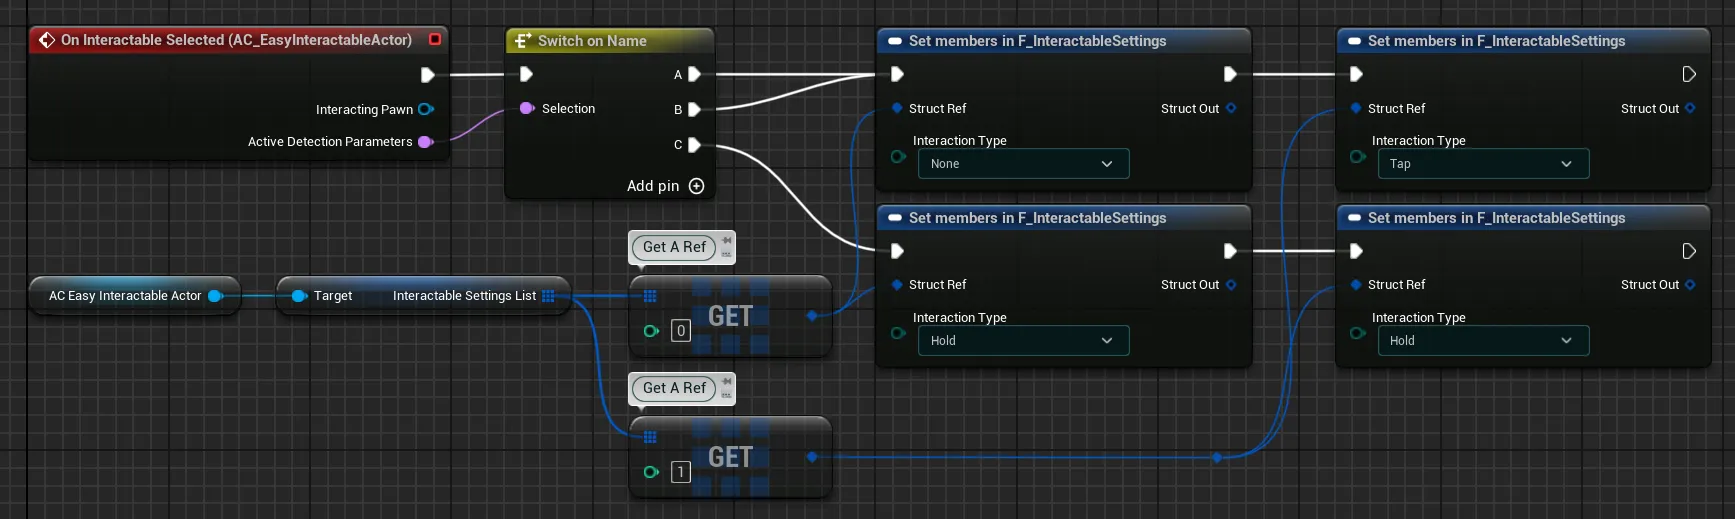
If you wish to modify the Interactable Settings directly with aSet Membersnode, make sure to use aGet By Refon the array, and not aGet A Copy -
On Interactable Unselected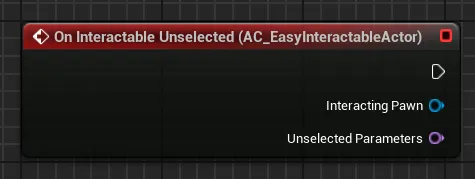
Triggered when the actor is no longer selected/focused or can no longer be interacted with (because the interaction is disabled, blocked, completed, etc)
-
On Interaction Started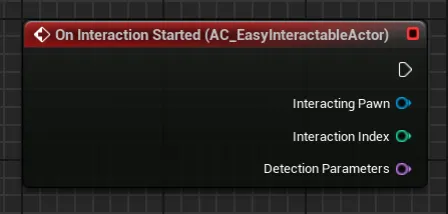
Triggered at the begining of the interaction, when the input key is first pressed down
-
On Interaction Ongoing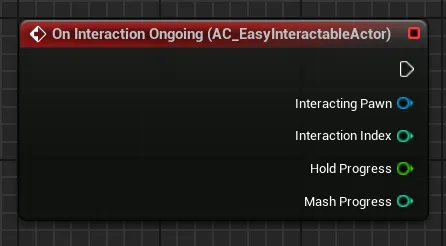
Triggered when the input type is set to
HoldorMashand the interaction is currently ongoing (not yet failed or succeeded). The event also returns the current Hold Progress (value from 0 to 1) or current Mash Progress (value from 0 to the definedMash Amount) -
On Interaction Failed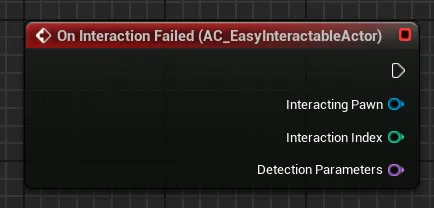
Triggered when the input type is set to
HoldorMashand the interaction has failed for any reason (lost focus, stopped holding, interactions disabled etc). The event is called right before executing theAction on Interaction Fail -
On Interaction Succeeded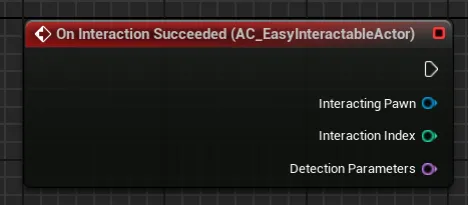
This event will be triggered when the interaction has been successful, it will mark the interaction as completed and execute the
Action on Interaction Success