UI Navigation System
The UI Navigation System is aimed at providing a versatile framework for handling all your UIs with seamless input routing & visibility states using a Stack system
The following section will cover how each part of this system works in a general way, and later sections will cover more specific topics like how to setup your widgets and a more global guide on how to use the system
System Overview
The UI Navigation System is inspired by advanced solutions like Unreal's Common UI, it acts as a centralized "brain" (managed via the Game HUD). The entire concept behind it is to move the logic from the Widgets to the system: Instead of widgets blindly managing their own visibility and inputs, they are handled as part of the system, greatly simplifying the widget's code and preventing most common widgets inputs/visibility conflicts.
The system has a few core concepts to properly understand it:
-
Stack-Based Layering: The system is based on a Stack logic, widgets are added ("pushed") into the stack based on available layers (Game, Menus, Modals, Loading, System). When a new widget is pushed on top of the stack, the system retrieves its desired parameters and update all the widgets in the stack accordingly (updating focus, visibility, inputs, etc.)
The system also guarantees that only the stack Top-most widget (or "active widget") is actively handling focus & inputs at all time, which prevents many kind of potential conflicts when handling many complex widgets.
The active widget is the one to dictate the state of the stack: It can tell if lower-layers widget should be visible or not, it can tell which input mode to use, which IMCs are allowed, which button to focus, etc. All of this through just a few variables, without ever having to hard-code any inter-widgets logic.Some parameters of widgets can still "bleed through" to the bottom of the stack even if they are not active, for example if a widget in the stack request that all widgets below him should be hidden, that state will persist until this widget is removed, even if it is not actively at the top of the stack. However, a widget can never dictate the state of widgets higher than him on the stack, it can only affect lower widgets
-
Dynamic Focus Routing & Fallback: The system is designed to always safely catch focus loss and constantly queries the active widget for its dynamically updated "Desired Focus Target", ensuring smooth transitions between Gamepad and Keyboard/Mouse navigation. This also means that as long as the active widget provides a valid focus target, transitions between different widgets will always be handled by the system without any additional code required.
-
Widget Lifecycle: Widgets that are managed by the system respond to a predictable chain of events that allows you to set up specific logic and interactions between widgets:
- The widget is first "Added to the Stack": At this point the widget is in the stack and can become visible if no other widgets above it has requested the occlusion of lower-layers
- If the widget is at the top of the stack, then it is "Activated": The system retrieves its parameters and applies them to the stack, this widget becomes focused and has control over the system
- If another widget is added above it (like a confirmation modal above a menu), then the widget is "Deactivated" and no longer dictate the state of the stack, it has fully passed the control to the widget that is now higher in the stack. Activation and Deactivation can happen many times during the lifecycle of the widget
- Once the widget is no longer needed it can then be "Removed from the Stack", which will purge all its parameters from the system and remove it from the screen (potentially activating another lower widget if needed)
Setup the UI Navigation System in your Widgets
How to proceed
The UI Navigation System requires some setup on your widgets in order to properly work with the system, to do so you have two solutions:
- The Manual Implementation solution
The first solution is to implement the logic of the system manually through the provided helper functions/macros. This solution takes a bit more time to setup but ultimately allows you to use your widget more freely with the system without any reparenting. -
The Reparenting solution
The second solution is using the provided Base Class Widget with most of the setup done and just a few parameters to tweak. Using it is faster to setup and less prone to errors but requires reparenting, which may not be suitable if your widget already has a different parent than "User Widget" (like another blueprint parent or C++ class), or if you prefer to limit dependencies with the asset.If you plan on replacing widgets of the system (like the Pause Menu, Options Menu) by different widgets entirely, they should be set up using this second method
If you wish to see an example of the setup process, you can take a look at the WBP_EasyExampleWidget located in the EasyGameUI/DemoContent folder, this widget already has a setup for the entire system using the reparenting solution
A. Doing the manual implementation
-
First start by opening the widget that will be using the system, then go to the
Class Settingsand locate theImplemented Interfacessection in the Details panel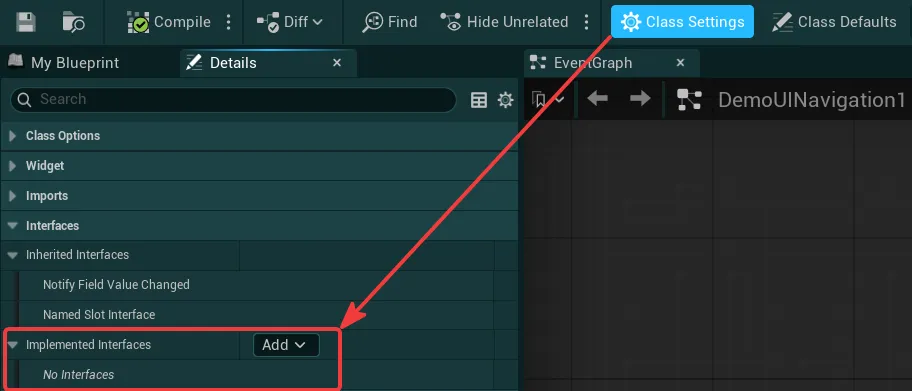
-
Click on "Add", search for the
BPI_EGUI_UINavigationInterfaceand click on it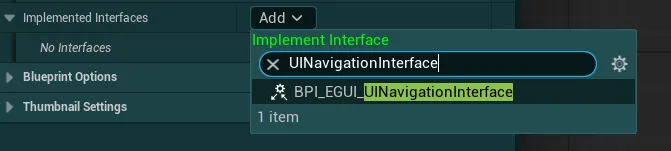
-
Then, go to
Functions>Overrideand override the functionOn Mouse Move(If you already have it overriden, simply open the function)
-
Inside this function, simply add the
Handle on Mouse Movemacro and plug it in the function with all the associated pins wired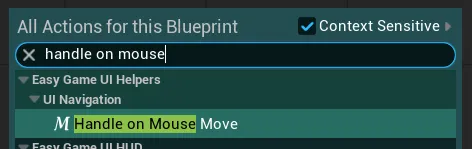

Hud Reference
You could use the function
Get Easy Game HUDto plug into the HUD pin but I would strongly suggest making aHudReferencevariable in your widget, and populating it with theEvent On InitializedorEvent Construct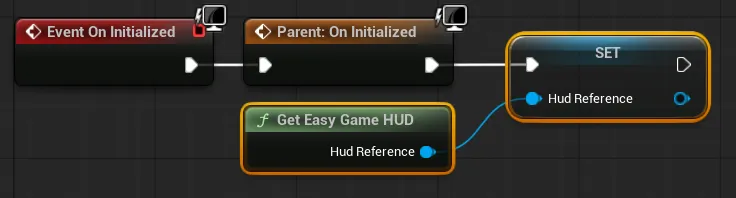
This way, you can easily access the HUD without any potential performance impact
-
Then, go back to
Functions>Overrideand override the functionOn Preview Key Down(If you already have it overriden, simply open the function)
-
Inside this function, simply add the
Handle on Preview Key Downmacro and plug it in the function with all the associated pins wired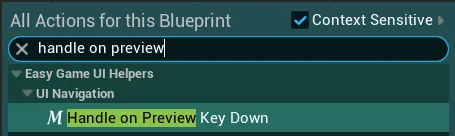

-
Finally, depending on your widget logic, you may need to perform some additional setup steps:
Widget Removal
One very important thing to consider with this system is widget removal, you should never use the
Remove From Parentnode to remove the widget directly.Instead, use the
Remove Widget Instance From Stackfunction of the HUD, this will ensure the system is properly notified of the removal and can update the stack accordingly.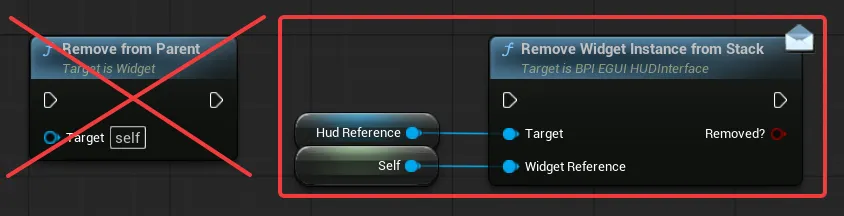
Ideal Mouse Setup
To ensure the best mouse behavior possible (when using gamepad mostly), it is also recommended to always have one element of your widget that blocks everything in the background. This can be for example your main Canvas Panel or a dedicated background image that should be set with a Visibility of
Visible -
Once this is done, your widget is ready to be used with the system, check out the following section to configure it and use the provided events
B. Using the provided Parent Class (Reparenting)
-
To use the provided parent class, start by opening the widget that will be using the system and on the top right of the window, make sure that the
Parent Classis the default engine classUser Widget
If it is something else, please check back the first implementation method
-
Then, go to the
Class Settingsand locate theParent Classvariable in the Details panel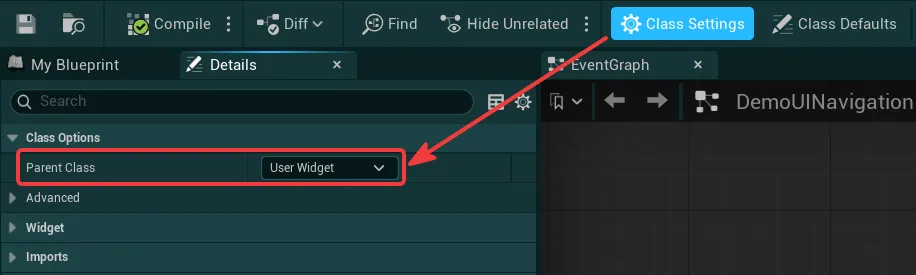
-
Click on the dropdown, search for the
WBP_EasyMasterWidgetclass and click on it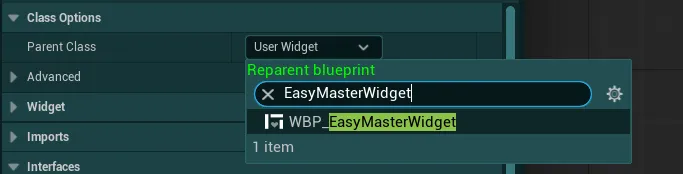
-
Finally, depending on your widget logic, you may need to perform some additional setup steps:
Possible Functions Overrides
Your widget may be overriding some functions that the system needs, check out the following instructions to make sure the system can still properly use them
-
If you use the
Event On Initializedin your widget, Right click on it and selectAdd Call to Parent Function, then plug in the newly generated node before any of your code like on the image below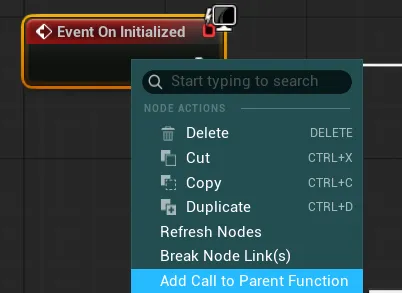

-
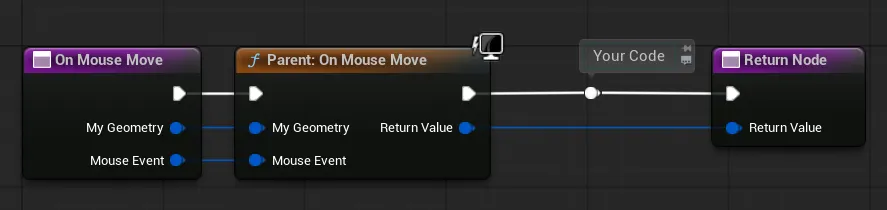
Repeat the same process if you are using the functions
On Preview Key Downand/orOn Mouse Movein your widget
Widget Removal
One very important thing to consider with this system is widget removal, you should never use the
Remove From Parentnode to remove the widget directly.Instead, use the
Remove This Widgetfunction provided by the parent class, this will ensure the system is properly notified of the removal and can update the stack accordingly.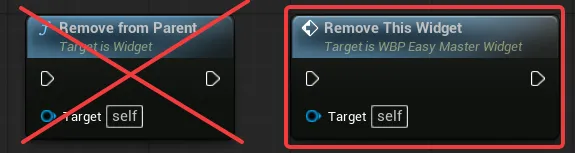
Ideal Mouse Setup
To ensure the best mouse behavior possible (when using gamepad mostly), it is also recommended to always have one element of your widget that blocks everything in the background. This can be for example your main Canvas Panel or a dedicated background image that should be set with a Visibility of
Visible -
-
Once this is done, your widget is ready to be used with the system, check out the following section to configure it and use the provided events
Widget Configuration
When your widget is set up, you can now start configuring it with the provided functions and implement optionnal additional logic to respond to specific system events, you can find those functions under the Interfaces > Easy Game UI Widgets > UI Navigation category
You will find 3 groups of functions: Configuration functions / Widget State Events / Input Events
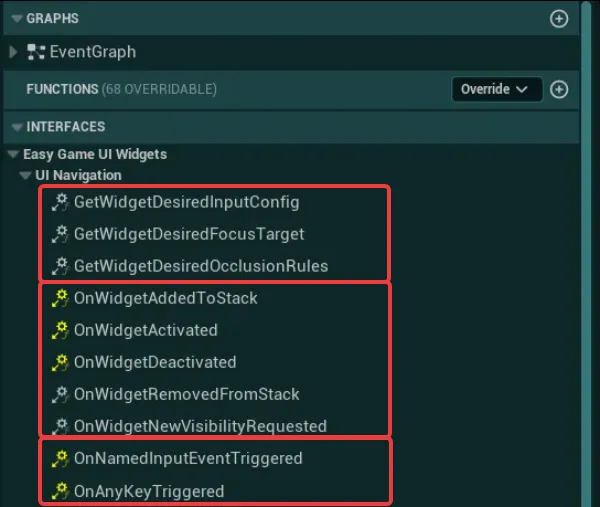
Configuration Functions
Configuration Functions
The configuration functions allow you to tell the system how the widget should be handled when in the stack. These are the only "mandatory" functions to set up in order to get the wanted behavior for your widget
Get Widget Desired Input Config
This function defines the input configuration that this widget requires on activation and deactivation. It also gives an opportunity to register for input events
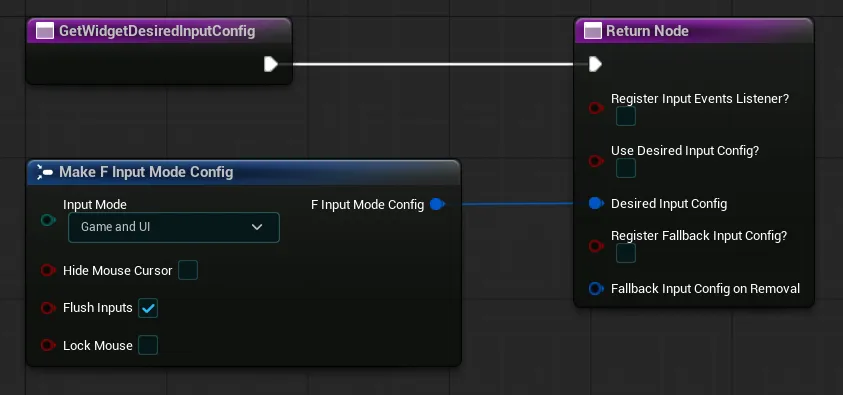
RegisterInputEventsListenerIf True, this widget will be notified when a key or named input event are triggered through theOn Any Key TriggeredandOn Named Input Event TriggeredeventsUseDesiredInputConfigIf true, the system will apply the provided input config when this widget becomes active. If False, the system will look for a fallback or use the default input configDesiredInputConfigInput config to apply when this widget is activatedRegisterFallbackInputConfigIf True, the following fallback input config will be registered by the system to be used if neededFallbackInputConfigOnRemovalInput config to apply when this widget is removed from the stack and no other widget in the stack is able to provide a new input config. This will only be considered if "RegisterFallbackInputConfig" is true
Get Widget Desired Focus Target
Returns the element this widget request as focus if needed (like a button). This target can be dynamic as it will be requested every time the focus has to be restored to this widget
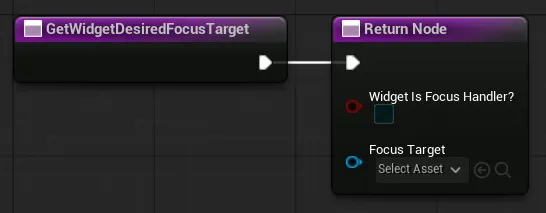
Widget Is Focus HandlerIf True, this widget notifies the system that it can handle focus and requires its target to be focusedFocus TargetTarget that should be used as focus point for the system when this widget becomes active
Get Widget Desired Occlusion Rules
Returns the rules this widget requires for occlusion of inputs and lower priority widgets in the stack
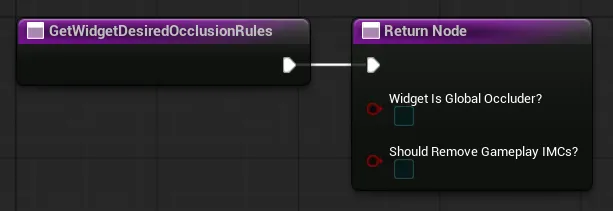
Widget Is Global OccluderIf True, this widget will force all widgets below him in the stack to be hidden. This will be applied even if the widget is not the current active widget.Should Remove Gameplay IMCsIf True, all registered Gameplay Input Mapping Contexts in the Global Config will be removed when this widget is in the stack. If none of the widgets in the stack has this value at true, the IMCs are added back to the player.
Widget State Events
Widget State Events
The widget state events allow you to set up logic responding to system events when this widget is being handled in the stack
On Widget Added To Stack
Event called when this widget has been added to the stack but is not yet visible on screen and not yet focus handler.
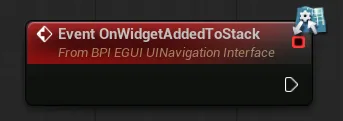
This event gives an opportunity to do one-time set up just before this widget is fully shown and setup. The event will only trigger once until the widget is explicitely removed and added back to the stack
On Widget Activated
Event called when this widget becomes the newly active focus handler.
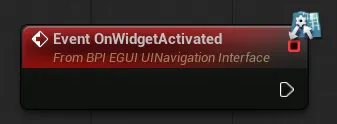
When this event is triggered, the widget and system have been fully set up with the provided parameters and the widget is ready for use (it is the active focus handler)
On Widget Deactivated
Event called when this widget is no longer the active top-most focus handler in the stack.
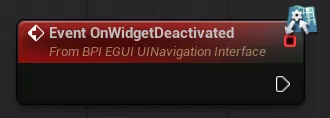
This can be triggered if a new focus handler widget has been added on top of the stack, or if this widget is being removed from the stack
On Widget Removed From Stack
Event called when this widget is entirely removed from the stack and need to be marked for deletion. If handling the removal manually, be cautious with delayed removals as they could cause issues if trying to add the same widget back to the stack while it is being removed from it.
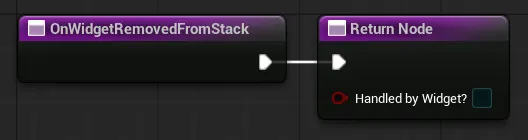
Handled By WidgetIf True, the widget will have to handle the removal of itself from the viewport (After this triggered, the use of Remove From Parent is fine), giving an opportunity to play animations for example. If False, the system will handle it and no other actions is required in the widget.
On Widget New Visibility Requested
Event called when the system requires this widget to change visibility.
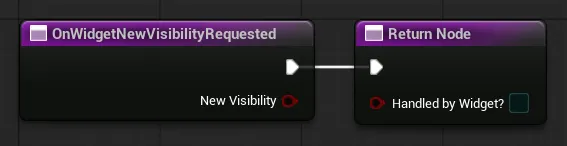
Handled By WidgetIf True, the widget will have to handle the visibility change (Hide whenNew Visibilityis False / Show when True), giving an opportunity to play animations for example. If False, the system will handle it and no other actions is required in the widget.
Input Events
Input Events
The input events functions allow you to set up logic responding to various inputs (either any key or named events like back, etc.)
On Named Input Event Triggered
Event triggered when a named event input is triggered by the player (back, header nav, etc)
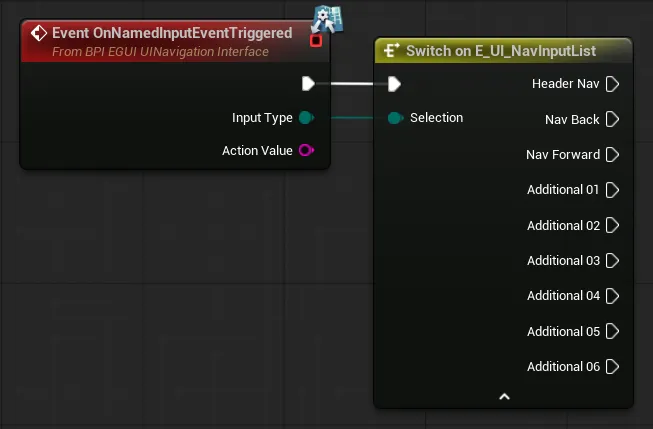
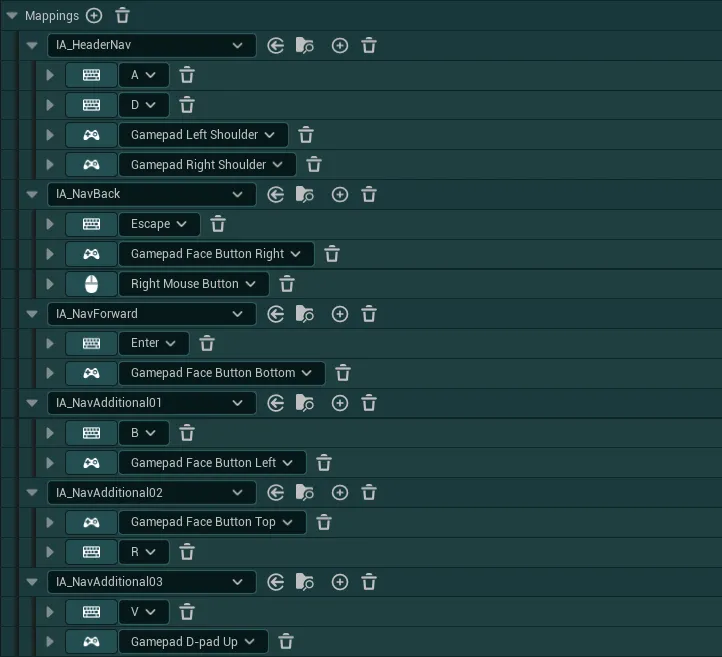
These events are called based on the following keybinds that can be found in the IMC_EGUI_Navigation asset
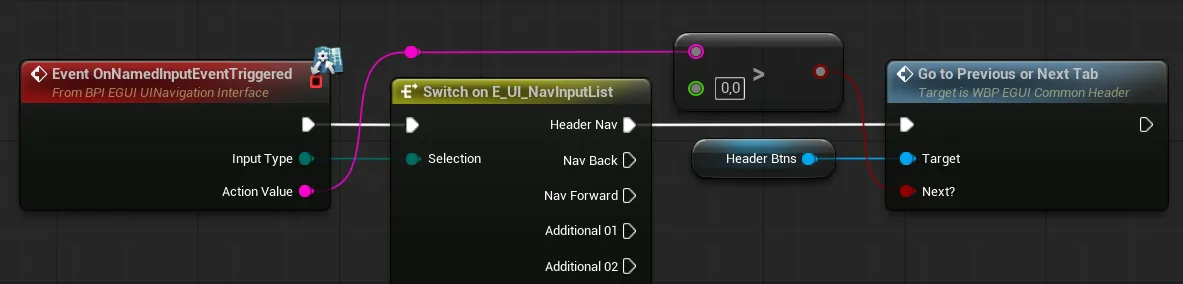
For the Header Nav event, you can use the Action Value pin to know the requested direction of navigation (>0 = Next)
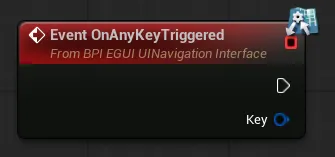
On Any Key Triggered
Event triggered when any key is triggered by the player, giving a change to reply on specific key presses.
UI Navigation System Usage
With your widget set up, you can then use all the HUD functions under Easy Game UI HUD > UI System to handle your widget
You will find 3 groups of functions: Widget Creation & Insertion in Stack / Widget Removal from Stack / Utilities Functions
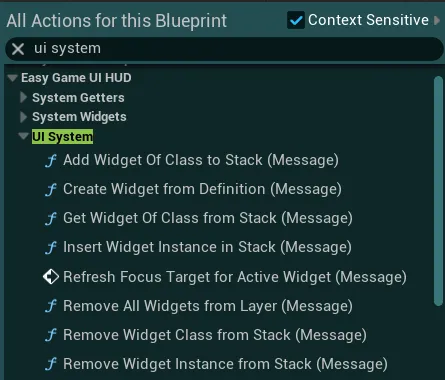
Widget Creation & Insertion in Stack
Widget Creation & Insertion in Stack
Create Widget From Definition
This function allows you to easily create a widget of a given class. It is very similar to a standard Create Widget function but allows you to natively benefit from the caching ability built into the system when Keep Persistent Instance is set to True
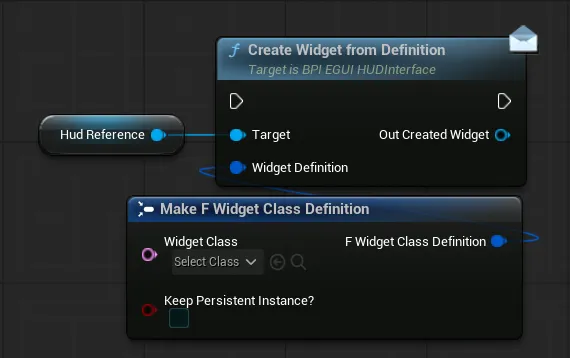
The output gives you a standard User Widget object, that you can then Cast to a specific type if you need to.
Insert Widget Instance in Stack
This function allows you to add an existing Widget Instance to the stack at the top of the specified layer.
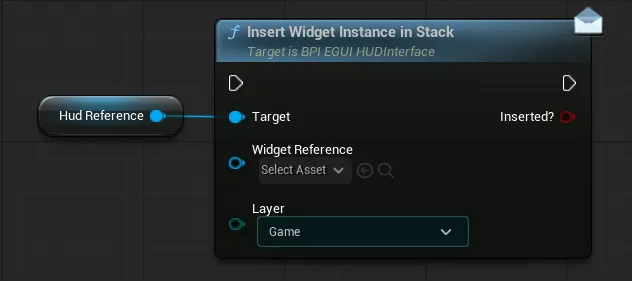
This can be used in combination with Create Widget From Definition to first create the widget, then pass it some data and finally insert it in the stack on the needed layer
After this function has been called, the widget will be created, receive the On Widget Added To Stack event. If this widget is the new top-most widget in the stack, the On Widget Activated will be called on it and the previous focus handler will receive the On Widget Deactivated event.
Add Widget of Class to Stack
This function allows you to create a widget and insert it in the stack directly at the top of the specified Layer (combining both previous functions)
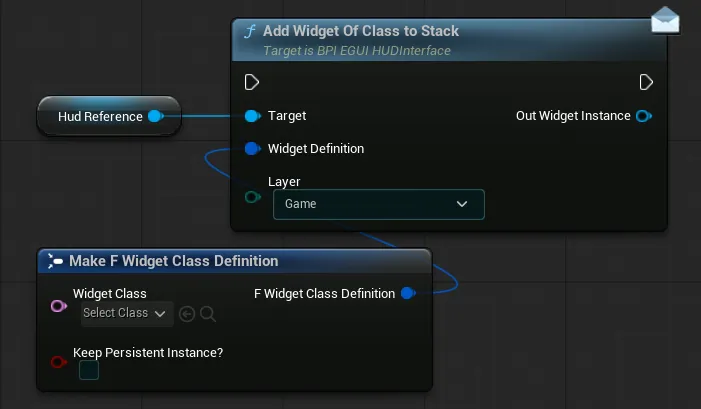
After this function has been called, the widget will be created, receive the On Widget Added To Stack event. If this widget is the new top-most widget in the stack, the On Widget Activated will be called on it and the previous focus handler will receive the On Widget Deactivated event.
The output gives you a standard User Widget object, that you can then Cast to a specific type if you need to.
Widget Removal from Stack
Widget Removal from Stack
Remove Widget Instance from Stack
When this function is called, the system will remove the provided Widget Reference from the stack (if present)
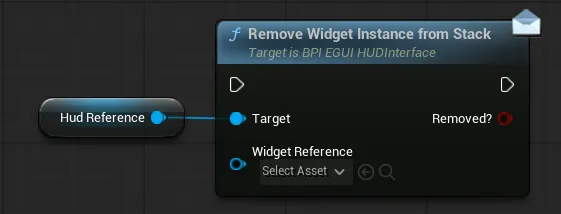
After this function has been called, the widget will receive the On Widget Removed From Stack event. If this widget was the top-most focus handler, it will also receive the On Widget Deactivated, and a new widget may become focus handler
Remove Widget Class from Stack
When this function is called, the system will remove from the stack the first occurence of a widget that matches the provided Widget Class (if present)
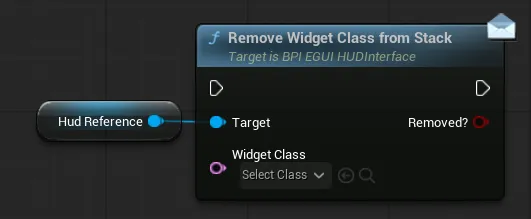
After this function has been called, the widget will receive the On Widget Removed From Stack event. If this widget was the top-most focus handler, it will also receive the On Widget Deactivated, and a new widget may become focus handler
Remove All Widgets from Layer
When this function is called, all the widgets in the specified layer will be removed (or all widgets of the entire stack if Clear All Layers? is True)
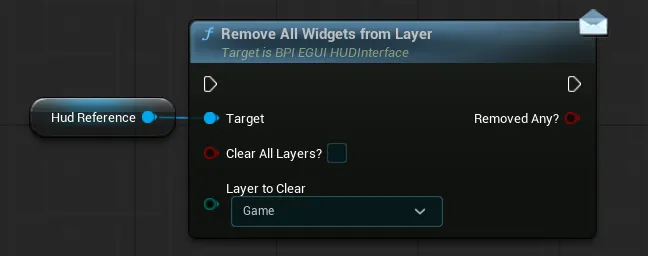
After this function has been called, the widgets will be removed from top to bottom and will all receive the On Widget Removed From Stack event. During the removal, multiple widgets may receive the On Widget Deactivated and On Widget Activated as the focus handling goes down the stack (if the top-most focus handler is part of the cleared layer)
Utilities Functions
Utilities Functions
Refresh Focus Target for Active Widget
When this function is called, the focus will be refreshed on the current focus handler, this can be useful if you want to jump between targets in your widget for instance
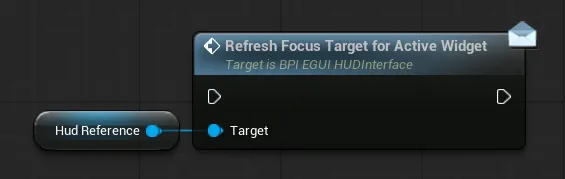
After this function is called, the widget will receive the Get Widget Desired Focus Target event so that it can provide updated focus values
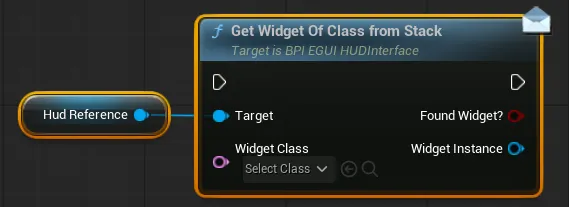
Get Widget of Class from Stack
When this function is called, the system will search for the first occurence of the specified Widget Class and return its instance (if any is present)