Settings System
The Settings System is aimed at providing a modular framework that allows to control settings logic (through Setting Managers) and settings selection (through Setting Widgets) in a fully decoupled way.
The following section will cover how each part of this system works in a general way, and later sections will cover more specific topics like adding or removing settings from the system.
System Overview
Setting Manager
The Settings Managers are a collection of components each containing the logic and data for one specific setting: Its name, options, how it is saved/loaded, how it is applied, etc. Those managers are initialized at Begin Play by the system and are fully independent from any UI.
You can find all the existing managers in the EasyGameUI/EasyOptionsMenu/Core/SettingManagers folder regroupped into categories with BaseClasses/ containing the master classes.
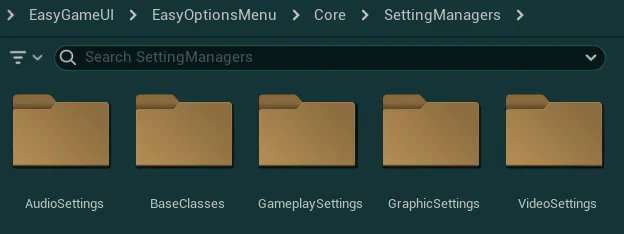
You will mainly encounter three types of managers, each controlling a "main type" of value (int, float, bool):
Selector Manager / Slider Manager / Toggle Manager
Each of these managers has a standard set of variables that can define the base setup of the setting (name, description, options, etc.) and a set of overridable functions to set up the functionnality of the setting.
More details about setting up these parameters and managers will be given the following section
Setting Widget
The Settings Widgets are built to give the player the ability to change any setting manager in a controlled manner, the widget is fully independent of the manager, this means the manager can live without any widget associated and multiple widgets in multiple systems can point to the same manager. A setting widget can also be placed without having a linked manager for "transient" settings that don't require game persistance.
Each type of manager has an associated type of widget (the widgets can be found in the EasyGameUI/Core/CommonWidgets/SettingsWidgets folder):
Setting Selector / Setting Slider / Setting Toggle
The basic configuration of a setting widget is really simple, you can either link it to a Setting Manager or provide it with Setting Data (in case the setting is local and doesn't require a manager). You can then find a few additional configurations like state rules, visibility, application parameters, etc.
More details on all of these parameters and how to set up widgets will be given the following section.
System Helpers
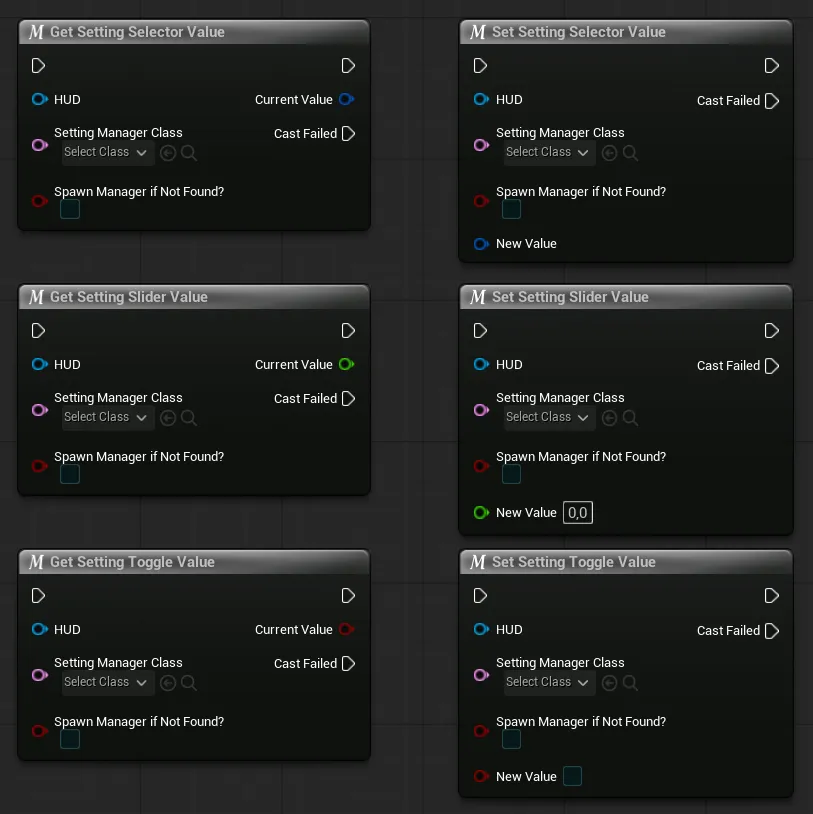
The system also has several helper functions/macros that provide a safe read/write access to the setting (one for each type of manager), they should be used in priority when interfacing from external systems:
You can also retrieve a direct reference to the manager and call the functions on it (better if called frequently):
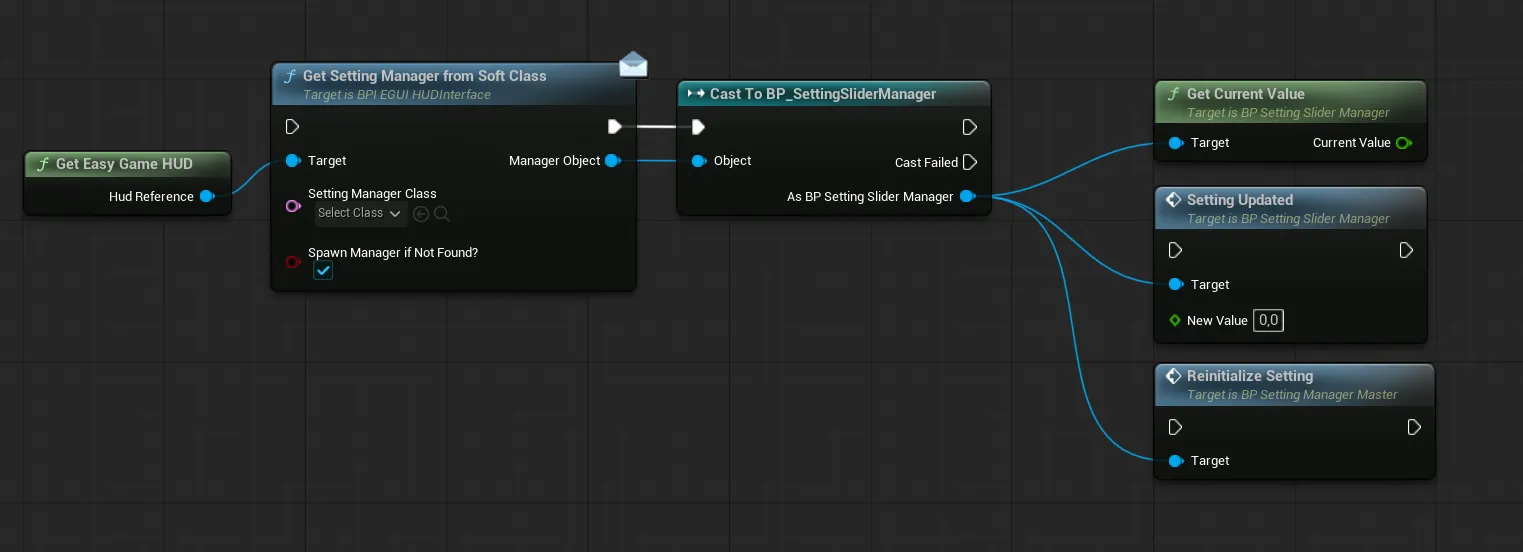
Get Current ValueFunction to call if you wish to retrieve the current setting value from a given manager
Setting UpdatedFunction to call to force a new value to be set in the setting, calling this function ensures that the value is properly registered and applied by the manager
Reinitialize SettingFunction to call if you need to fully reinitialize a setting, this should not usually be needed unless you need to retrigger the initialization process to refresh the setting from new external data
Add New Settings to any System
How to proceed
To add new settings, you first need to define the goal of the setting:
-
If your setting require persistance, saving/loading, etc. (during gameplay and across play sessions) like a setting in an Options Menu
In this case, you will first need to setup a setting manager, then setup your setting widget in the desired system (or no widget at all if you just which to create a setting controlled by code)
-
If your setting is only "transient" and does not require saving or external handling like a setting in a Photo Mode
In this case, you can skip setting up a manager and only setup a setting widget
A. Setup a new Setting Manager
-
To create a new setting manager, open your Content Browser and create a new Blueprint, then in the
Pick Parent Classwindow that appears searchSetting Manager -
You will see a list of various objects, including 3 that you can use depending on your need:
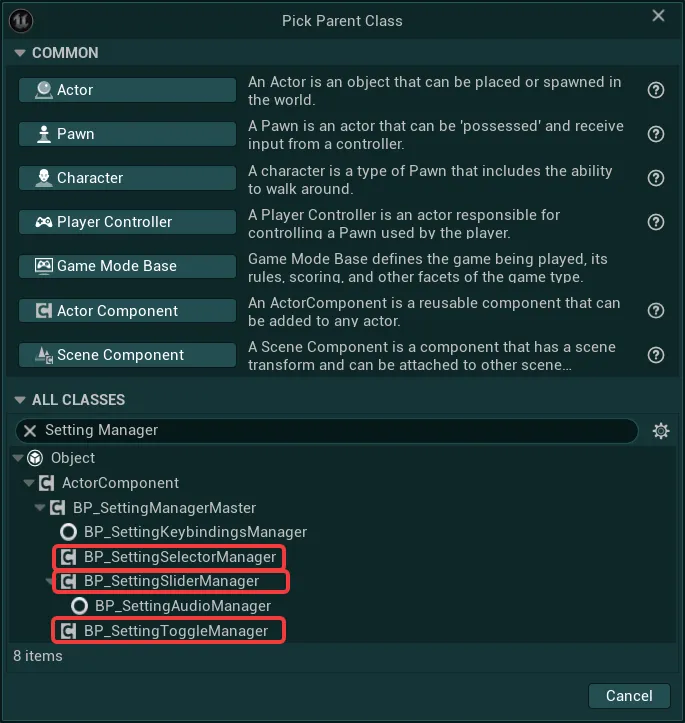
BP_SettingSelectorManagerManager used for settings that need multiple arbitrary values that the user can select (Resolution, Window Mode, Graphic settings)BP_SettingSliderManagerManager used for settings that need to have a numerical range of values (framerate limit, fov, gamma)BP_SettingToggleManagerManager used for settings that can only be toggled on or off (boolean settings)
Note
Audio and Keybindings Managers can also be used but require a specific set up, you can check out their dedicated section to set up these:
-
Once your Setting Manager is created, give it a name, open it and check out the
DetailsTabAll Manager types have a variable
Setting Datathat contain the base configuration parameters for the setting with a first group calledCommon Setting Datathat you need to configure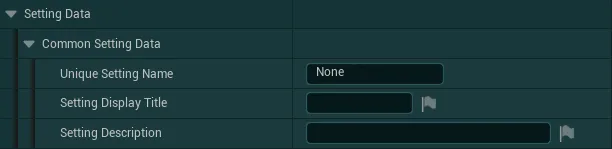
Unique Setting NameUnique Name for this manager used by the system (must be fully unique from any other manager). This will also be the named used when saving to diskSetting Display TitleDisplay Name shown in any Setting Widget that uses this Setting ManagerSetting DescriptionDescription provided to the Setting Widget that uses this Setting Manager for display in the UI if needed
-
Then, depending on your Manager Class, you will see different variables to configure the setting, you can find the details for each class in the following dropdowns:
Setting Selector Variables
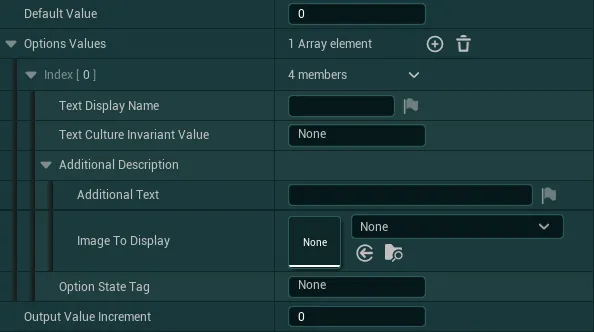
-
Default ValueThe default value of the setting when resetting to default or first initializing the setting (must be a valid index in the options array) -
Options ValuesArray of values used to display all the available options, each index has two inputs:-
Option Display NameThe displayed value that can be localized -
Option Culture Invariant ValueAn optional value that does not change with localization and can be used to reliably identify this option -
Additional DescriptionDescription and/or image to display when the user select this option (when used with a widget) -
Option State TagTag that the setting applies when this option is selected
(Tags can be used to dynamically enable/disable other Settings Widget, this system will be described in more depth in the setting widgets setup)
-
-
Output Value IncrementIf for any reasons you need to increment the returned index value, you can add an increment here
Setting Slider Variables
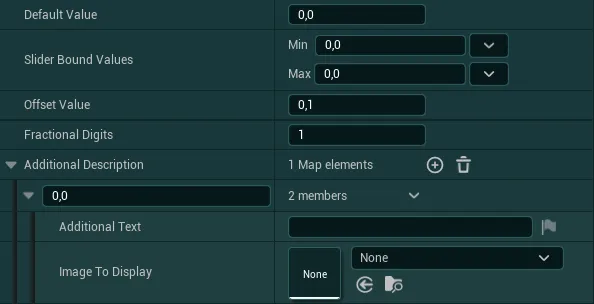
-
Default ValueThe default value of the setting when resetting to default or first initializing the setting (must be inside the min/max range) -
Slider Bound ValuesThe min/max value allowed for the setting -
Offset ValueThe increments of the value when using a keyboard of gamepad -
Fractional DigitsHow many digits should be displayed for this value in the Setting Widget -
Additional DescriptionAny additional description you may want to show based on the value of the slider (when used with a widget)Values must be added from largest to smallest, each additional description will then be displayed for any value higher or equal to each value
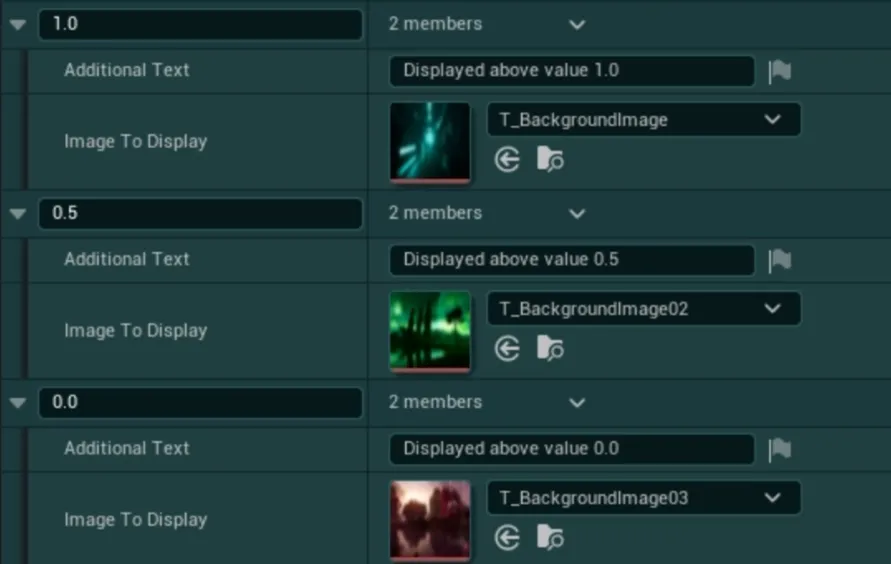
Example: If value is 0.6, the system will select the additional description set in the field with value “0.5”
If you only want to display a single additional description, simply set a single value to the lowest possible range of the slider
Setting Toggle Variables
-
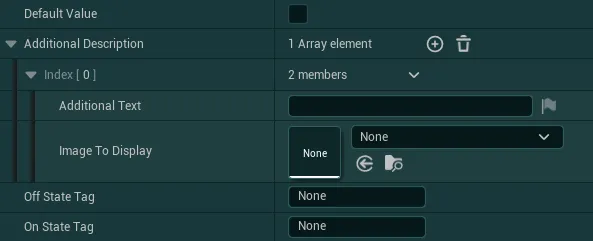
Default ValueThe default value of the setting when resetting to default or first initializing the setting -
Additional DescriptionAn array of additional description to display for any option selected by the user.
For the setting toggle, only two descriptions can be set: Index 0 for False and Index 1 for True -
Off State Tag/On State TagTags that the setting applies when the option is off or on
(Tags can be used to dynamically enable/disable other Settings Widget, this system will be described in more depth in the setting widgets setup)
-
-
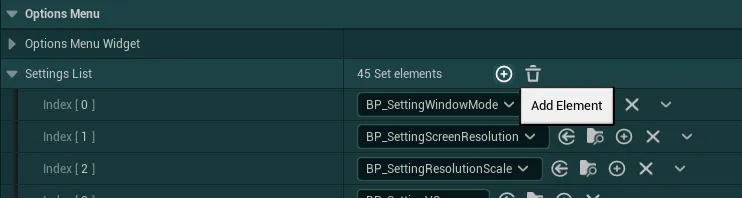
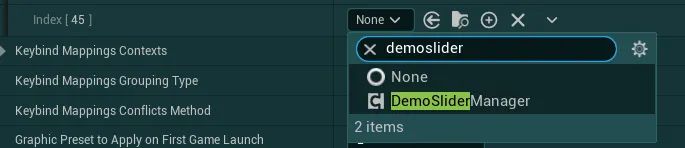
You now need to register your Setting Manager in the system, to do this, simply open your Global Config Data Asset and locate the variable
Settings ListIn there, simply add a new entry to the array and populate it with your newly created Setting Manager class
-
Once this default configuration is done, your setting is pretty much ready, it will automatically be saved/loaded and can be controlled from any system or through a Setting Widget as described in a next section.
If you wish to go further, you can also add custom logic to the Manager to control its behavior (how it applies the setting, how it is saved/loaded, etc.), check the very next section for more details on this.
Advanced Setting Manager Usage
To set up more advanced behaviors for your setting manager, you can override multiple functions from the parent classes.
To do so, in the Functions section of your blueprint, press the Override button, you will then see the following list of functions. The functions outlined in red are functions meant to be overriden, they are described right after
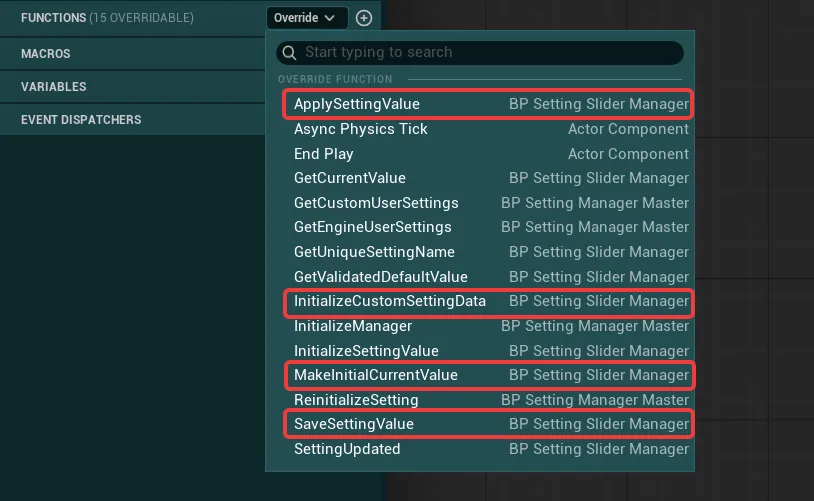
For a basic setup, you will likely only need to override the Apply Setting Value function which is called when the setting should be applied (at init, through code or through menus). The other functions allow you to set up more logic on initialization and saving.
-
Initialize Custom Setting DataFunction providing an opportunity for your manager to process any data before the setting is fully initialized for the first time.
In this function you can modify the
Setting Datavariable for example to update the options values based on externally sourced data to dynamically set the available options.Usage Examples
-
Default value override based on external data: In the
BP_SettingHardwareLumenRT(toggle setting manager), the default value is overriden on first initialization based on a choosen graphic preset
Tip
The hud function
Get Is First Settings Initializationcan be used in any of your logic to known if the settings are initializing for the first time and if the graphic preset should be overriden or not (if it should, the value of the graphic preset will go from 0 to 3: 0 being low and 3 being ultra) -
Dynamically filled Options Value based on external data: In the
BP_SettingScreenResolution(selector setting manager), the options values are filled dynamically based on the supported hardware resolutions. Once all the available resolutions are retrieved, we simply overwrite the Options Value of the setting.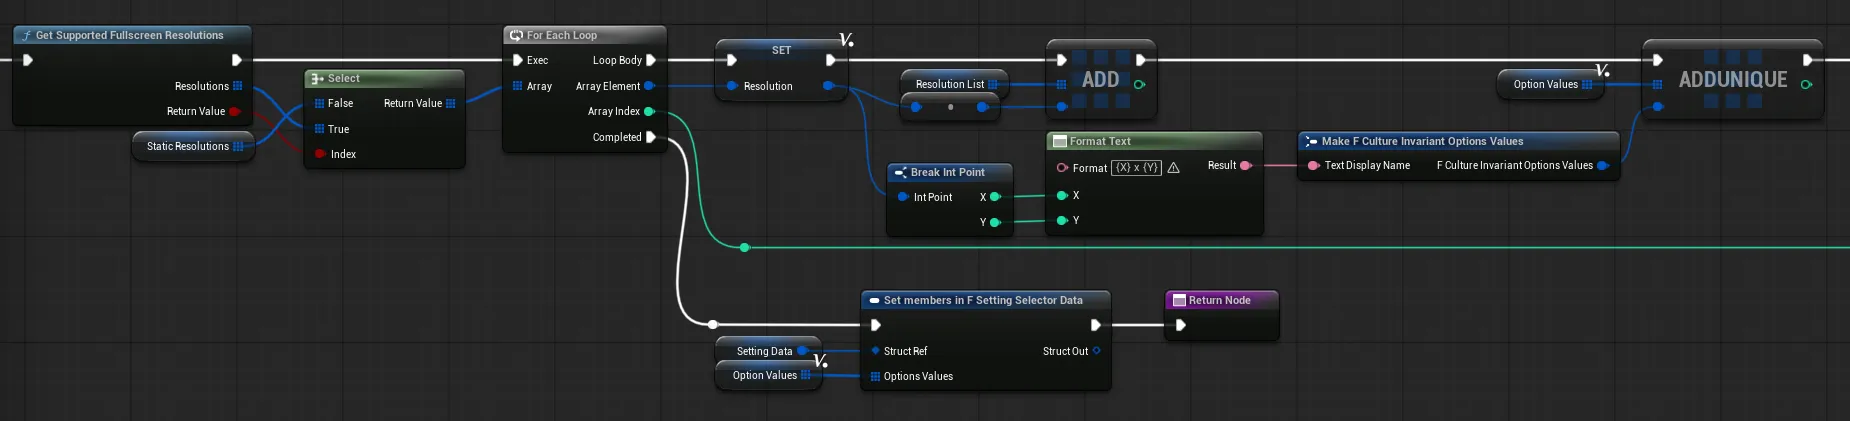
-
-
Make Initial Current ValueFunction responsible for loading (or setting the default value) a given variable from the JSON User Settings, it is set up by default to load the value as the type of the manager but can be overriden if you want to load from another source or with a specific type.

Usage Examples
Most settings that override this function only override it to not use the JSON User Setting (in most case, settings that are handled by the engine already)
-
In the
BP_SettingFramerateLimit(slider setting manager), on first initialization we simply use the default value and apply it. If not in first initialization we simply get the value saved and applied by the engine (since it was already applied by the engine on startup, we setApply And save?to False to not uselessly retrigger an apply)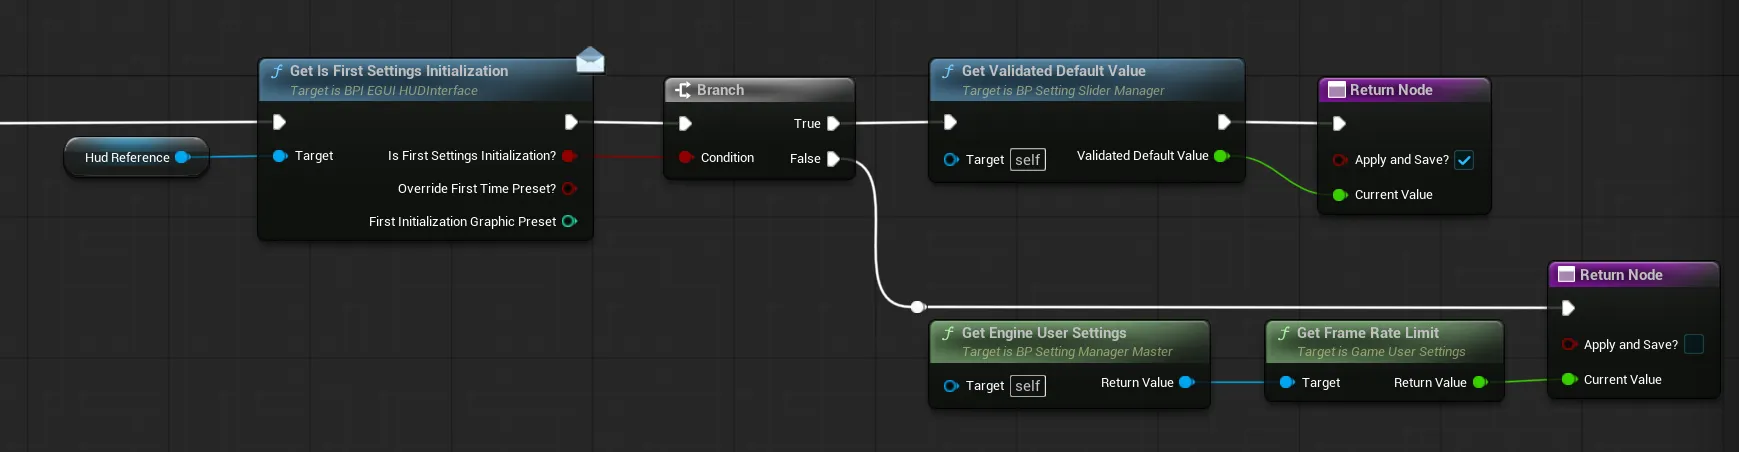
Tip
The function
Get Validated Default Valuecan be used in any of your logic to get the desired default value with a validation pass from the system (ensuring the default value is valid and within the allowed options for the setting) -
In the
BP_SettingScreenResolution(selector setting manager), we first processed the available resolutions in theInitialize Cusotm Setting Dataand defined at the same time if we found a valid current value. In which case we apply it, if not we take a validated default value (in this case, the default value being set at 99, this will clamp it down to the highest resolution available)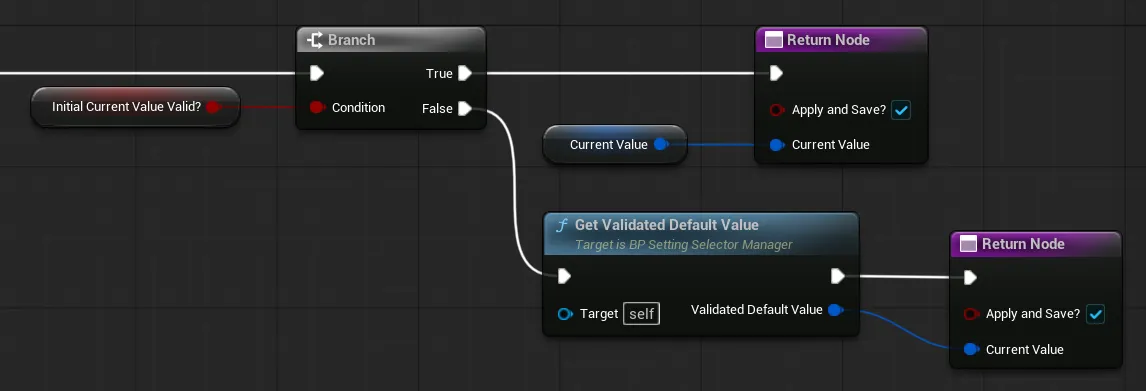
-
In the
BP_SettingGlobalIllumination(selector setting manager), on first initialization or if a preset was forced, then we simply get the value saved and applied by the engine, without reapplying it. We instead get the locally validated default value if we don't override the preset. (preset override from the Global Config)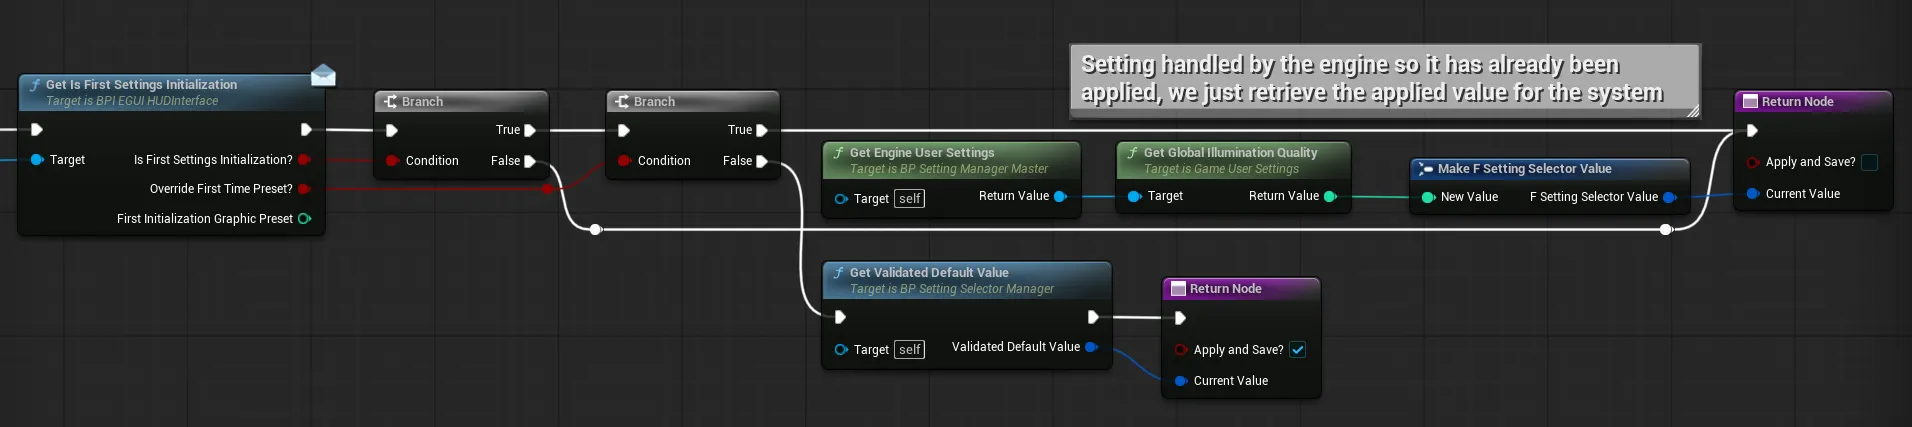
-
-
Apply Setting ValueFunction to override to apply the actual setting to the game, giving you a chance to update external systems when this setting request a new value.
Usage Examples
-
In the
BP_SettingMotionBlurQuality(selector setting manager), we use the function to update the motion blur quality through a console command
-
In the
BP_SettingUpscalingMethod(selector setting manager), we simply override the function to not apply anything, this is a special case where the setting value is actually read by an external system (the Game HUD) and applied from there, which means the setting manager doesn't do anything on apply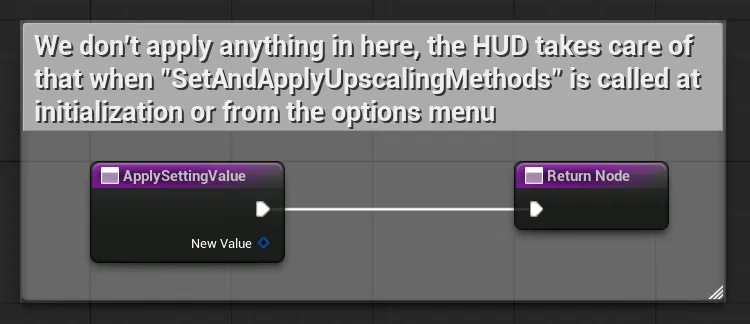
(in this case you could simply not override the function at all, it was just done there to indicate the behavior)
-
In the
BP_SettingColorBlindnessIntensity(slider selector manager), we use the function to update the color blindess parameters with a specific logic that retrieves the value of another setting in order to combine them (and we simply abort setting anything if the other manager doesn't exist, to avoid potential infinite loops)
-
In the
BP_SettingGlobalIllumination(selector setting manager), we simply apply the setting through the engine user settings system based on the provided value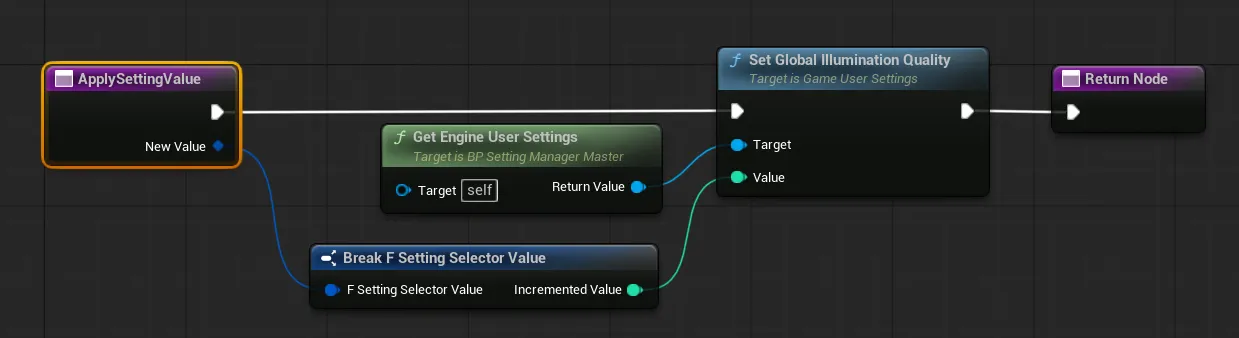
-
-
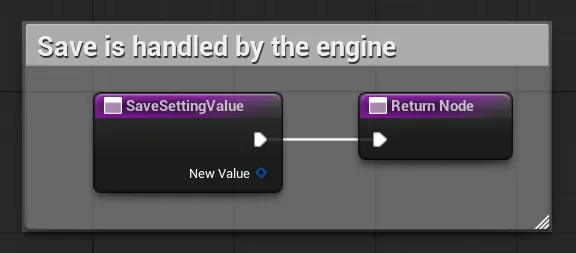
Save Setting ValueFunction responsible for saving a given variable to the JSON User Settings, it is set up by default to save the value as the type of the manager but can be overriden if you want to save as another type or use another saving method.
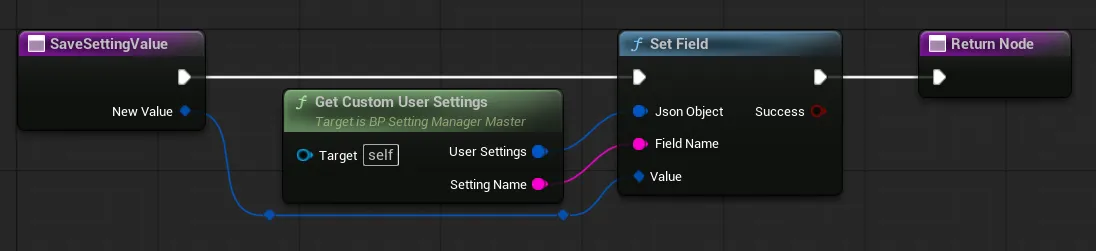
Usage Examples
Most settings that override this function only override it to not use the JSON User Setting (in most case, settings that are handled by the engine already)
B. Setup a new Setting Widget
-
To setup a new Setting Widget, start by opening the
WBP_EasyOptionsMenuMainwidget (or any other widget to which you wish to add a setting)Then inside the Widget Editor, click on the container in which you want to add your setting, for example the
GameplayOptionsContainer:
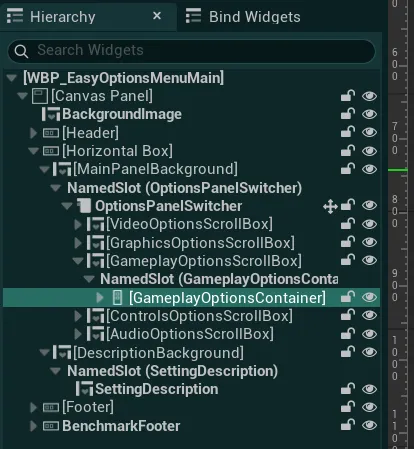
To find those containers more easily, you can search forOptionsContainerin the search bar of the Hierarchy windowHow to add a new container (tab) to the Options Menu
-
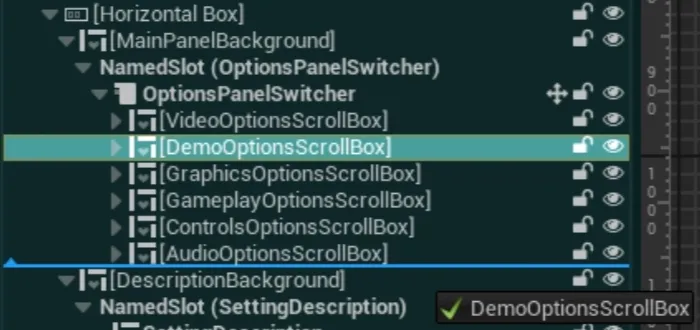
To add a new container, select one of the 5 scrollbox already existing (for example
VideoOptionsScrollBox) and duplicate it (Ctrl+D)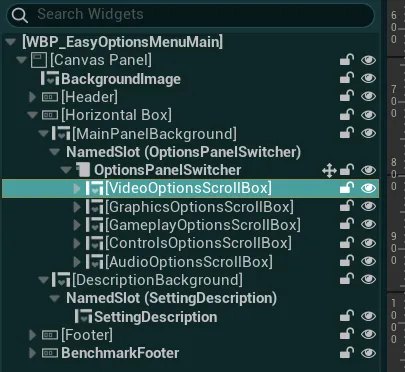
-
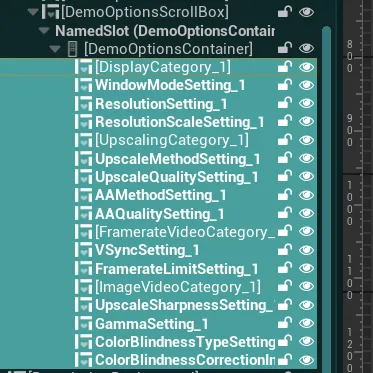
Rename the scrollbox and the vertical box inside it then delete all the settings that are present
-
Then, make sure to move the newly created scrollbox at the end of the widget switcher
-
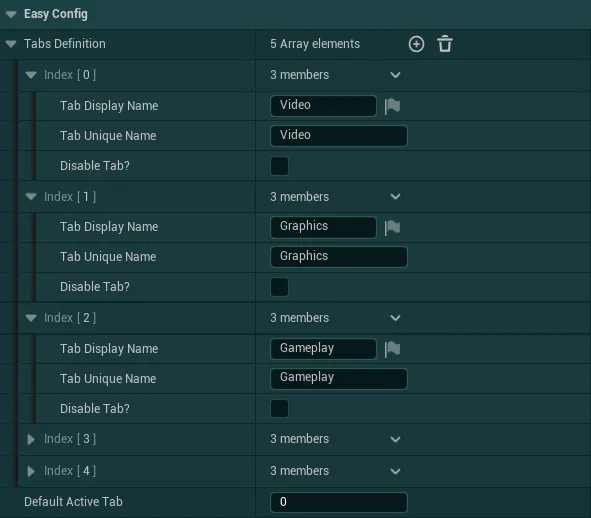
Click on the Header and in the config, add a new button to the
Buttons List, enter the name of this new tab
Note: You can place the tabs in any order you want by reordering this array but you will also need to reorder the scrollboxes in the same position inside the widget switcher
-
-
Then, in the
Palettetab, select the widget type needed for your setting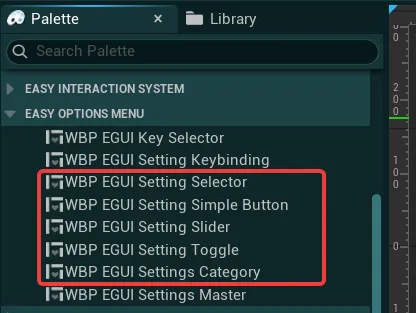
-
Setting SelectorWidget used for settings that need multiple arbitrary values that the user can select (Resolution, Window Mode, Graphic settings) → Can be used with Setting Selector Manager

-
Setting SliderWidget used for settings that need to have a numerical range of values (framerate limit, fov, gamma) → Can be used with Setting Slider Manager

-
Setting ToggleWidget used for settings that can only be toggled on or off (boolean settings) → Can be used with Setting Toggle Manager

-
Setting Simple ButtonWidget used to trigger actions when clicking a simple button (Run Benchmark button for example)

-
Settings CategorySimple Widget title to separate multiple groups of settings

-
-
Once placed inside your container, go to the
Detailspanel to configure your new setting under theEasy Configcategory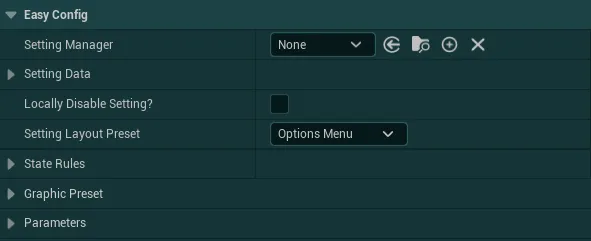
You will find 5 "categories" of variables that can be configured, check out the following drop-downs for more details on each:
Setting Manager/Setting DataIf you have previously set up a Setting Manager that you would like to control with this widget, simply add its reference to the
Setting Managervariable and you can ignore theSetting Datavariable.However, if you don't want/need to use a Setting Manager, you can then fill the
Setting Datavariable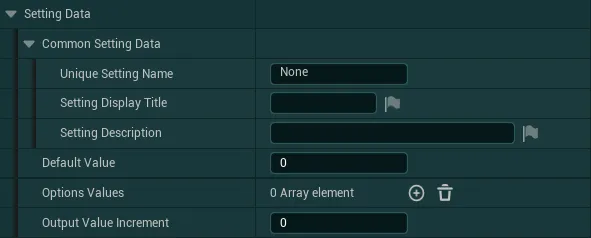
Those variables are the exact same as for the Setting Managers, you can find the details over here for each type: Setting Selector Variables / Setting Slider Variables / Setting Toggle Variables
Locally Disable Setting/Setting Layout PresetThose 2 variables control the visibiilty and style of the setting, the variable
Locally Disable Settingallows you to disable this setting, hiding it from the UI, you can find more details on disabling settings in the next section.The variable
Setting Layout Presetdefines the layout styling that will be used by this setting, it can be configured from theGlobal Styling Data AssetState RulesState Rules are a set of conditional parameters that allow you to enable/disable/hide some settings based on other settings values. For example you could want to disable a setting that control Framerate whenever VSync is enabled.
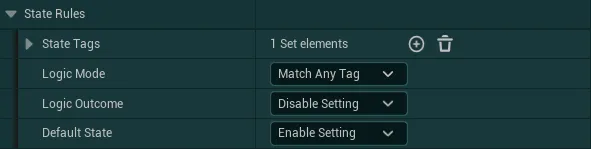
To do so, you first need to list all the State Tags that this setting will be considering in the
State Tagsvariable. These tags should be the same as you have defined in any Setting Manager or Setting Widget in theOption State Tagvariables.Then, you can define how the setting need to consider the tags with the
Logic Modevariable:Match Any TagThe outcome will be triggered if ANY of the listed tag is activeMatches AllThe outcome will be triggered only if ALL of the listed tags are activeMatch NoneThe outcome will be triggered only if NONE of the listed tags are active
Then, the
Logic Outcomevariable allow you to define what the setting need to do if the logic rule has succeded (for example if any of the tag has been activated by another setting)Disable SettingDisable the setting, blocking any edition of it (while still being visible)Enable SettingEnable the setting and allow the user to edit itFully Hide SettingHide the setting entirely, making it non editable and hidden in the UI
Finally, the
Default Statevariable allow you to define what the setting need to do if the logic rule has NOT succeded
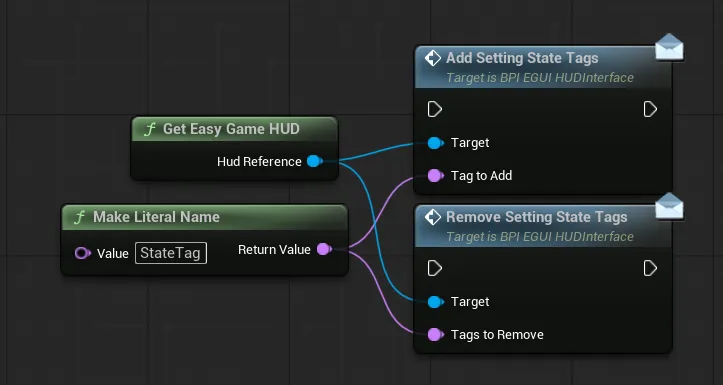
If you wish, you can also Add/Remove any State Tag of the System from code with the following functions of the HUD:
Graphic PresetWhen setting up a setting in the Options Menu, you can automatically register it to be controlled by the Graphic Preset system, this is supported on Settings Selector and Settings Toggle.
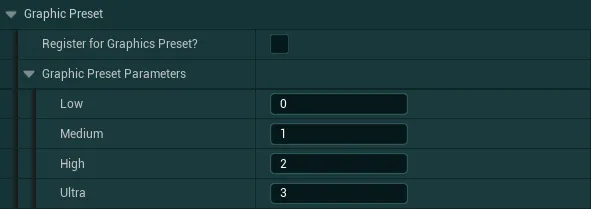
To register it, simply set the
Register for Graphic Preset?variable to True, then under the `Graphic Preset Parameters, enter a valid value that should be set by each preset.
For Settings Selector, a valid value is any value that exist in its Options array. For Settings Toggle, a valid value is either 0 or 1ParametersThe Parameters category has a few additional variables that can be configured for the setting:

The
Apply on Edit?variable control if the setting need to be applied as soon as the user make a change, or if the user has to press the Apply button for it to propagate (be mindful that this could have a negative performance impact depending on your apply logic)The
Show Reset Button?variable control if a unique reset button must be visible for the setting or not
Advanced Setting Widget Usage
To set up more advanced behaviors for your setting widget, you have access to multiple basic functions/events on the widget. You can see the usage of these functions/events in the WBP_EasyOptionsMenuMain
-
Setting UpdatedThis event will be called every time the setting is updated by the player (either every time it is changed if set toApply on Editor every time the setting is applied)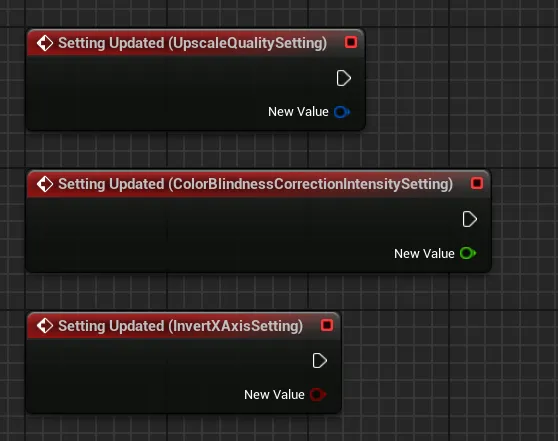
You can add this event from the Events category in the details panel (your widget must be set as Variable)

-
Apply Setting/Reset SettingCalling these functions will either apply the setting (if notApply on Edit) or reset it to its default value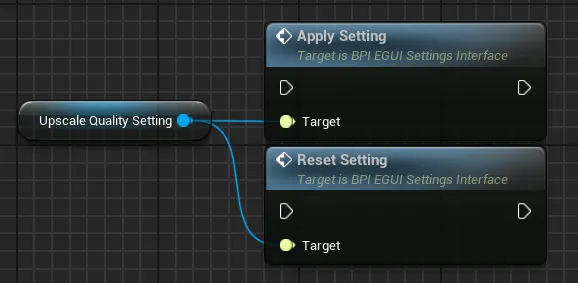
-
Update Setting ValueCalling this function allows you to update the setting to the next or previous value (on setting sliders, this will increment or decrement the value based on the Offset Value)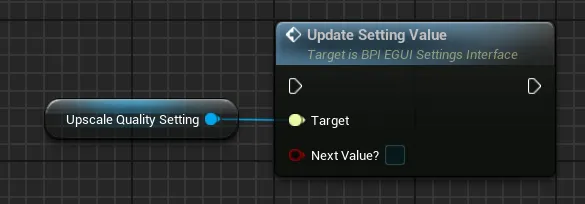
-
Is Setting Enabled?This function will return whether the setting is enabled or disabled (disabled might be from state tags, visibility, etc.)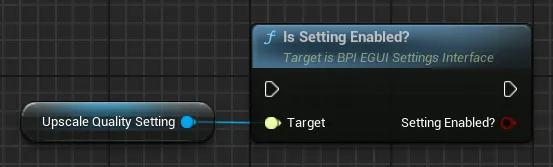
In addition to these functions, you can also receive multiple events from the setting to its owner widget.
For this, you first need to add the BP_EGUI_SettingsInterface to your owner widget (Class Settings > Interfaces)
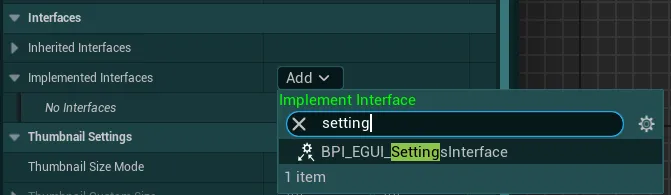
On any setting of your choice you can then call the function Initialize from Setting Owner. No additional steps are required to start receiving the following events from the settings
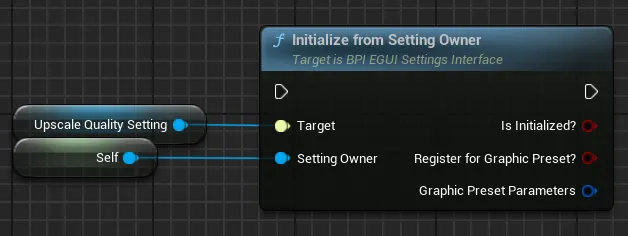
-
New Setting DirtyThis event will be called when any registered setting has been modified by the user, marking it dirty for application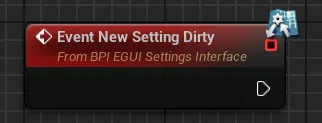
-
New Setting FocusedThis event will be called when any registered setting has been focused by the user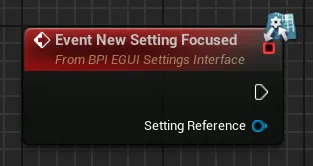
-
New Setting DescriptionThis event will be called when any registered setting request the display of its setting description, this can be useful to display on the ui for the user.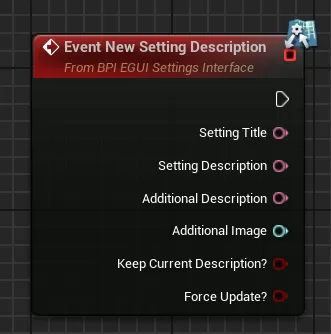
Remove Existing Settings
To remove a setting from the system, you can do it at two levels:
Either fully disabling the Setting Manager, which will disable it entirely from the game and UI. Or disabling it only in the UI (hidden for the player) while keeping the setting manager active (in which case the setting would still work but not be configurable by the player).
Fully disable a Setting Manager
To disable the setting entirely, start by locating the Setting Manager that you would like to disable (The Managers can be found in the EasyGameUI/EasyOptionsMenu/Core/SettingManagers folder)
For example the Global Illumination Setting:
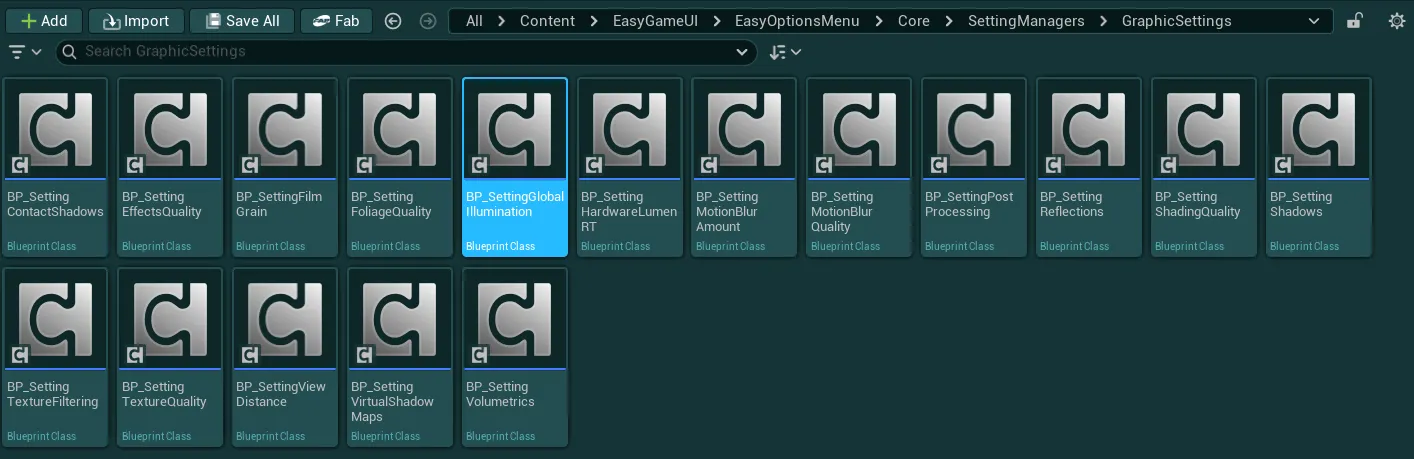
Then open this manager blueprint and go in the Details tab, from there simply locate the Globally Disable Setting variable and set it to True
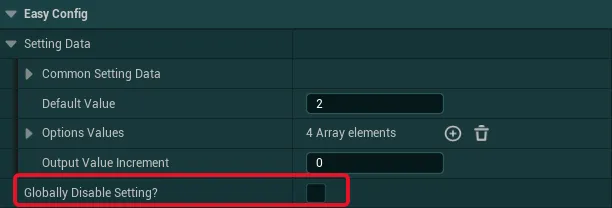
Once this is set to True, the setting will be fully disabled from the game, it will no longer appear in the UI and won't do anything unless you set that variable back to False.
Disable a Setting Widget
To only disable a setting in the UI, start by opening the WBP_EasyOptionsMenuMain widget (or any other widget from which you wish to disable a setting)
Then inside the Widget Editor, find the setting you want to disable and select it, for example the Global Illumination Setting:
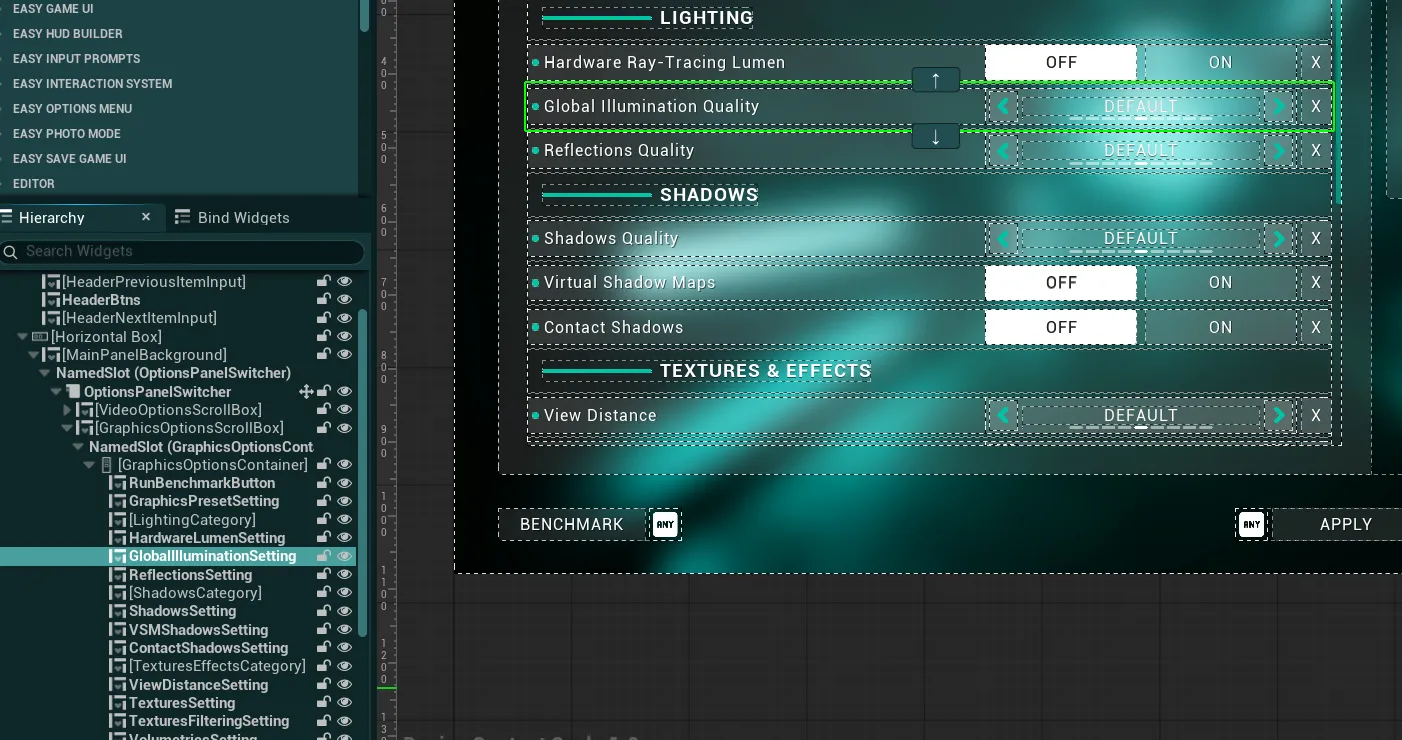
Then go in the Details tab, and from there simply locate the Locally Disable Setting variable and set it to True
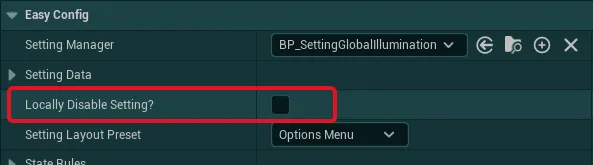
Once this is set to True, the setting will be disabled from the UI and won't be visible to the player, if the setting is linked to a manager, that manager will still be active and can still modify the setting (like during initialization, or through code)
Hide Tabs from the Options Menu
In addition, you can also hide entire tabs from the options menu, but keep in mind that this will not disable the settings, only hide them in the UI:
To hide tabs from the Options Menu, simply start by opening the WBP_EasyOptionsMenuMain widget and select the Header
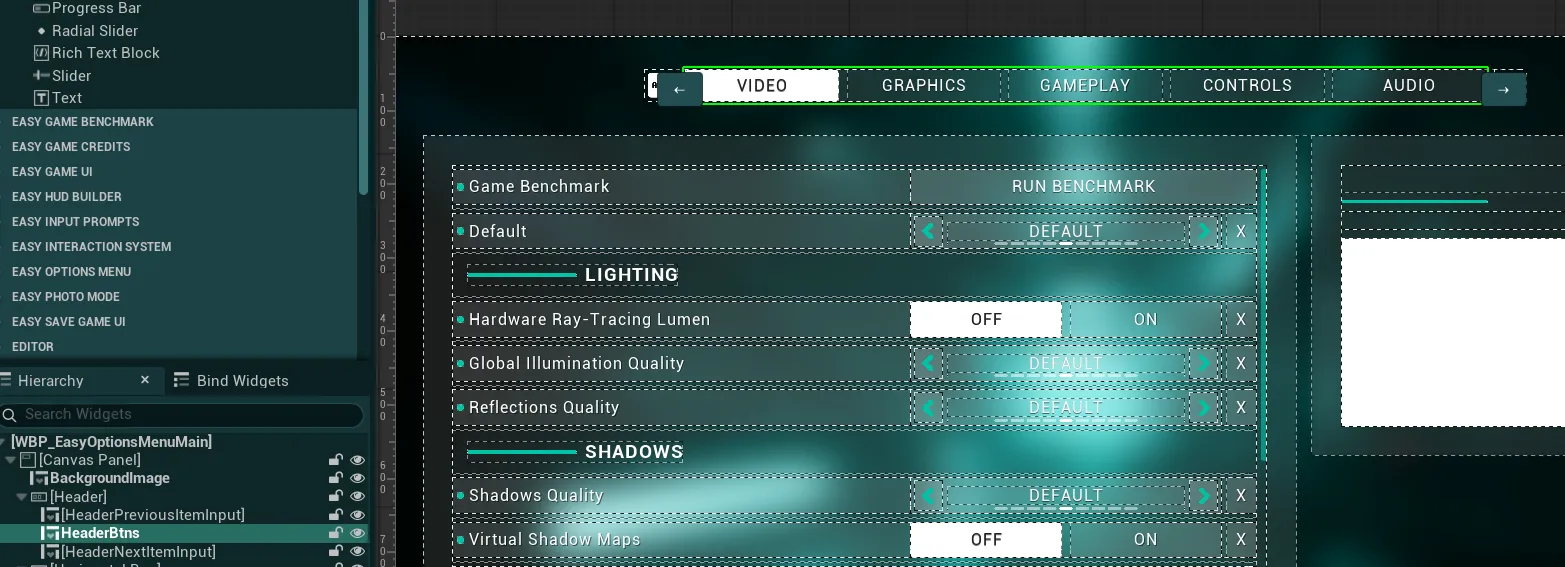
Then go in the Details tab, and from there you can disable any of the tabs in the Tabs Definition variable.
Simply set the boolean Disable Tab? to True for the desired tab.