Save Game System
Out of the box, all functionnalities of the UI works without any required implementation and are acccessible from the provided Main Menu or Pause Menu. In order for the save system to apply to your game, you will however need to setup various parts of the system in your actors.
You can find all the necessary details in the following guides:
- World Actors Saving Setup
- Additional Objects Saving & Expand with your own logic
- Save Systems Usage
- Additional Guides
World Actors Saving Setup
By default, the player controller and its controlled pawn/character has its world transform saved on a per-persitent level basis, you can disable this behavior inside your Global Config Data Asset in the Save Player Tranform? variable
The included saving system also allows to save any actor in your world, you can either do the following implementation process for any actor blueprint or directly in your world on any actor (the second option won’t allow to save variables)
Save Component Setup
To get started with setting up the save component, either open the actor blueprint you wan’t to save or select any actor in the world, then click on the Add button inside the actor components and add the AC Easy Save Game Component
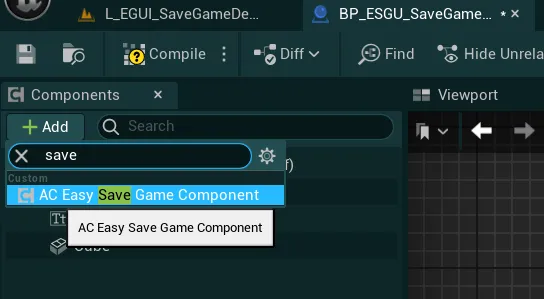
Once added, take a look at the Details panel when selecting the component, there are various options that you need to configure:
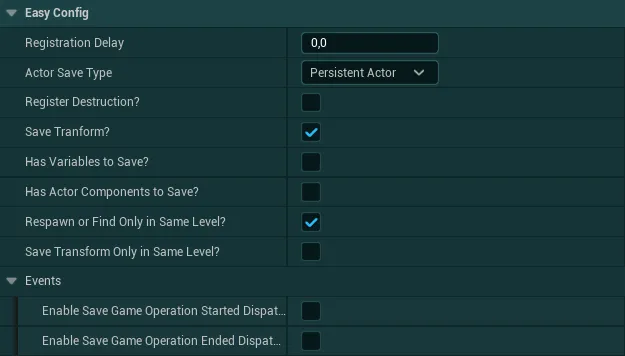
-
Registration DelayDefines the delay before triggering the registration on the save operations manager.
For actors that are spawned very early in the level like the gamemode, it is recommended to increase this delay (0.2s for example) -
Actor Save TypeThis variables defines the way your actor will be considered when saving which depends on how they are spawned.
It is very important to set this variable correctly to ensure your actors are saved as intendedThere are 3 types of actors:
Persistent Actors- Any actor that is manually placed by you inside the world in the editorThis actor type is the most reliable to save, most if not all actors should be saved as persistent if possible to ensure the best performances and reliability.
Example: An Interactable actor in the world or an objective area with different states are both actors that would be placed manually and that can be saved as persistent.
Please note, this only applies to actors you have manually placed in the world, in some situations it may appear to work in the editor for actors like the Player Character, but this will not reliably work in a packaged build (Player Character/Controller should be set as
Find Similar Actor on Load)Actors to Find (Find Similar Actor on Load)- Any actor that is always spawned at runtime by code or by the engine (Player, Gamemode, Hud)This applies to all actors that would be always spawned by code at runtime (either your code, or the engine) like the Player (Character, Controller, State), Gamemode, Game Hud class.
This way of saving actors will only be reliable if you always have the same amount of actors spawned at runtime by this method.
Example: The player character is an example of that, it will be automatically spawned on the map by the engine when starting the game, but is not placed on the map by hand
Actors to Respawn (Respawn actor on Load)- Any actor that is spawned at runtime by code in response to a gameplay eventOnce an Actor to Respawn is saved, it will be respawned automatically with all its data if it has any.
Example: A wall placed by the player with a house building system would be an actor to respawn, it is uniquely spawned at runtime by code (the building system) and not always present in the world (not present if not built by the player)
-
Register DestructionIf true, the actor will be saved as destroyed when the “Destroy Actor” function is called on it. Actors registered as destroyed will then be automatically redestroyed when loading the save
-
Save TransformIf true, the Root Transform (Location, Rotation, Scale) of the actor in the world will be saved. If you want to save any local transform of other components of the actor you will have to save it as variable
-
Has Variables to Save?If you want to save any variables for this actor you need to set this to True. (more details on saving variables are available right after)
If False, no variables will be saved (only the destruction and transforms will be saved if they are enabled)
-
Has Actor Components to Save?If your actor has any code component that also need to save variables, you can set this to True. Any component with the
BPI_ESGU_SaveGameInterfacewill then be processed alongside the actor. (more details on saving components are available right after) -
Respawn or Find Only in Same LevelFor actors of type
Respaw Actor on LoadorFind Similar Actor on Load, this variable will allow your to control how the data of these actors are shared across levels.If True, all the data will be saved and loaded only in the persistent level they where spawned in.
If False, the actor will be able to be respawned or found in any level. This can be useful for actors like the Player Character if you wish to "Transfer" data with it across multiple persistent levels. -
Save Transform Only in Same Level?For actors of type
Respaw Actor on LoadorFind Similar Actor on Load, this variable will allow your to control how the transform of these actors are shared across levels (if Transform is saved).If True, the Transform of this actor will only be loaded when in the same level as when saved (one transform per-persistent level).
If False, the actor will have its Transform loaded regardless of the level.By default, this setting does nothing if
Respawn or Find Only in Same Levelis set to True -
EventsThese options allow you to enable various events related to the save game operations
When setting
Enable Save Game Operation Started Dispatcher?orEnable Save Game Operation Ended Dispatcher?to True, the associated events can now be listened to from the actor owner of the Save Game Component.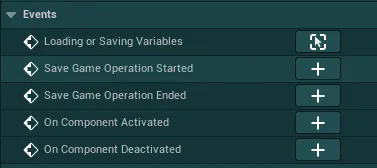
These events can be useful if you need to have any logic when a save game operation has started or ended
Variables Saving/Loading
To save any variables alongside the actor, make sure to set the Has Variables to Save? setting to True in the component.
-
Then click on the
+button beside the eventLoading or Saving Variables(still in the same Details panel as the config)
The event will then be added to your Event Graph. This event will be triggered when a new save is requested or when loading a save
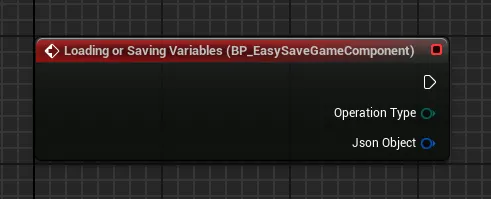
-
In the helpers, you can now search for the Macro node
Save or Load Variable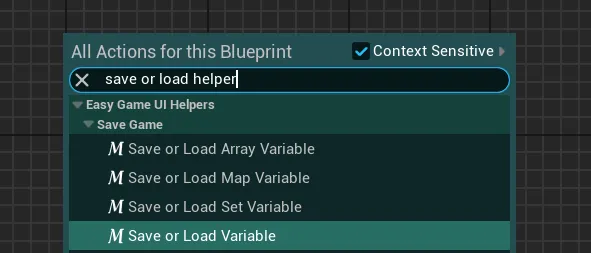
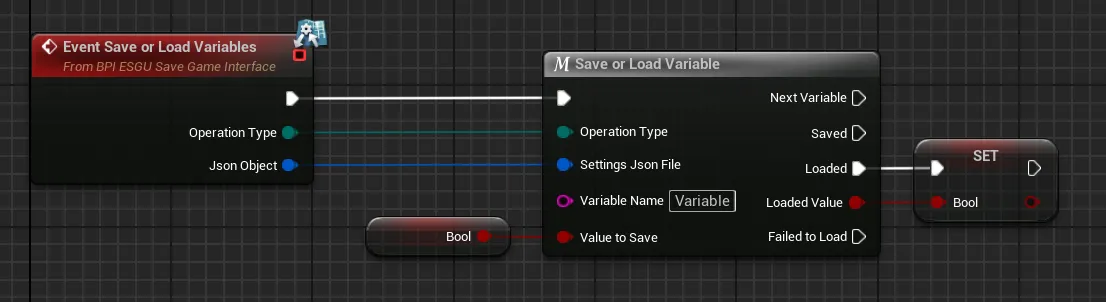
This node is available in four variants depending on the type of the variable you are looking to save (Array, Map, Set or simple variable)Once placed, you will have various pins in and out like the following image
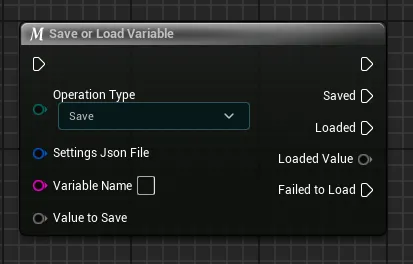
-
You first need to plug the Input exec pin (white) with the event you added earlier or another
Save or Load VariablenodeYou also need to plug the
Operation Typepin andJson Objectpin from the event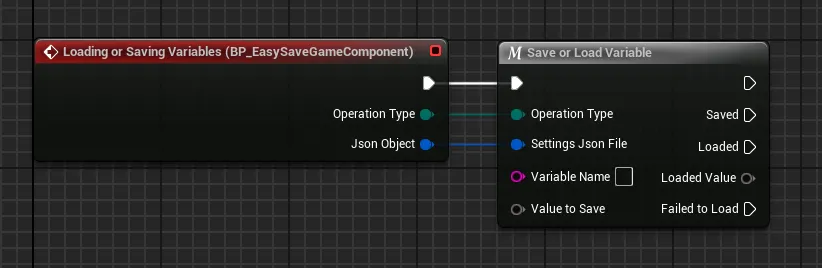
-
Then, set a unique name for this variable in the field
Variable Name(must be unique inside the same actor BP class, different actors classes can have the same variable names)
-
Finally, get the value you want to save (variable or anything else) and plug it in the grey
Value to SavepinAnd finally from the
Loadedoutput pin you can set your variable with the loaded value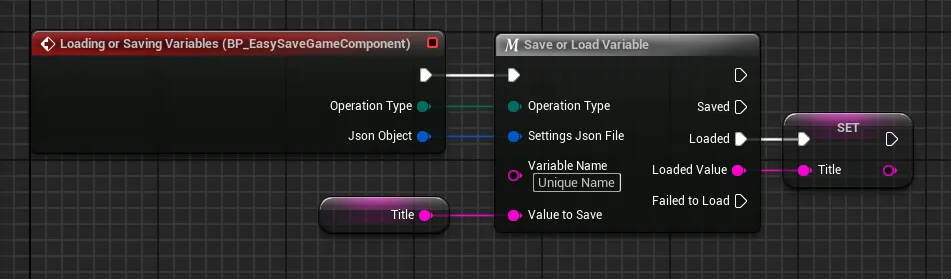
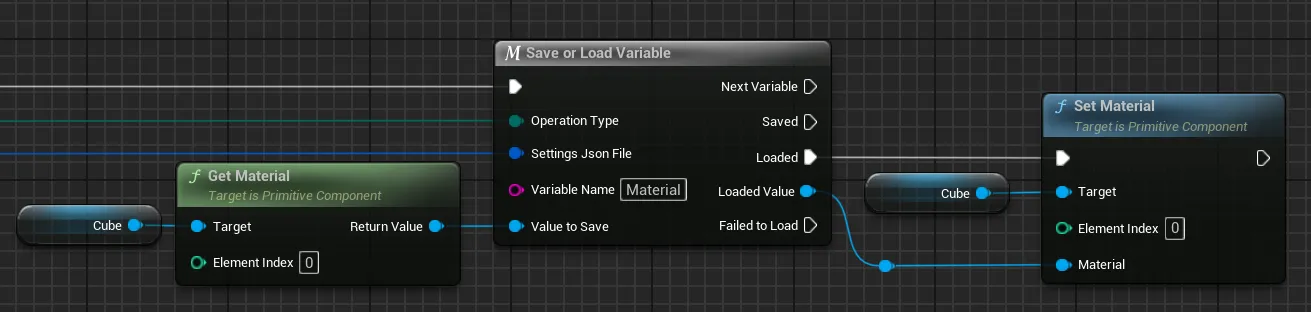
Important note for
StructurevariablesIn some situations you may find that variables of type Structure may not load properly.
If you encounter this issue, simply use the
Save or Load Variablenode as usual but instead of setting the variable from theLoaded Valuepin, place first aGet Fieldnode.On this Get Field node, connect the
Json Objectpin with the same value as theSettings Json Filepin and write the exact same variable name as on theSave or Load VariablenodeFinally, plug the set variable node on that
Get Fieldnode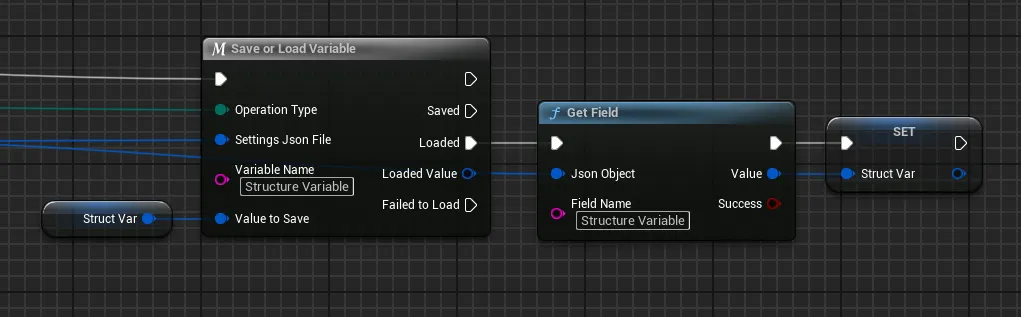
Important note for
Mapvariables in UE 5.3 & 5.4Due to an engine bug in Unreal Engine 5.3 & 5.4 (newer versions don't have this issue) maps variables can have issues connecting to the wildcard node and appear “incomplete” like so:
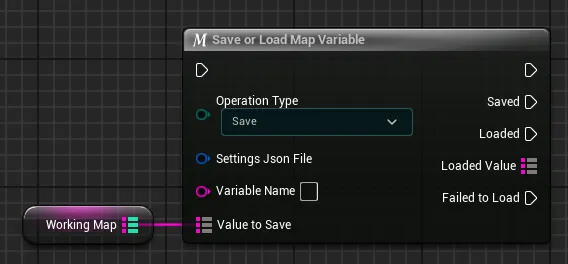
If you encounter this issue, simply plug in all your nodes as normal, and then Right Click on the Macro and select "Expand Node”
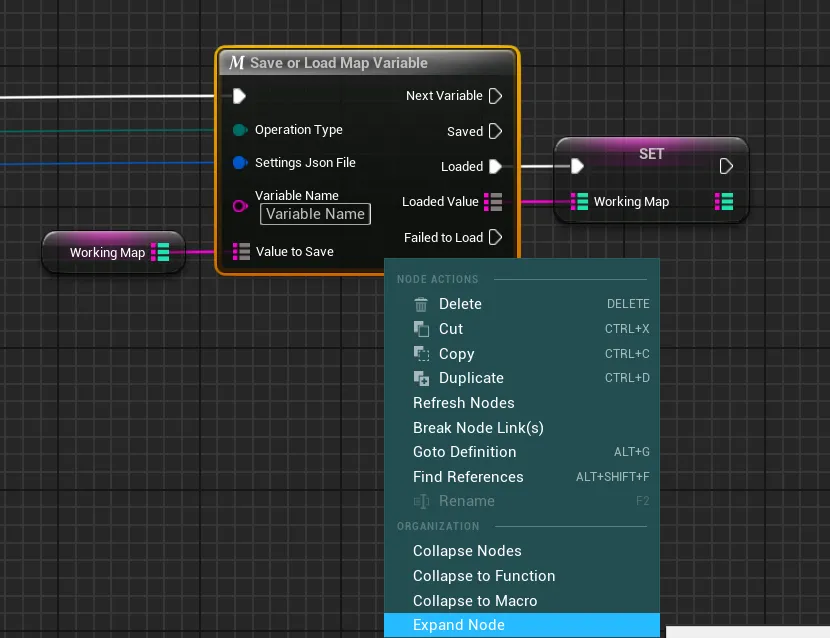
You will then end up with nodes like this, all the connections should still be properly connected and the exec pins are labeled for all the needed actions
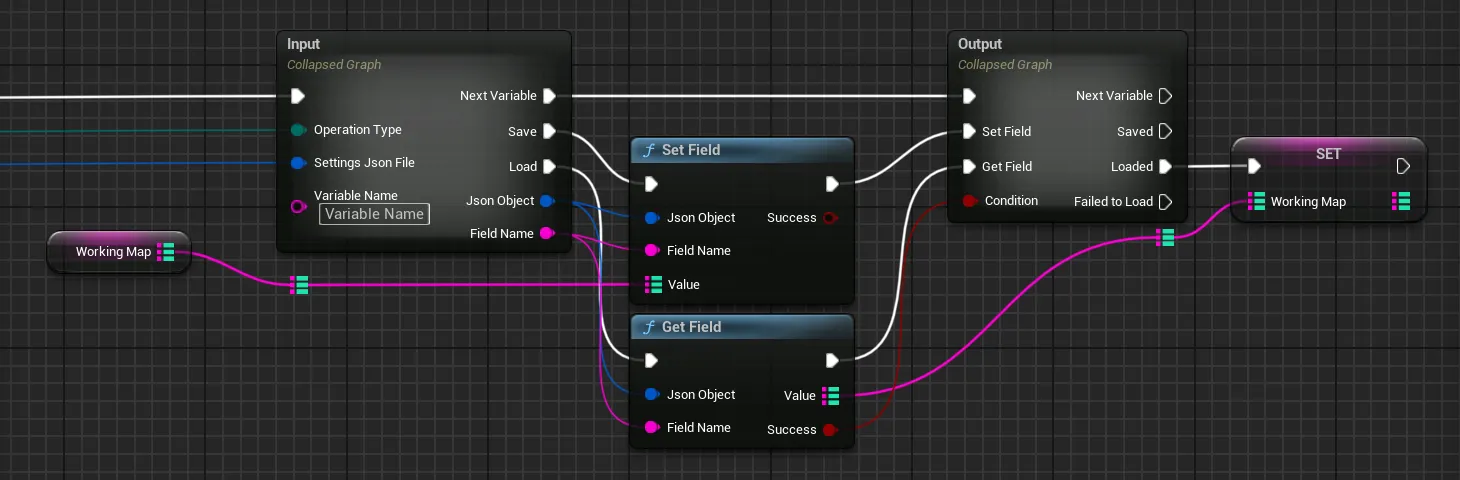
Feel free to also add any logic after the variable got saved with the
Savedoutput pin or also do any custom logic in theFailed to loadpin if you want to have any sort of fallback.To save all your variable, you can then place as many
Save or Load Variablenode as you need, you just have to remember to plug theOperation TypeandSettings Json Filepins to the event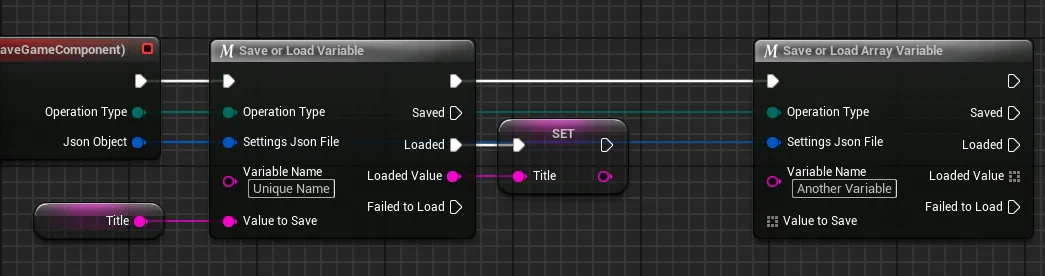
Tip
If for any reasons you need to load variables on Persitent actors that were not initially loaded during the file load, you can call the function
Request Load Variablesfrom the Save Game Component. This will instantly load the datas associated with the given actor in the latest save file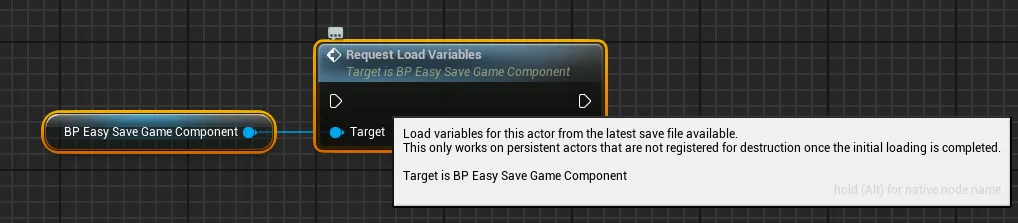
This only works for actors that have the
Persistenttype and are not already registered as destroyed as only these can be uniquely identified even after the save file was loaded
Actor Components Saving
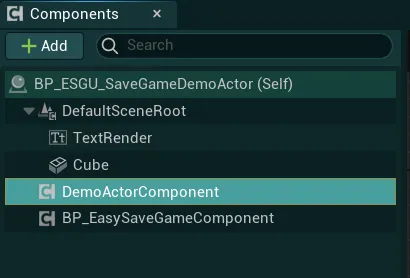
To save any code actor component alongside the actor, make sure to set the Has Actor Components to Save? setting to True in the save component.
In order to be considered, the component must be part of the saved actor
-
Open the Actor Component blueprint that you wish to save and go to the
Class Settings
-
Then, in the
Detailspanel, underInterfaces, add the interfaceBPI_ESGU_SaveGameInterfaceto your class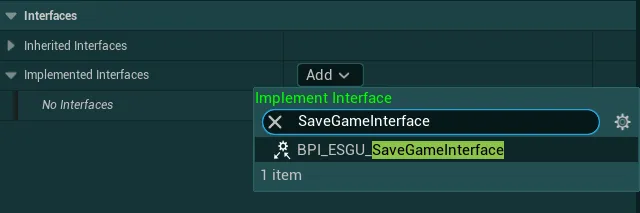
-
From the interface functions list, implement the event
Save or Load Variables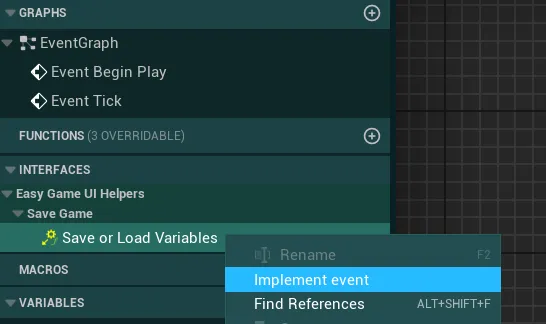
-
With this event, simply follow the same instructions as before to save your component variables
Additional Objects Saving & Expand with your own logic
In addition to saving world actors, the system also supports saving non-actor objects like the Game Instance or other Unreal save objects. You can also fully replace the system if you wish
Saving additional Unreal save objects
-
To save additional Unreal save objects, start by opening the
BP_EasySaveGameOperationsManagerand locate theAdditional Saving/Additional Loadingnodes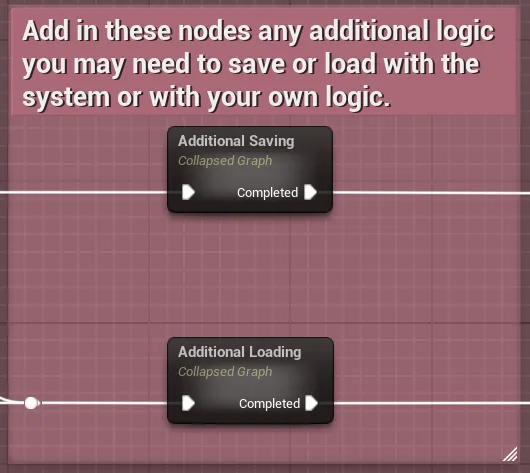
-
In the
Additional Savingnode, you can use the provided macroSave Object to Slot, simply input your own Save Game Object and set a unique name for the object. The system will then handle the rest to save the object in the correct slot, etc.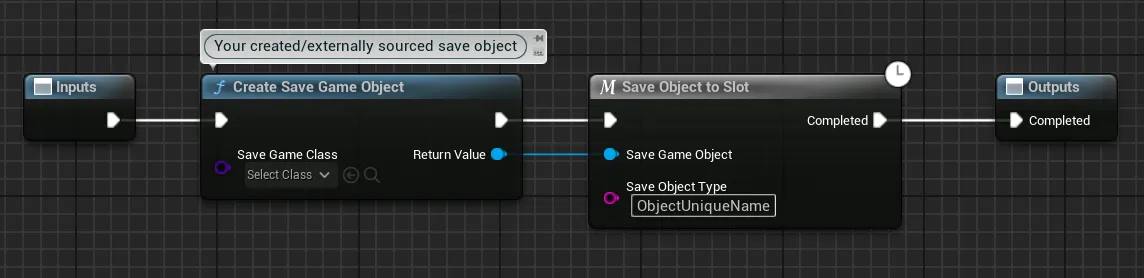
Warning
In order for the save to be properly processed, please make sure to always have every execution path connected to the
Completednode of the graph -
Then in the
Additional Loadingnode, you can use the macroLoad Object From Slotwith the same name as for saving to retrieve the save object and load anything from it
Saving Game Instance variables
-
To save variables from your Game Instance, simply open your game instance blueprint then go to
Class Settings -
Then, in the Details panel, under Interfaces, add the interface
BPI_ESGU_SaveGameInterfaceto your class -
From the interface functions list, implement the event
Save or Load Variables -
With this event, simply follow the same instructions as before to save your game instance variables
Info
Since the Game Instance is persistent across level loads, the data loaded through the system will never be "cleared", if you think this may cause issues, I would recommend implementing a method to clean that data especially when creating a new game
Similarly, you can also save data from any other non-actor object (to save additional Unreal Save Object, check out the section right before):
-
First, set up your object with the save blueprint interface and variables saving like explained right before for the game instance
-
Then, open the
BP_EasySaveGameOperationsManagerand locate theAdditional Saving/Additional Loadingnodes -
In the
Additional Savingnode, you can use the provided functionSave or Load Additional Object. In theOperation Type, selectSaveThen, in the
Object To Savepin, plug the object on which the save/load event will be called. In theSave Game Objectsimply plug the variableCurrent Save Game ObjectFinally, set the
Save Indexto a unique integer value higher than 0 (0 being reserved for the Game Instance). If you have multiple objects to save like this, simply increment the value every time.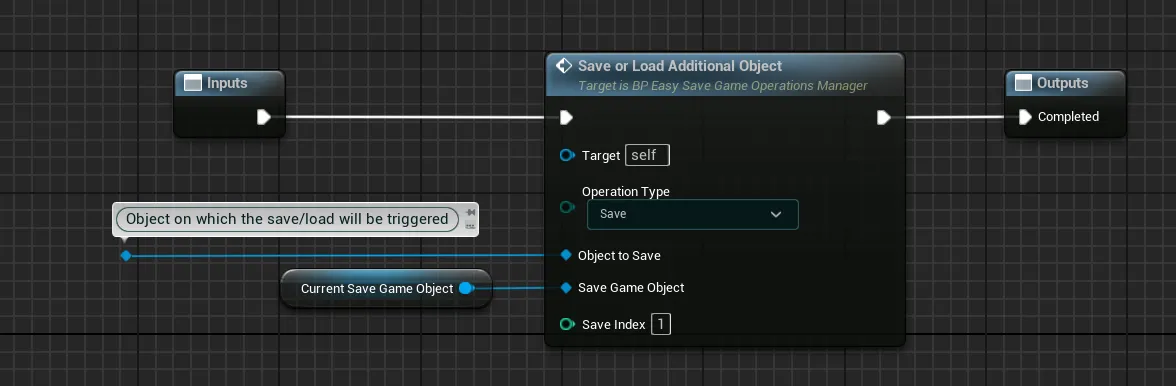
-
Then in the
Additional Loadingnode, reuse the same function with the same parameters aside from theOperation Typethat you must set toLoad
Expanding with your own logic
- If you wish the expand/replace the included save system with your own, you can easily do it from the
BP_EasySaveGameOperationsManager -
You will find two commented areas that you can modify based on your needs.
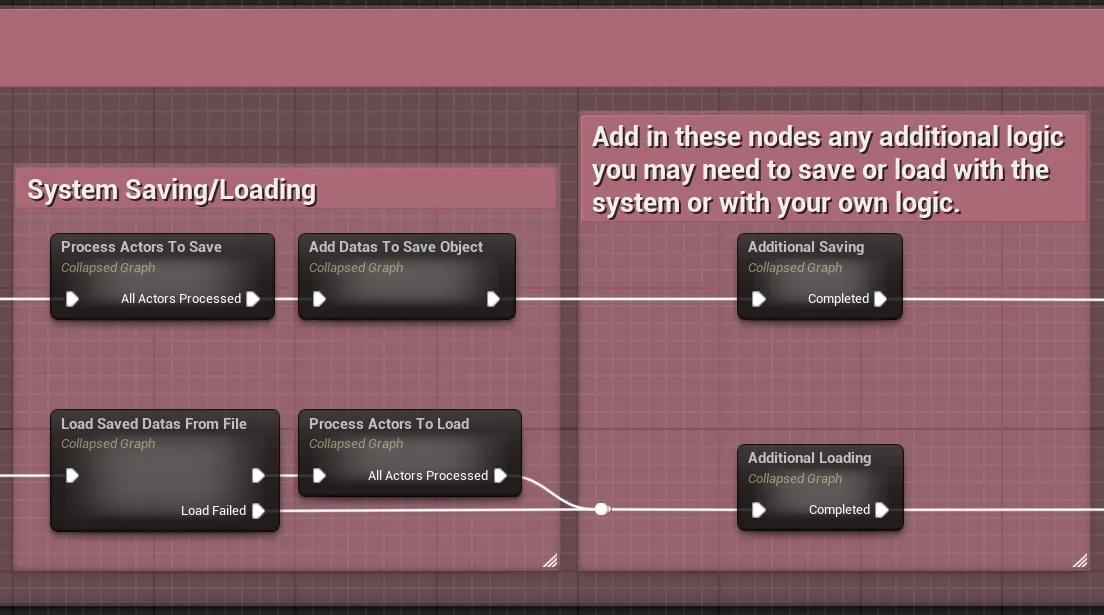
The
System Saving/Loadingis all the logic responsible for saving and loading by default, you can unplug these nodes (do not delete them) if you don't plan on using the built-in systemOn the right, the nodes
Additional SavingandAdditional Loadingis where you can add your own save/load logic to be executed. By modifying only this part, the built-in system will still be responsible for handling slots, UIs, triggering save/load but the actual logic will go through your own system.If you just need to save additional Unreal save objects, check out the previous sections.
-
In order to ensure a cleaner folder structure, it is higly recommended to use the provided
Get Current Save slot as Path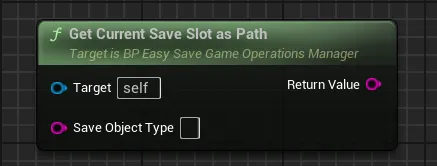
This function returns the target folder formatted as
[ProfileName]/[SlotName]/[SaveObjectType]. If no profile is currently selected, it will just return[SlotName]/[SaveObjectType]If you wish to get the actual folder path on the system, simply use the function
Get Save Files Path(which already includes the profile folder in it), then append it with theCurrent Save Slotvariable and the desired name of your file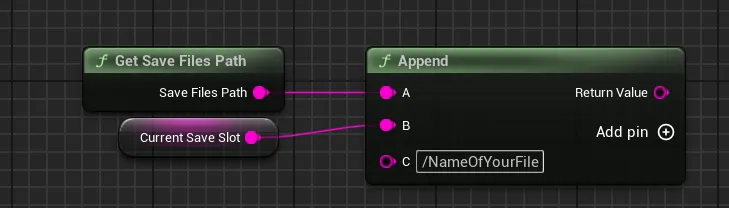
Save Systems Usage
The save game system can be tweaked in various aspects that can help tailor the loading and saving experience to your game.
Many settings can be tweaked directly from your Global Config Data Asset in the Save Game section. In addition you can implement and tweak the following features based on your needs:
Quick Saves
By default, quick saves and quick load are bound inside the IMC_EGUI_DemoInputs (EasyGameUI/DemoContent/Inputs)
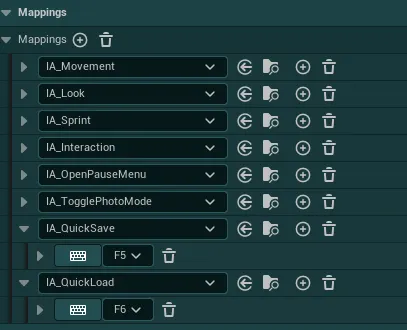
If you want to implement those in your Input Mapping Context you just need to add the IA_QuickSave and IA_QuickLoad with the keys of your choice. The default bindings I choose are F5 for saving and F6 for loading, no gamepad keys have been set up as it’s very unusual to have such features on a gamepad. Feel free to add any key you want.
Once this is done, quick saves and quick load features will be available without any other setup needed as long as this Input Mapping Context is active on your player controller
Important/Checkpoint Saves
You can use the important save trigger to easily set up saves in your level that will be triggered when the player overlaps with the trigger
To setup an important/checkpoint save trigger, go to the EasyGameUI/EasySaveGameUI/Core folder and look for the BP_ESGU_ImportantSaveTrigger
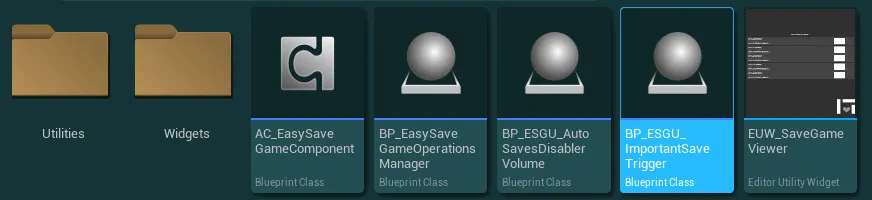
Once placed, you will find a few settings that you can change in the Details Panel
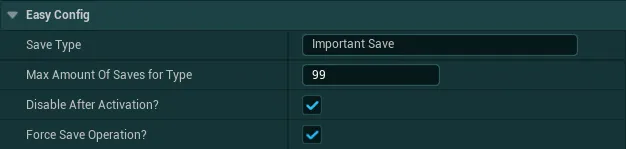
Save TypeThe Unique Name of the save type, “Important Save” by defaultMax Amount of Saves For TypeRestriction of the amount of saves that can be created for the specified type, if there are more saves than allowed, the oldest will be overwrittenDisable After ActivationCheck this box if you want this trigger to activate only once, if true this trigger won’t be triggerable ever again by the player even if reloading the world after a saveForce Save Operation?If True, the trigger will force the save operation even if saves are not allowed from the config
Auto Save Disabler Volume
Auto saves are enabled by default and can be configured through the Global Config, they will trigger on the defined time interval but you may want to disable auto saves in specific areas of your level (like a boss arena). You can use the Auto Saves Disabler Volume (a volume in which auto saves can’t be triggered) for this purpose:
To setup the volume, go to the EasyGameUI/EasySaveGameUI/Core folder and look for the BP_ESGU_AutoSavesDisablerVolume
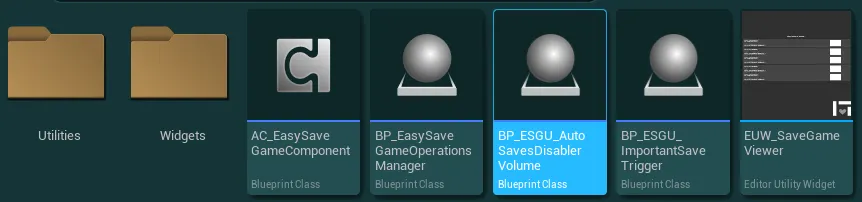
Then simply place it in your world and adjust the trigger box size to contain the desired area. Auto Saves will be disabled as soon as the player enters the volume and will be reenabled on exit (only if auto saves are enabled in the config)
Manually trigger saves or load
If you want to manually trigger a save or load at any time with code, you can do so with the following Game Instance functions
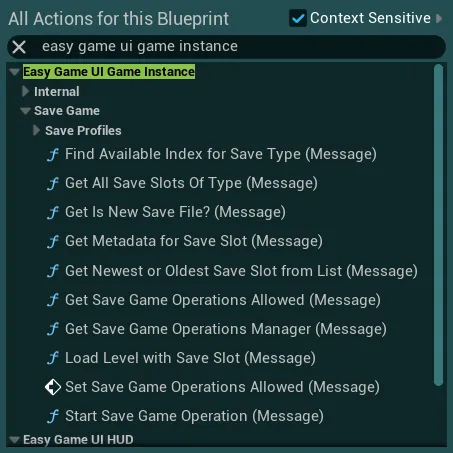
Some of the functions are simple helpers to retrieve a slot, know if the current save is a blank save file, etc. You can find more details about loading/saving in the following dropdowns
Saving to a save file
To save, you can first use the function Find Available Index for Save Type in order to retrieve an empty save slot
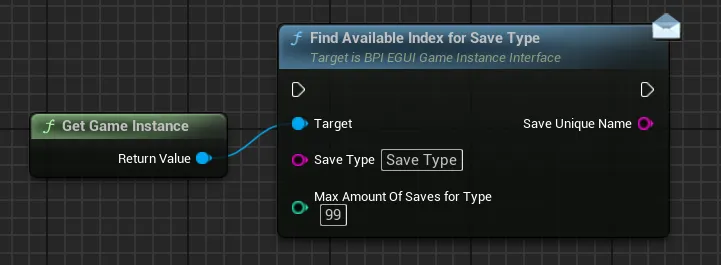
This function is needed to ensure that you won’t erase any previous save files (you can do so but at your own risks)
You just need to give it the Save Type (save unique name) you want and how many slots are allowed for this save type, if there are already more slots than allowed, the oldest will be overwritten
Once you know the target slot, you can use Start Save Game Operation function to trigger the actual save
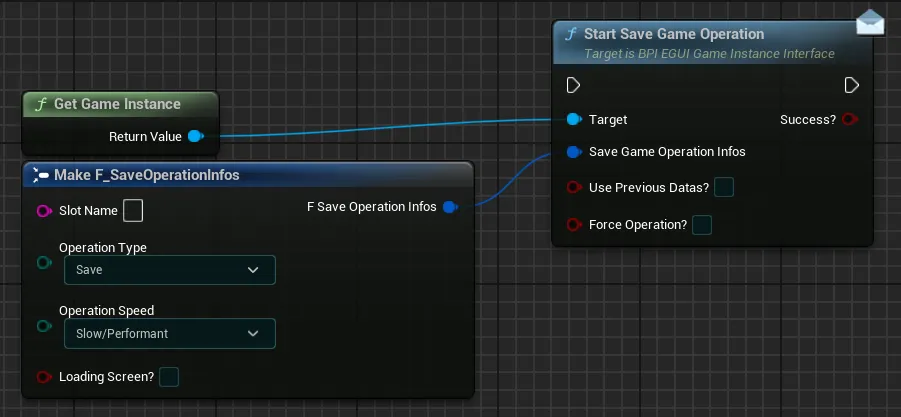
-
Slot NameThe name of the unique save slot given by the previous function or manually set -
Operation TypeIf you either want to load from or save to the given slot (Save in this case) -
Operation SpeedDefine which “speed” preset will be usedSlow/Performantis the most adequate for operations during live gameplay (such as auto saves)Mediumis adequate for live gameplay operations if the user is aware that some moderate amount of lag/stutters could happen (such as quick save)Instantis not adequate for live gameplay as it will most likely cause stutters or a prolongated freeze depending on how much there is to save/load. This type of operation should only be done inside a menu or behind loading screens
-
Loading Screen?Check this box if the operation should trigger a loading screen until its end (the user won’t have any control during the loading screen) -
Use Previous Datas?Most likely doesn’t need to be used, this boolean is used at begin play by the system to tell the game instance that it should check if there is anything to load -
Force OperationThis boolean allows to force the save/load even if they are disabled from the Config
Tip
You can chain multiple Start Save Game Operation nodes, they will be queued and executed one by one by the system. You can also combine a save and then a load
Loading a save file/level
If you wish to load a specific save file, you can first find it through the functions Get All Save Slots of Type and Get Newest or Oldest Save Slot from List
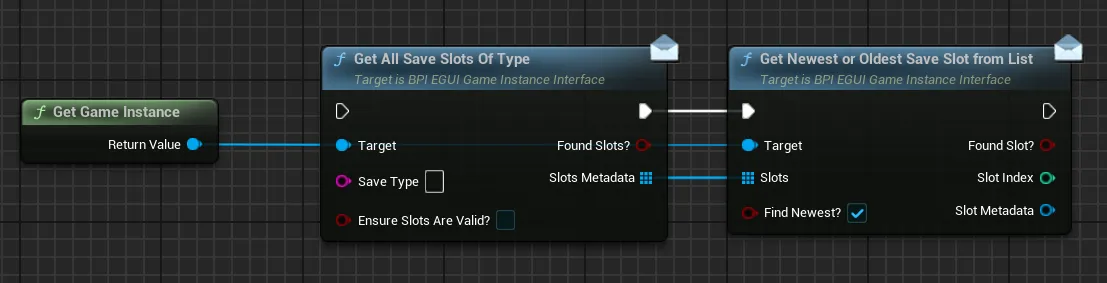
The first function allows you to retrieves all the slots that match the provided Save Type (or if empty, it will return all the available save slots). From there you can pass the list to the second function to find the newest or oldest slot in the list based on your needs.
You can obviously skip this step if you already know which slot you need to load or wish to only load a level without any slot.
You can then use the function Load Level with Save Slot for multiple purposes, either load a level without any slot (just with the loading screen logic, etc.), load a specified level with a save slot that has to be initialized on it, or load the level that is associated with the save slot (origin level in which the save was created)
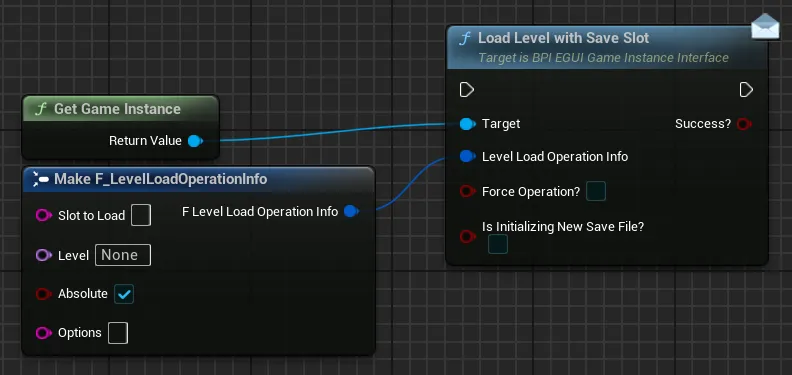
To do so, you can fill the variables in the following way:
Slot to LoadIf any slot is defined, the system will attempt to load it alongside the level. You can leave it empty if you just want to load a levelLevel & parametersName of the level to load, if it is empty, the system will take the level that is associated with the slot to loadForce OperationThis boolean allows to force the load even if they are disabled from the Config-
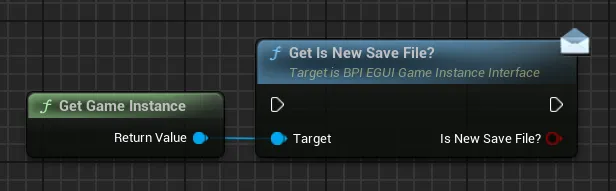
Is Initializing New Save File?If True, the system will consider this as a new save file so that you can do one-time initialization of your systems. This is automatically set when doing a "new game" from the Main Menu.You can retrieve this value from the
Get Is New Save File?function and use it at the begin play of your actors for example
Save Profiles
By default, the system doesn't use any save profiles which means the save files are stored directly in the SaveGames folder of your project. You can however use the profile system to cleanly organize saves into different folders for your player. To do so, you have a few game instance functions to your disposal:
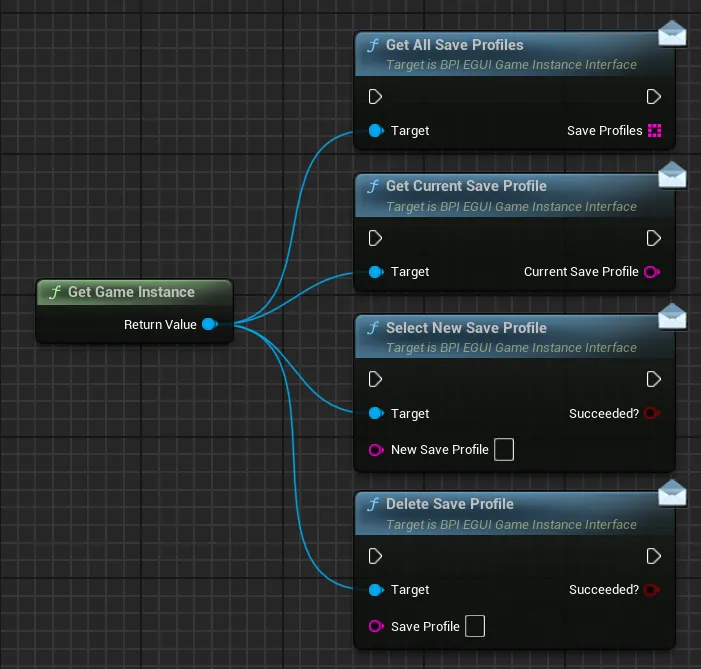
Get All Save ProfilesReturns all the valid save profiles that have been found (or empty if no profile is found)Get Current Save ProfileReturns the currently selected save profile (or empty if no profile is selected)-
Select New Save ProfileSelect a new save profile used by the system.Use with caution: Changing save profile should be done exclusively in a controlled environment, the player shouldn't be able to perform a save or load or access the save manager menu when the save profile is being switched. This should be performed exclusively in non-gameplay situations like a Main Menu.
Changing profile can cause a stutter depending on the amount of saves contained in the profile.
-
Delete Save ProfileDelete the given save profile if it exists
Additional Guides
Save Debugger Tool
The Save Debugger tool can allow you to easily read the content of a save file created with the system so that you can better understand any potential save issues you are encountering.
To open it, simply go to EasyGameUI/EasySaveGameUI/Core, right click on the EUW_SaveGameViewer and select Run Editor Utility Widget
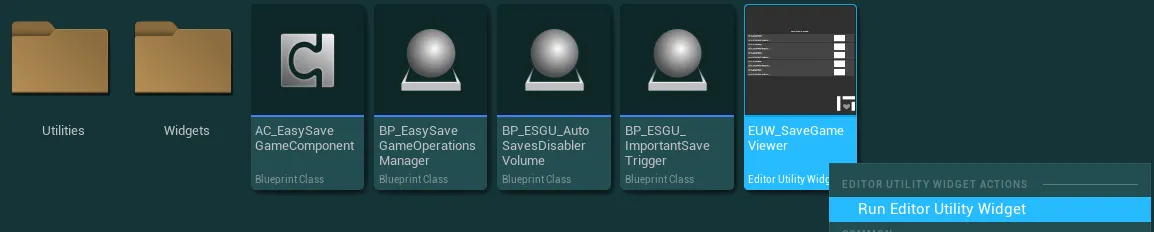
You will then simply find the list of all the created save files, you can select any to preview its content
In there, you will find a few sections with your actors data:
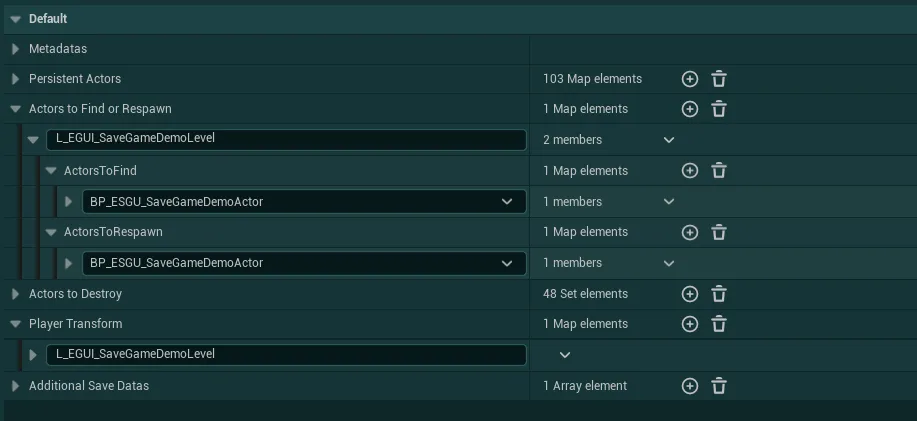
MetadatasMetadatas of the save file (name, date, playtime, etc.)-
Persistent ActorsList of all the presistent actors that are saved in this save file alongside their variables
-
Actors to Find or RespawnList of all the actors that are marked to find or respawn, the data for these is divided per-level and per actor class Actors to DestroyList of all the persistent actors that are marked for destructionPlayer TransformList of all the player transforms saved for each persistent level (if saving the player transform is enabled in the config)Additional Save DatasData from additional objects like the Game Instance
How to set custom display names
By default, the display name is the same as the unique name of the save file (which is the save type followed by a number, “Auto Save 2” for example), you can change that to add a custom unique name if you wish in the BP_EasySaveGameOperationsManager
-
To do so, open the
BP_EasySaveGameOperationsManagerblueprint and open theSaveCurrentMetadatasfunction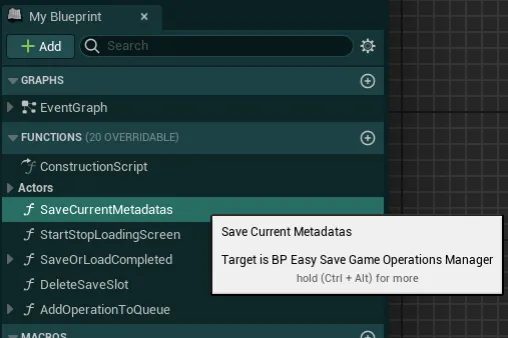
-
To set a custom display name per-file you simply need to remove the current connection to the
Save Display Namepin in theMake F_SaveGameMetadatasnode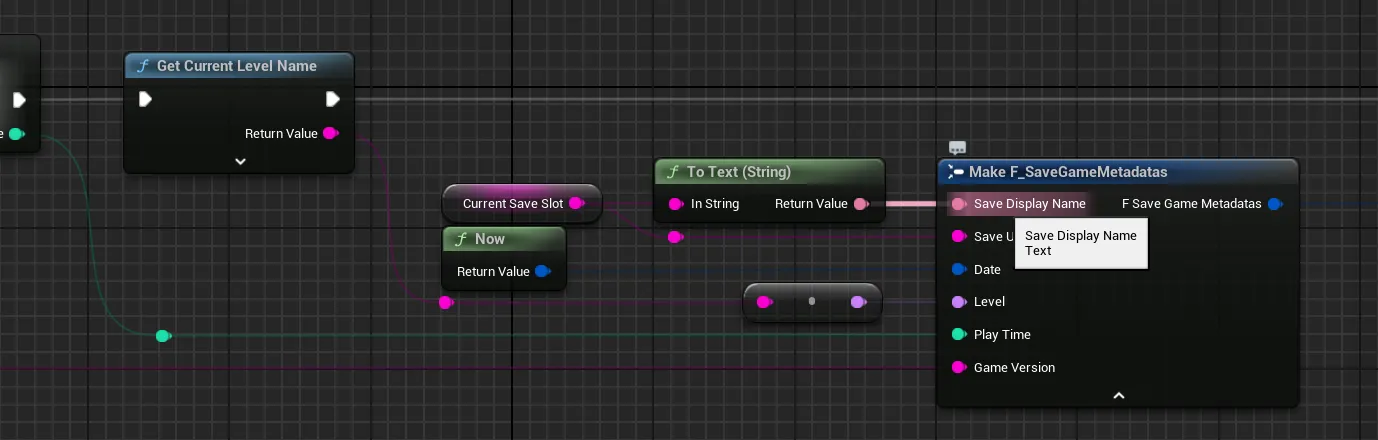
You can then input anything in here, it may be your level name if you wish, the name of the current story chapter or anything else. This function is executed each time a save operation is requested so that you can retrieve the value from anywhere you wish