Options Menu
The Options Menu system can be accessed from the provided Main Menu or Pause Menu. Some settings and part of the options menu may require additional setup to be fully working and integrated in your project, you can find all the necessary details in the following guides:
- Keybindings Settings Setup
- Graphics Settings Setup
- Gameplay Settings Setup
- Audio Settings Setup
- External Upscaling Setup (DLSS, FSR, XeSS)
- Benchmarking Tool Setup
Check out the Settings System Usage section for more details on how to add/remove new settings or use settings in any system other than the options menu.
Keybindings Settings Setup
Introduction Note
The key rebinding system provided by the asset uses the Unreal Engine Enhanced Input System. If you are still using the legacy deprecated inputs system, you will first need to convert your inputs to this new system. You can check out Unreal’s documentation to get started with Enhanced Inputs
An example of an Enhanced Input setup is available in the folder EasyGameUI/DemoContent/Inputs with the inputs being used in the BP_EGUI_DemoMainCharacter
-
To get started with the keybindings setup, you first need to configure which Input Mapping Contexts will be considered by the system and how grouping/conflicts should be handled.
To do so, open your Global Config Data Asset, you will then find the following relevant settings under the Options Menu section:

Keybinding Mapping ContextsThis variables defines the list of all the Input Mapping Contexts that will contain any rebindable inputs and you would like to be used in the Key Rebinding system. The text associated with each will be used as category name if grouping by Mapping Context-
Keybinding Mappings Grouping TypeThis variables defines how the keybindings are groupped when beind displayed inside the menuGroup by Mapping ContextWill group all the keybinds under a category defined by the input mapping contextGroup by Input CategoryWill group all the keybinds by each key's ownDisplay Category, regardless of the mapping context
-
Keybinding Mappings Conflict MethodThis variables defines how the keybindings conflicts should be handled by the systemConflicts by Input Mapping ContextOnly keys within the same input mapping context will conflict (regardless of display categories)Conflicts by CategoryOnly keys within the same display categories will conflict (regardless of Input Mapping Context) - Note that based on your input setup, this could create unwanted behaviors withing IMCs, consider using "Conflicts All" if suitableConflicts AllAll keys will be considered for conflicts (regardless of category or IMC), meaning no conflict will be allowed at all across all available keymappings
-
Once this is configured, open the Input Mapping Context(s) that you would like to be set up for rebinding
-
Then, for each key that you would like to appear in the keybindings setting (even if locked to the player), configure them with the following parameters described below
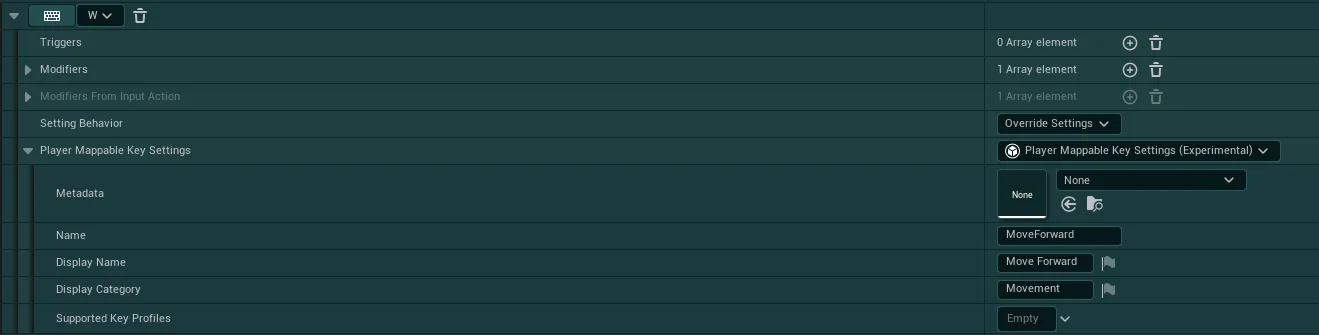
Setting BehaviorShould be set toOverride Settingsif the key needs to be visible in the settings,Ignore Settingsif it should be fully hiddenPlayer Mappable Key SettingsSimply selectPlayer Mappable Key Settingsin the dropdown for this variable-
NameMust be a fully unique name to describe the key. This name itself no real importance but it must be uniqueKeybind Modifiers
The system supports multiple "modifiers" that can be added to any given key to change its behavior. To add a modifier simply add
_ModifierNameto the end of your unique Name, the following modifiers are available:_SecondaryAny key with this modifier will be shown in a secondary slot (only supported for mouse/keyboard keys), it can be shown alongside a primary keybind in the same mapping_LockedAny key with this modifier will be displayed in the UI, but it won't be manually rebindable by the player_AllowConflictsAny key with this modifier will ignore all conflicts, this means any other keybinds is allowed to have the same key as this one_HoldAny key with this modifier will be shown as an "Hold" key, this doesn't modify the way the key rebinding works, only the visual of the key changes
You can combine any modifiers, for example:
MoveForward_Hold_LockedorMoveForward_AllowConflicts_Secondaryetc. -
Display NameThe name you wish to display in the UI, you can reuse the same text as other keys for this one, up to 3 keys can share a single Display Name (2 Mouse/Keyboard keys and 1 Gamepad Key), in which case they will be shown together in a single keybindings setting Display CategoryIf choosing to sort by key category inside the Global Config, this will be the category under which the key will be displayed- You can then ignore any settings that I did not mention
Graphics Settings Setup
Out of the box the system provides a full array of Graphics Settings that will work without any additional set up required. The following instructions are only recommendations that would improve the system when applied to your project.
Improved Graphics scalability settings
Unreal Engine has a default set of scalability rules to define all graphics settings (shadows, lighting, textures, etc.) but those can often be extreme especially on lower settings (like disabling shadows entirely on Low).
To improve this, you can use the following scalability that provides more "reasonable" settings even on low/medium graphics.
To use it, simply open your file explorer, go inside the Config folder of your project and create a DefaultScalability.ini file.
Then, copy the following text and paste it inside the created file:
;-----------------------------------------------------------------------------------------------------------------

[ViewDistanceQuality@0]
r.ViewDistanceScale=0.5

[ViewDistanceQuality@1]
r.ViewDistanceScale=0.65

;-----------------------------------------------------------------------------------------------------------------

[PostProcessQuality@0]
-r.MotionBlurQuality=0
r.MotionBlur.HalfResGather=1
r.AmbientOcclusionMaxQuality=40
r.DepthOfFieldQuality=1
r.Tonemapper.Quality=2

r.DOF.Gather.ResolutionDivisor=2 ; lower gathering resolution
r.DOF.Gather.AccumulatorQuality=0; lower gathering accumulator quality
r.DOF.Gather.PostfilterMethod=2  ; Max3x3 postfilering method
r.DOF.Gather.EnableBokehSettings=0   ; no bokeh simulation when gathering
r.DOF.Gather.RingCount=3 ; low number of samples when gathering
r.DOF.Scatter.ForegroundCompositing=0; no foreground scattering
r.DOF.Scatter.BackgroundCompositing=0; no foreground scattering
r.DOF.Recombine.Quality=0; no slight out of focus
r.DOF.TemporalAAQuality=0; faster temporal accumulation
r.DOF.Kernel.MaxForegroundRadius=0.005   ; required because low gathering and no scattering and not looking great at 1080p
r.DOF.Kernel.MaxBackgroundRadius=0.005   ; required because low gathering and no scattering and not looking great at 1080p

[PostProcessQuality@1]
-r.MotionBlurQuality=3
r.MotionBlur.HalfResGather=1
r.LensFlareQuality=1
r.FastBlurThreshold=3
r.Tonemapper.Quality=4

[PostProcessQuality@2]
-r.MotionBlurQuality=3
r.MotionBlur.HalfResGather=0
r.FastBlurThreshold=7

[PostProcessQuality@3]
-r.MotionBlurQuality=4
r.MotionBlur.HalfResGather=0

;-----------------------------------------------------------------------------------------------------------------

[AntiAliasingQuality@0]
r.FXAA.Quality=1
r.TemporalAA.Quality=1
r.TSR.RejectionAntiAliasingQuality=1

[AntiAliasingQuality@1]
r.FXAA.Quality=2

;-----------------------------------------------------------------------------------------------------------------

[ShadowQuality@0]
r.LightFunctionQuality=1
r.ShadowQuality=2
r.Shadow.CSM.MaxCascades=2
r.Shadow.MaxCSMResolution=1024
r.Shadow.DistanceScale=0.65
-r.VolumetricFog=0
r.LightMaxDrawDistanceScale=0.25
r.CapsuleShadows=1
r.Shadow.Virtual.SMRT.RayCountDirectional=2
r.Shadow.Virtual.SMRT.RayCountLocal=2

[ShadowQuality@1]
r.Shadow.CSM.MaxCascades=2
r.Shadow.DistanceScale=0.75
r.Shadow.CSM.TransitionScale=0.3
-r.VolumetricFog=0
r.Shadow.Virtual.MaxPhysicalPages=1024

[ShadowQuality@2]
r.ShadowQuality=4
r.Shadow.DistanceScale=0.9
-r.VolumetricFog=1
-r.VolumetricFog.GridPixelSize=16
-r.VolumetricFog.GridSizeZ=64
-r.VolumetricFog.HistoryMissSupersampleCount=4

[ShadowQuality@3]
-r.VolumetricFog=1
-r.VolumetricFog.GridPixelSize=8
-r.VolumetricFog.GridSizeZ=128
-r.VolumetricFog.HistoryMissSupersampleCount=4

;-----------------------------------------------------------------------------------------------------------------

[GlobalIlluminationQuality@0]
r.DistanceFieldAO=1
r.AOQuality=1
r.SSGI.Quality=1

[GlobalIlluminationQuality@1]
r.SSGI.Quality=2

[GlobalIlluminationQuality@2]
r.SSGI.Quality=3

[GlobalIlluminationQuality@3]
r.SSGI.Quality=4

;-----------------------------------------------------------------------------------------------------------------

[ReflectionQuality@0]
r.SSR.Quality=2

[ReflectionQuality@3]
r.Lumen.TranslucencyReflections.FrontLayer.Enable=1

;-----------------------------------------------------------------------------------------------------------------

[TextureQuality@0]
r.Streaming.MipBias=2
r.Streaming.MaxNumTexturesToStreamPerFrame=2
r.Streaming.Boost=0.5
r.MaxAnisotropy=2
r.Streaming.PoolSize=500

[TextureQuality@1]
r.Streaming.PoolSize=750

[TextureQuality@2]
r.Streaming.PoolSize=1000

[TextureQuality@3]
r.Streaming.PoolSize=1500

;-----------------------------------------------------------------------------------------------------------------

[EffectsQuality@0]
r.SSS.Scale=0.5
-r.SSGI.Quality=0
r.EmitterSpawnRateScale=0.15

[EffectsQuality@1]
-r.SSGI.Quality=1
r.EmitterSpawnRateScale=0.3

[EffectsQuality@2]
r.DetailMode=2
-r.SSGI.Quality=2
r.EmitterSpawnRateScale=0.6

[EffectsQuality@3]
r.MaterialQualityLevel=3 ; High quality
-r.SSGI.Quality=3

;-----------------------------------------------------------------------------------------------------------------

[FoliageQuality@0]
foliage.DensityScale=0.3
grass.DensityScale=0.3

[FoliageQuality@1]
foliage.DensityScale=0.6
grass.DensityScale=0.6

;-----------------------------------------------------------------------------------------------------------------
Feel free to tweak these scalability settings to your specific game needs, for reference you can find the engine default scability in the following file:
[UE Install Folder]\Engine\Config\BaseScalability.ini
Apply a Graphic Preset on first game launch
Most of the time, Unreal Engine will usually default to use the Epic/Ultra graphics preset when first launching a game, which may be a poor experience on lower-end hardware.
To help with this issue, the system has a built-in parameter in the Global Config that you can tweak to apply a specific preset of your choice on first launch.

Gameplay Settings Setup
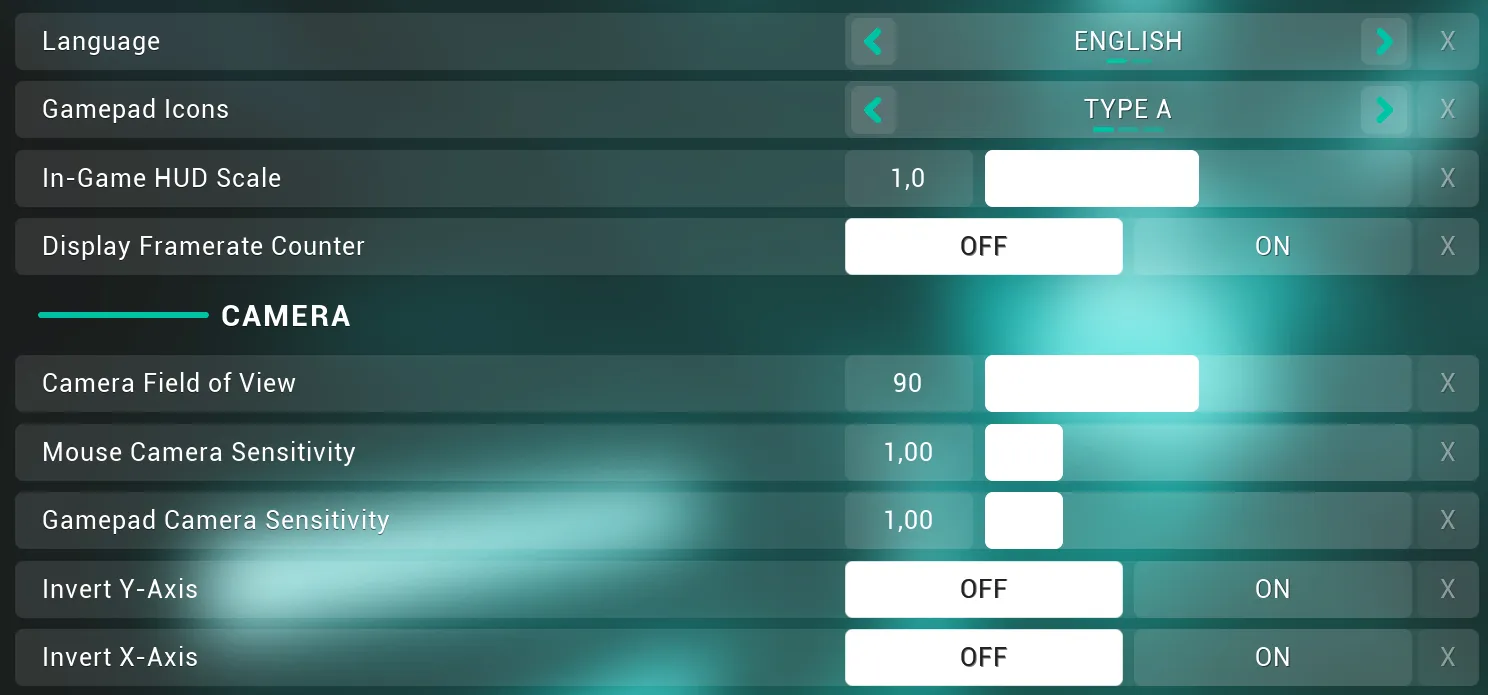
Out of the box the options menu provides several gameplay options, some of which will work automatically depending on your project setup and others that require a quick additional setup that is described in this section
Language
The Language Setting will work automatically with the built-in Localization Dashboard tool provided by Unreal Engine, any language set up in this tool will be displayed in the options menu for the user to choose without any additional setup required.
Gamepad Icons
The Gamepad Icons setting allows the user to select which gamepad brand the input icons should be using, no setup is required for this setting, it will work out of the box.
If you wish to change the default gamepad brand applied to the game, you can do so in your Global Styling Data Asset with the Default Gamepad Keys Brand setting
HUD Scale & Framerate Counter
The HUD Scale & Framerate Counter settings don't require any additional set up aside from setting up any of your HUD logic with the HUD Building Toolkit.
- The HUD Scale will apply globally to all modules displayed with the system.
- The Framerate Counter will not require any additional setup aside from having a
Framerate Counter Modulein your Modules configuration (which is already set up for the Default Modules configuration)
Camera Field of View
The Field of View setting should work automatically without additional set up, but in some situations it might apply the FOV to an incorrect gameplay camera.
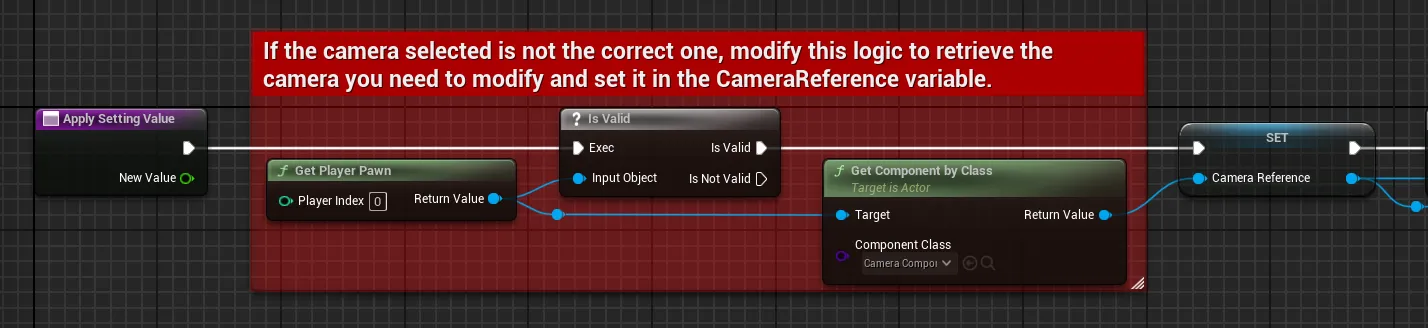
If you notice this issue, open the blueprint BP_SettingCameraFOV in EasyGameUI/EasyOptionsMenu/Core/SettingManagers/GameplaySettings
Then in the Apply Setting Value function, replace the logic in the red comment with your own logic to retrieve the correct gameplay camera from your character
Sensitivity & Camera Inversion
The gameplay options for mouse and gamepad camera use Enhanced Input Modifiers to apply to your input mapping context and modify the inputs with the requested sensitivity and camera inversion settings. You can see an example of this setup in the IMC_EGUI_DemoInputs (EasyGameUI/DemoContent/Inputs)
- To apply those, simply open the Input Mapping Context that contain your camera inputs
-
Then, in your “Look” inputs, add the corresponding
Modifiers:Mouse Sensitivityfor mouse inputs andInvert XAxisorInvert YAxisbased on the mouse axis you have set.If you are using a single
Mouse XY 2D-Axis, then simply add the Mouse Sensitivity modifier and both theInvert XAxis&Invert YAxismodifiers to that input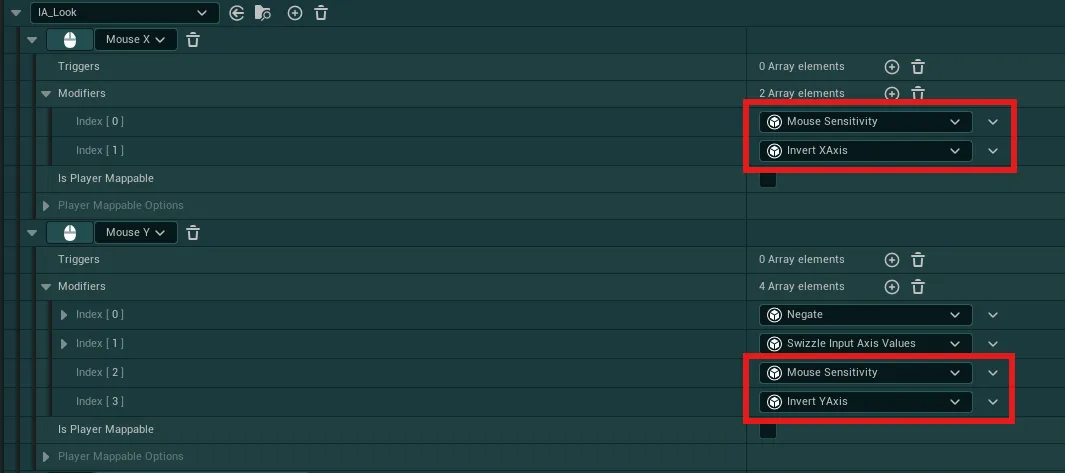
-
Repeat for any gamepad inputs but with the
Gamepad Sensitivityinstead of Mouse Sensitivity. Same instructions apply for theInvert XAxis&Invert YAxis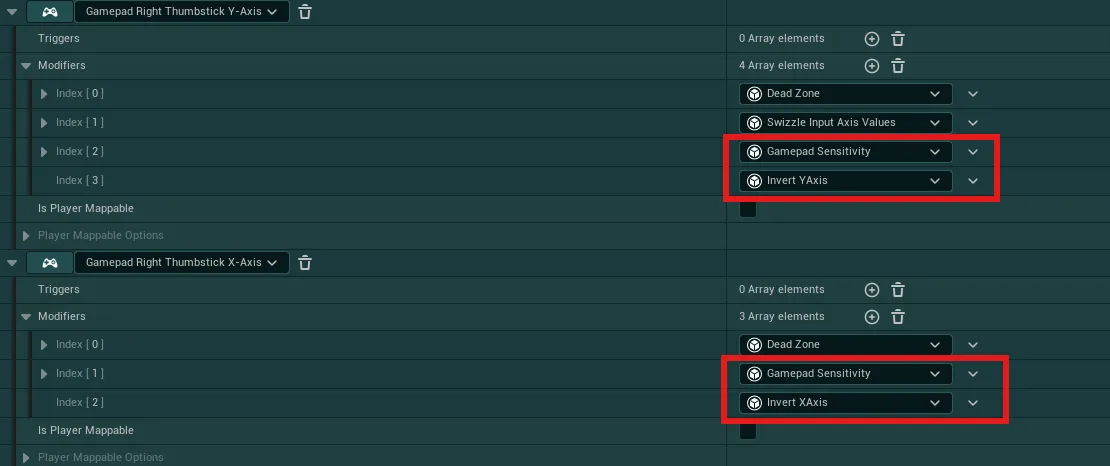
Audio Settings Setup
To setup the audio settings in your project you can either use the audio classes provided by the pack, or implement your own classes in the system
Using the provided audio sound classes
-
Go into the project settings
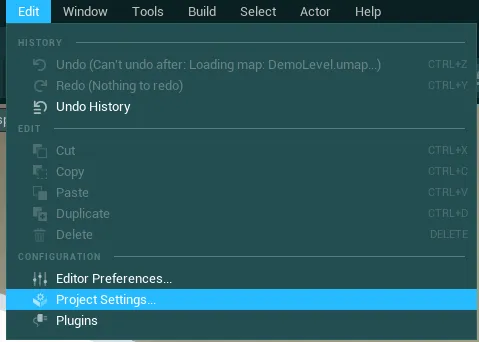
-
Under “Engine”, search for the
Audiocategory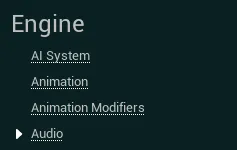
-
Now fill in the provided sound classes for the
Default Sound Class,Media Sound Class,Default Base Sound Mixwith the following values:SC_EGUI_MasterAudiofor the first two,SCM_EGUI_MasterMixfor the sound mix like on the image below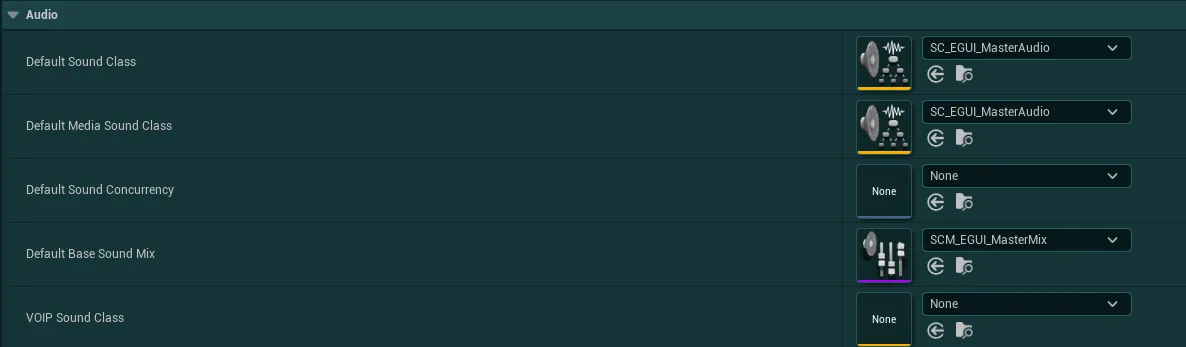
-
Then, go inside your Global Config Data Asset and locate the setting
Game Audio Classes, populate it with the corresponding values (SC_EGUI_MasterAudioinMaster, etc. You can also find this setup inside the Demo Config Data Asset)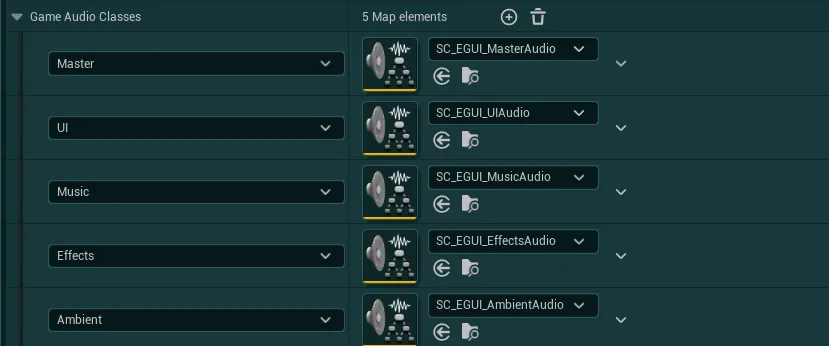
-
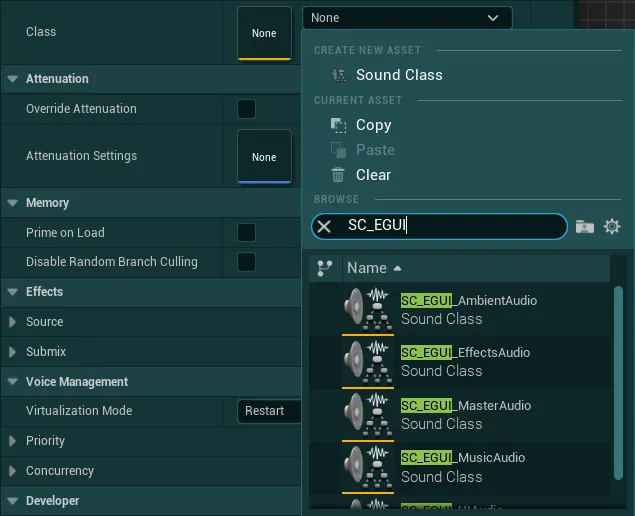
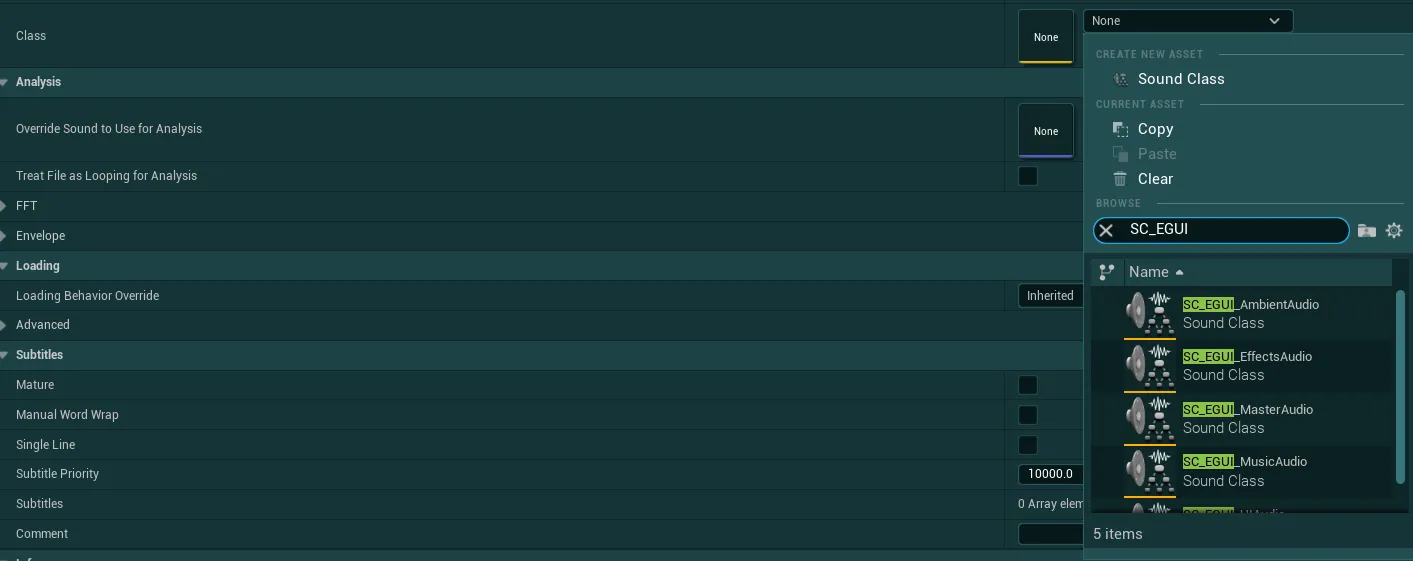
You then need to set the correct audio category for each sound wave/sound cue asset that you are using in your project.
To do this, in a Sound Wave asset or Sound Cue, search forClassunder the Sound Category and select one of the provided sound classes:SC_EGUI_EffectsAudio/SC_EGUI_MusicAudio/SC_EGUI_UIAudio/SC_EGUI_AmbientAudioIn a Sound Cue Asset
In a Sound Wave Asset
Using your own sound classes
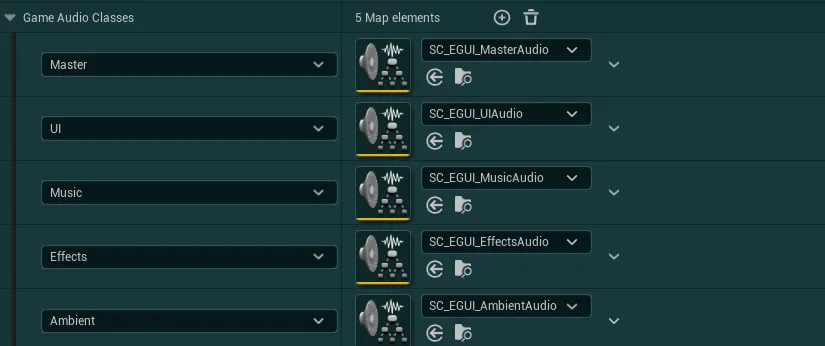
- In order to use your own audio classes, you simply have to go inside your Global Config Data Asset and locate the setting
Game Audio Classes -
Once found, populate each category with the corresponding audio class from your system, here is an example using the demo sound classes that can also be seen inside the Demo Config Data Asset
-
The audio classes will now be controlled by the setting with the corresponding name inside the options menu. Check out the section just after if you wish to add new classes
Adding new sound classes/audio settings
If you wish to register new sound classes in the system, either existing custom classes or new classes alongside those provided by the pack, you can do the following:
-
If you are using the provided master sound class (
EasyGameUI/Core/Audio/SC_EGUI_MasterAudio), open it then drag a wire from “Children” to an empty space on the graph Type the name for this new class then press Enter. This will automatically generate a new sound class in the same folder as the master.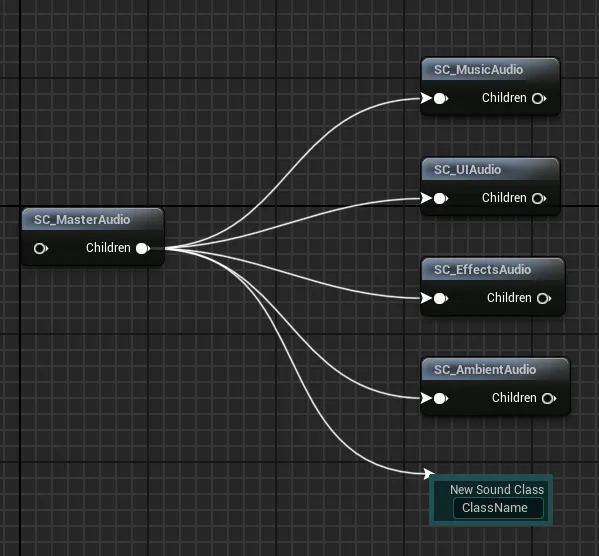
-
Then, open the enumeration
E_AudioClasseslocated in theEasyGameUI/EasyOptionsMenu/Datas/folder -
Add a new item with the
Add Enumeratorbutton then give it a name in the newly generated field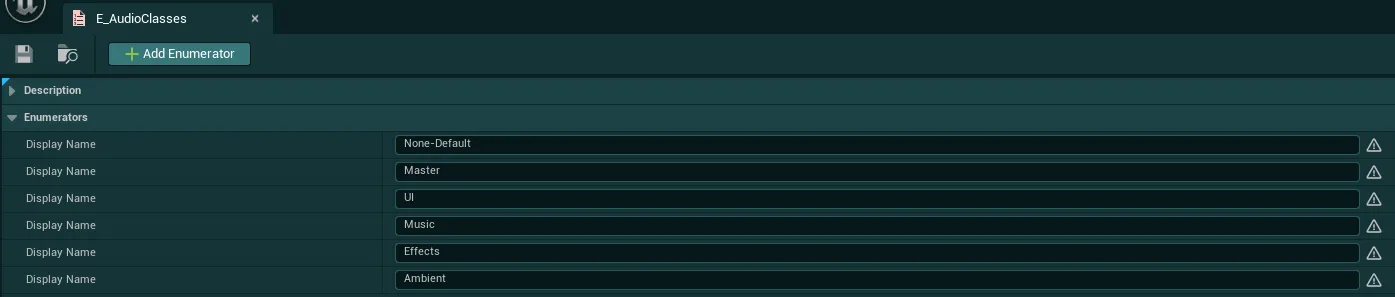
-
Then, go in the folder
EasyGameUI/EasyOptionsMenu/Core/SettingsManagers/AudioSettingsand duplicate any of the blueprint in it likeBP_SettingAudio_Master(Right Click > Duplicate or Ctrl + D)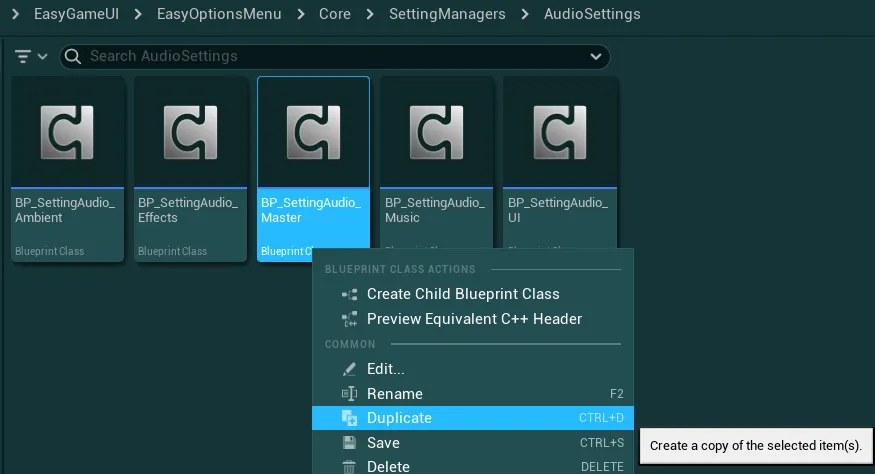
-
Give this new blueprint a name of your choice and open it, you will see the following parameters in the Details panel
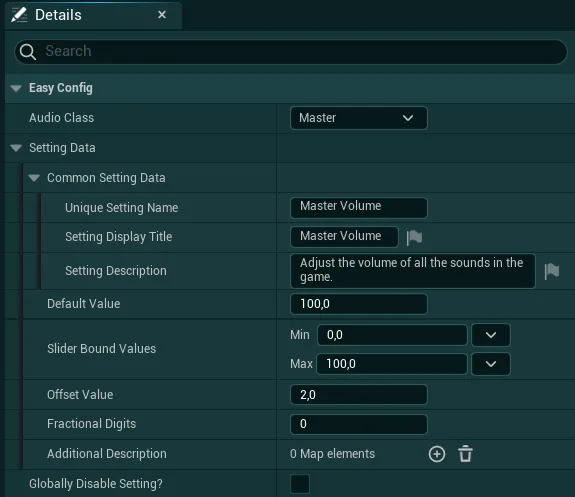
Audio ClassFirst select your created audio enum value in the dropdown of this variableSetting DataThen configure the setting to your liking (display name, description, values, etc.). Those will be used by the setting widget in the UI
-
Then, we simply need to add a widget for this setting in the
WBP_EasyOptionsMenuMain(EasyOptionsMenu/Core/) -
In the Hierarchy of the widget, search for any of the
Audio Setting(such asAmbient Audio Settingwhich I will use as example) then duplicate it (Ctrl+D)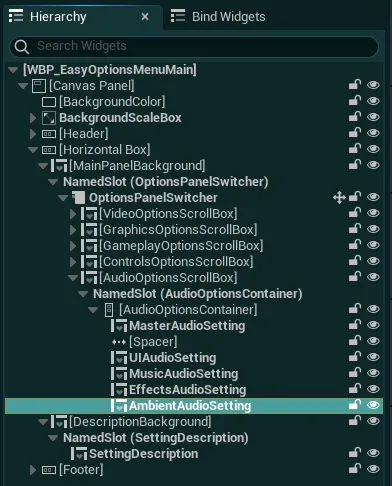
-
Give this widget a proper name and simply select the blueprint you just created in the
Setting Managervariable under theEasy Configcategory.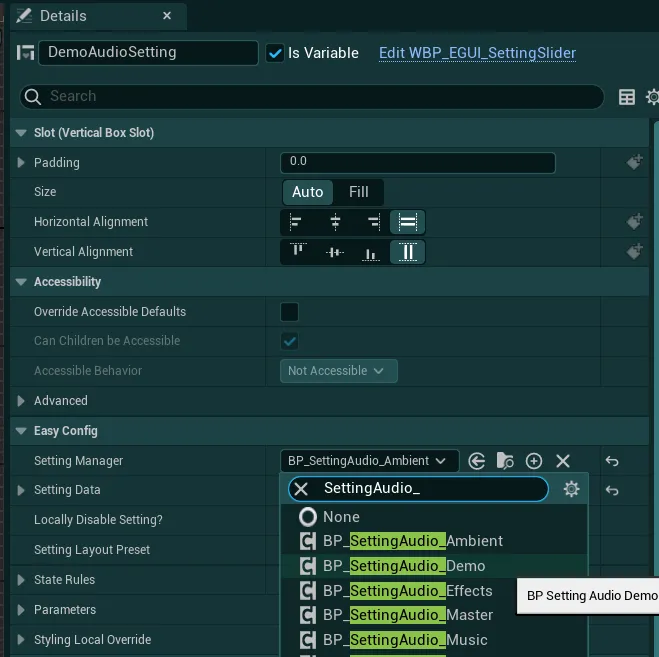
You don’t need to change anything else, the setting should be properly set up
-
Finally, we just need to reference the new audio class and setting in the Global Config to be registered properly by the system.
-
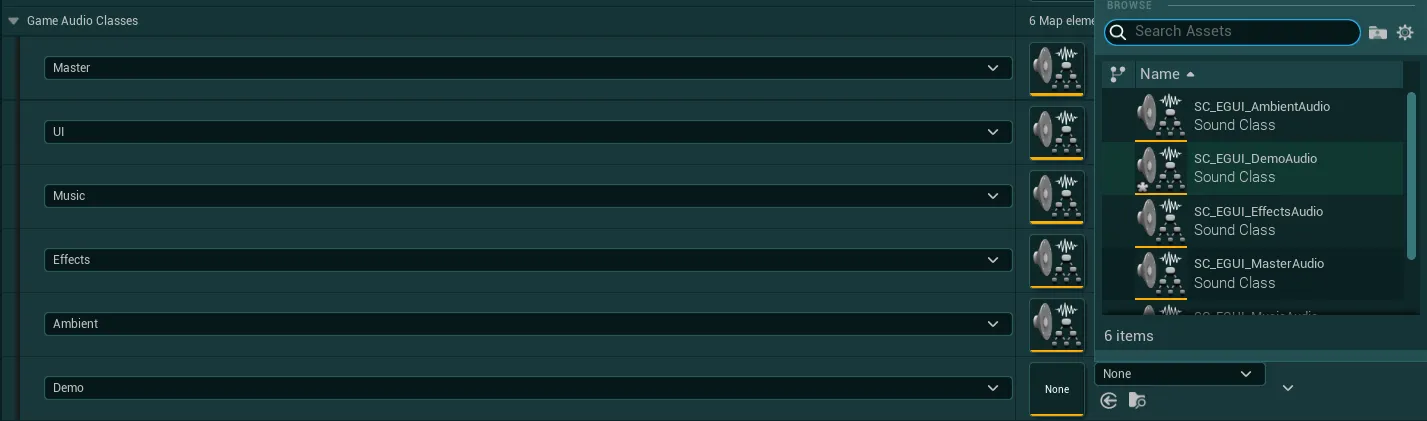
Open your Global Config data asset and in the variable
Game Audio Classes, add a new entry with the+button.Then in the dropdown of the new entry, select the enum value you added earlier and select the associated audio class
-
Lastly, locate the
Settings Listvariable and add the newly createdBP_SettingAudioblueprint class in it
-
Now compile and save all the edited blueprints and you are done!
External Upscaling Setup (DLSS, FSR, XeSS)
To setup the external upscaling solutions you will first need to download and import each plugin in your project
The following are the minimum versions I tested and validated for the indicated version of the pack. Older versions might work but I recommend always using the latest version for each plugin.
| Pack Version | Nvidia DLSS | AMD FSR | Intel XeSS |
|---|---|---|---|
| 3.0 | 8.1.0 | 4.0.3a | 3.0.1 |
Plugins Availability
All the plugins might not always be available for the every version of Unreal Engine, if a plugin is not available, please check back a few weeks later to see if it was updated or not, I have no control over the release of these third-party plugins.
In case not all plugins are available, the system provides a way of enabling only specific plugins as shown in the following instructions.
Plugins Installation
The following instructions will help you install each plugin in your project, you can install the plugins of your choice as you will then be able to only activate some specific plugins to be used by the system.
Nvidia DLSS Installation
- Download Link: https://developer.nvidia.com/rtx/dlss/get-started
-
Scroll down to the
DLSS in Unreal Engine 5section and download the version that correspond to your Unreal Engine version.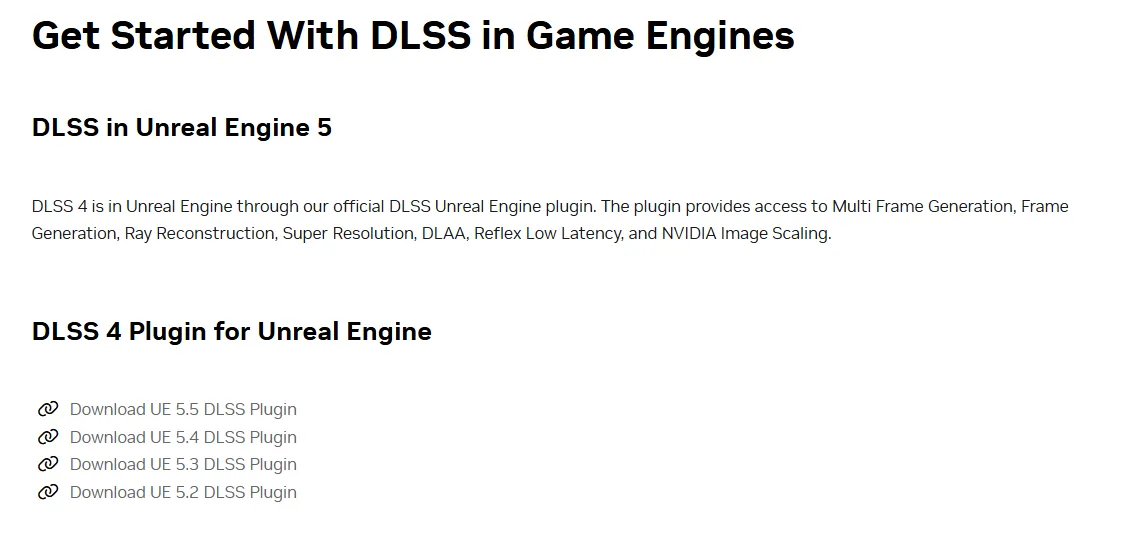
-
Extract the .zip file that you downloaded
-
Among the extracted files, look for the
Pluginsfolder
-
Inside the
Pluginsfolder, copy theDLSSand theStreamlineNGXCommonfolders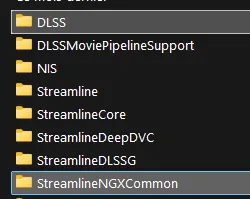
-
Then, go to your project folder & paste the copied folder inside the
Pluginsfolder (create one if it doesn’t exist)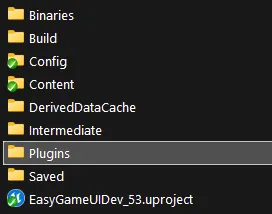
AMD FSR Installation
- Download Link: https://gpuopen.com/learn/ue-fsr/
-
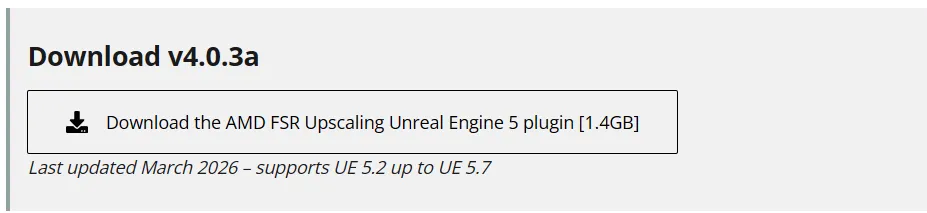
Click on the download button, it will start the download for all available Unreal versions
-
Extract the .zip file that you downloaded
-
Among the extracted files, look for the folder matching you engine version (530 = 5.3 / 540 = 5.4, etc)
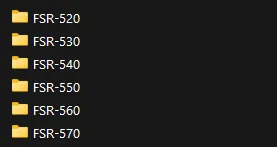
-
Inside the folder of your version, copy the
FSRfolder (only this one)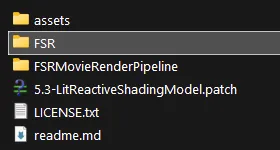
-
Then, go to your project folder & paste the FSR3 folder inside the
Pluginsfolder (create one if it doesn’t exist)
Intel XeSS Installation
- Download Link: https://github.com/GameTechDev/XeSSUnrealPlugin/releases
-
In the latest release, click on the download link for the version that match your Unreal Engine version
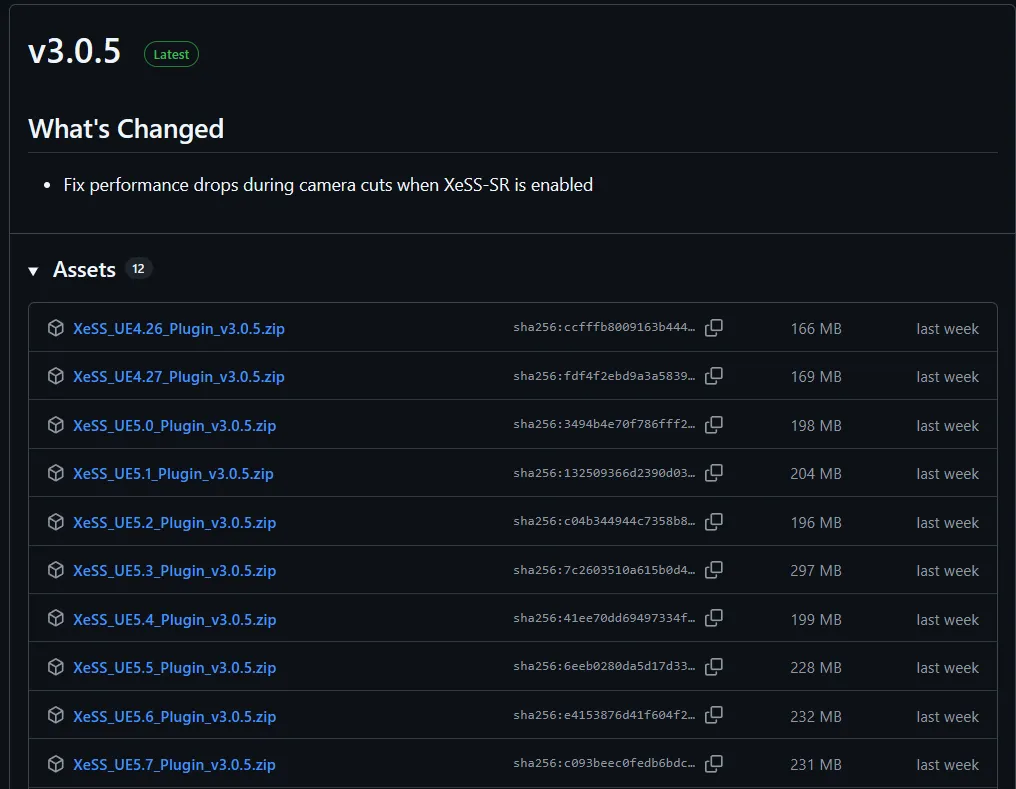
-
Extract the .zip file that you downloaded
-
Place all the extracted content inside a single folder and copy this new folder
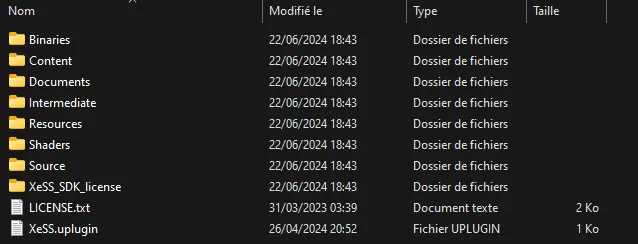
-
Then, go to your project folder & paste the newly created folder inside the
Pluginsfolder (create one if it doesn’t exist)
Project Setup
- First, restart your Unreal Project if you did not close it before installing the plugins
-
Then, if you installed the AMD FSR plugin, go to
Edit>Project Settings, typeFrame Generationand make sure that theFrame Generation Enabledsettings is unchecked (false)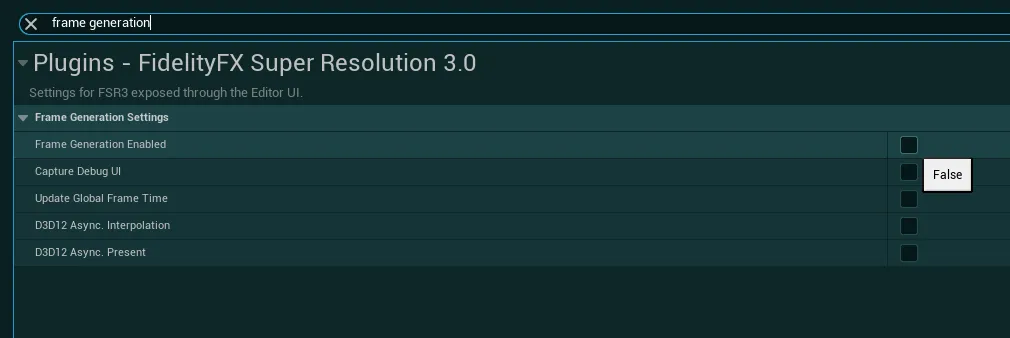
-
Then, go to the
EasyGameUI/Core/Utilitiesfolder, open theBPFL_EGUI_EasyFunctionUtilitiesblueprint and open theGet Supported Upscaling Methodsfunction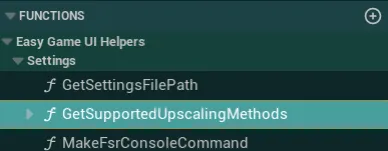
-
In this function, simply connect the nodes for the installed plugins only
For example, if you only installed DLSS, only connect theEnable DLSS Supportnode and leave the others disconnected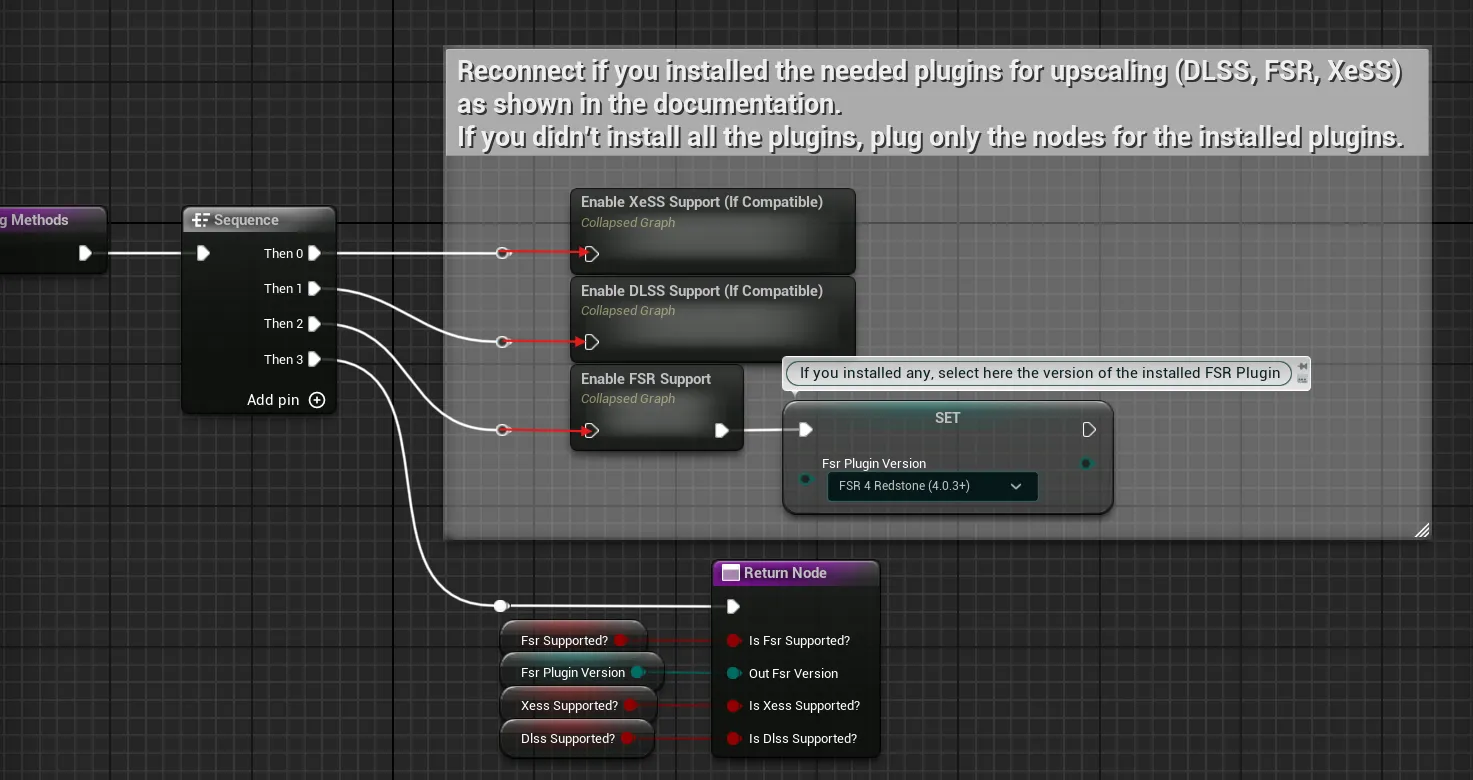
FSR Version Selection
If you are using an older version of the FSR plugin (3.X, 4.0.0), you can select the installed version in the variable
FSR Plugin Version. This is required due to changes made by AMD in the plugin code, which makes those versions non-compatible between each other without explicitely selecting it.Leave it at the default value
FSR 4 Redstoneif you just downloaded the most recent version. -
Compile, save and you are done!
Additional Guides for Upscaling
Considerations for testing
-
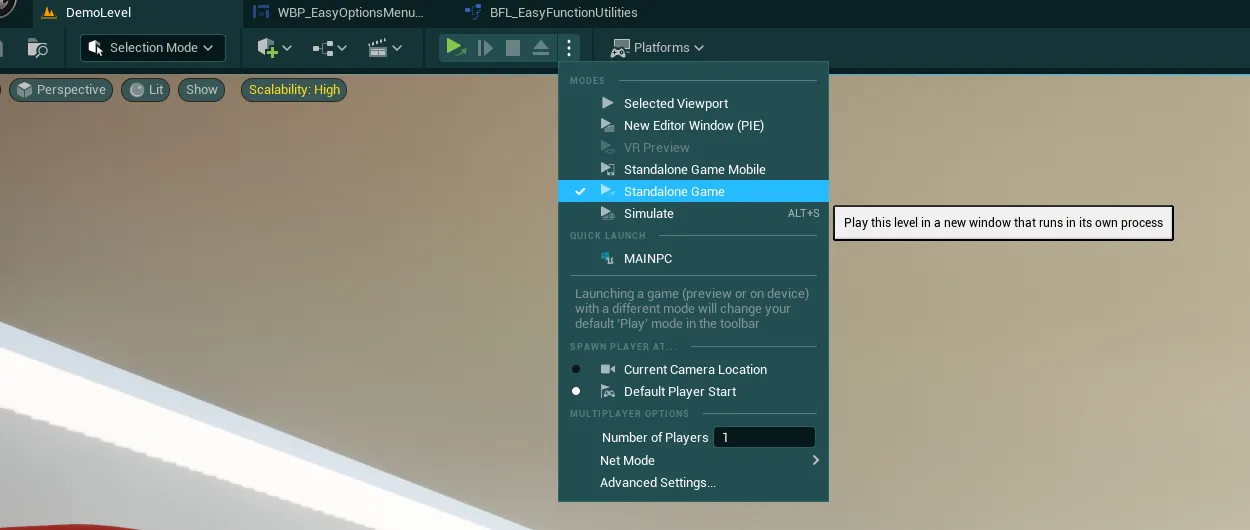
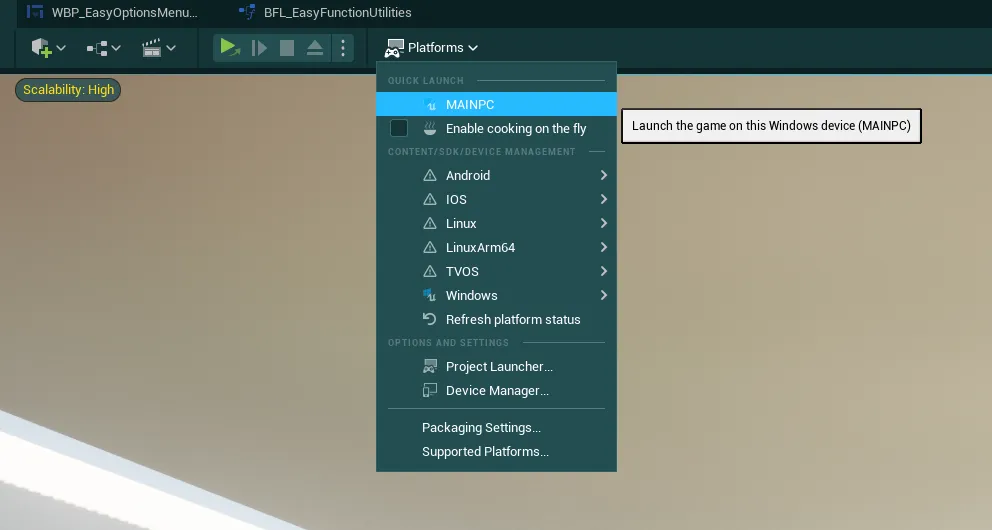
To properly test the upscalings, you will need to play in Standalone Game mode / Quick Launch mode / Packaged Build. Testing in Play In Editor (PIE) will not represent the proper functionnality
-
If all 3 options don’t appear inside the menu it can be because your hardware is not compatible. Nvidia DLSS only works on Nvidia RTX GPUs. Intel XeSS and AMD FSR should work on most modern GPUs
- Everything should mostly work out-of-the-box but for an optimal implementation or if you notice any weird/inconsistent behavior, please refer to the documentation of each plugin
Fix possible package compilation errors
This issue is most likely to appear with the FSR plugin in UE 5.6+
If you encounter compilation errors (blocking errors, not warnings) during packaging related to any of the upscaling plugins, try to move the plugin installation into the engine folder:
- First, locate where you installed the Unreal Engine version you are using
-
Then, go to the folder
Engine/Plugins/Marketplace. If you don’t have this folder in the Plugins folder, simply create a new folder and name itMarketplace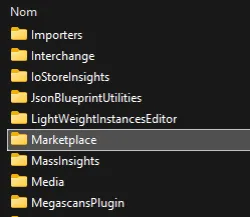
-
Then, from the plugins that you had installed inside your project, move the plugin that is causing errors (FSR, DLSS or XESS) to this Marketplace folder (removing it entirely from the project)
-
Once this is done, reopen your project and make sure that the plugin is still enabled by going into
Edit>Pluginsthen searching for the plugin you moved and checking that it is still enabled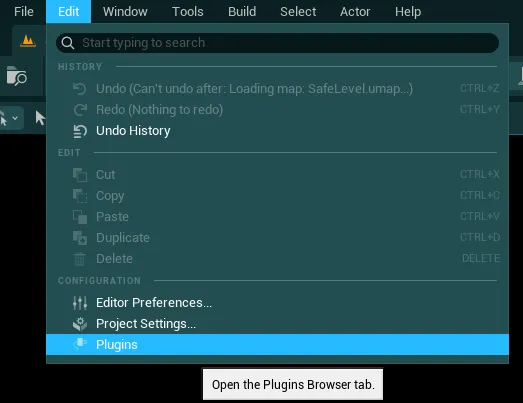

How to change the game default Upscaling/AA Method
The system will use Nvidia DLSS as default upscaling/AA method (if the plugin is available). Check out the following instructions if you wish to change this default
- Go to
EasyGameUI/EasyOptionsMenu/Core/SettingManagers/VideoSettingsand open the blueprintBP_SettingUpscalingMethod -
In this blueprint, locate the function
Initialize Custom Setting Dataand you should see a variableDefault Requested Upscalerat the begining of it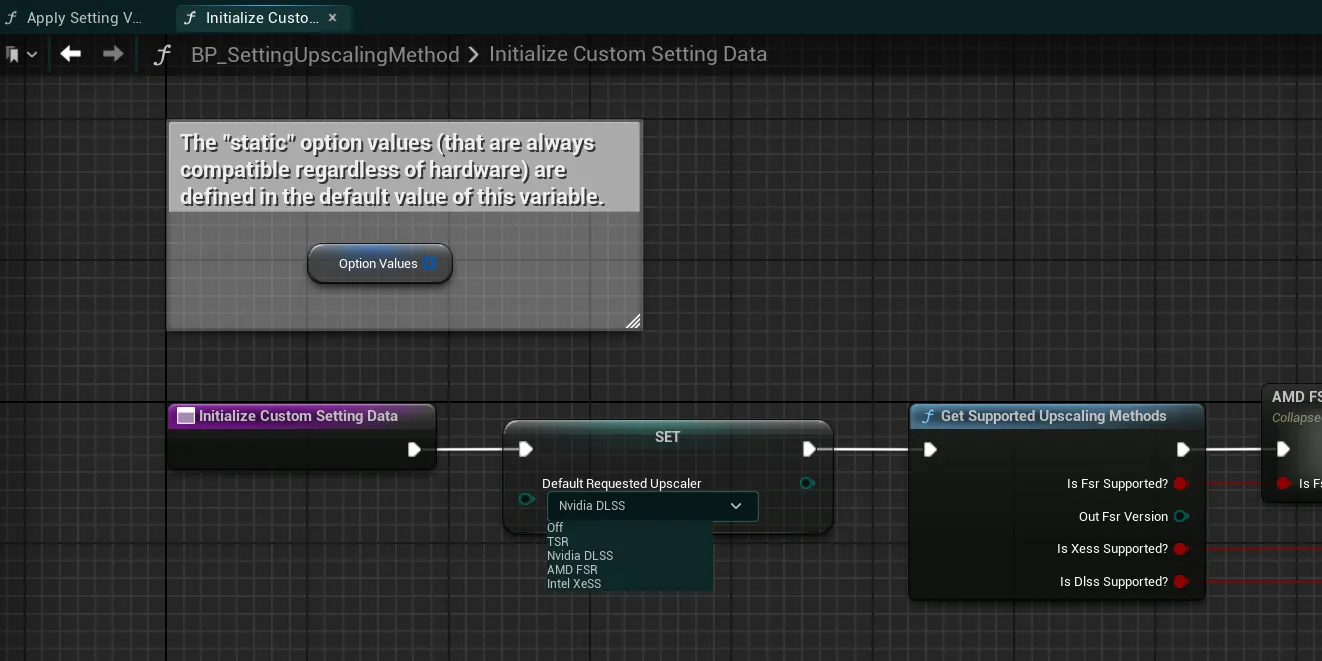
-
In the dropdown of this variable, simply select the system you wish to use as default (note that the related plugin has to be installed, the system may fallback to another upscaler if the selected one is not compatible with the user hardware)
-
Then, simply replicate the same steps in the blueprint
BP_SettingAntiAliasingMethod, this time to select theDefault Requested AA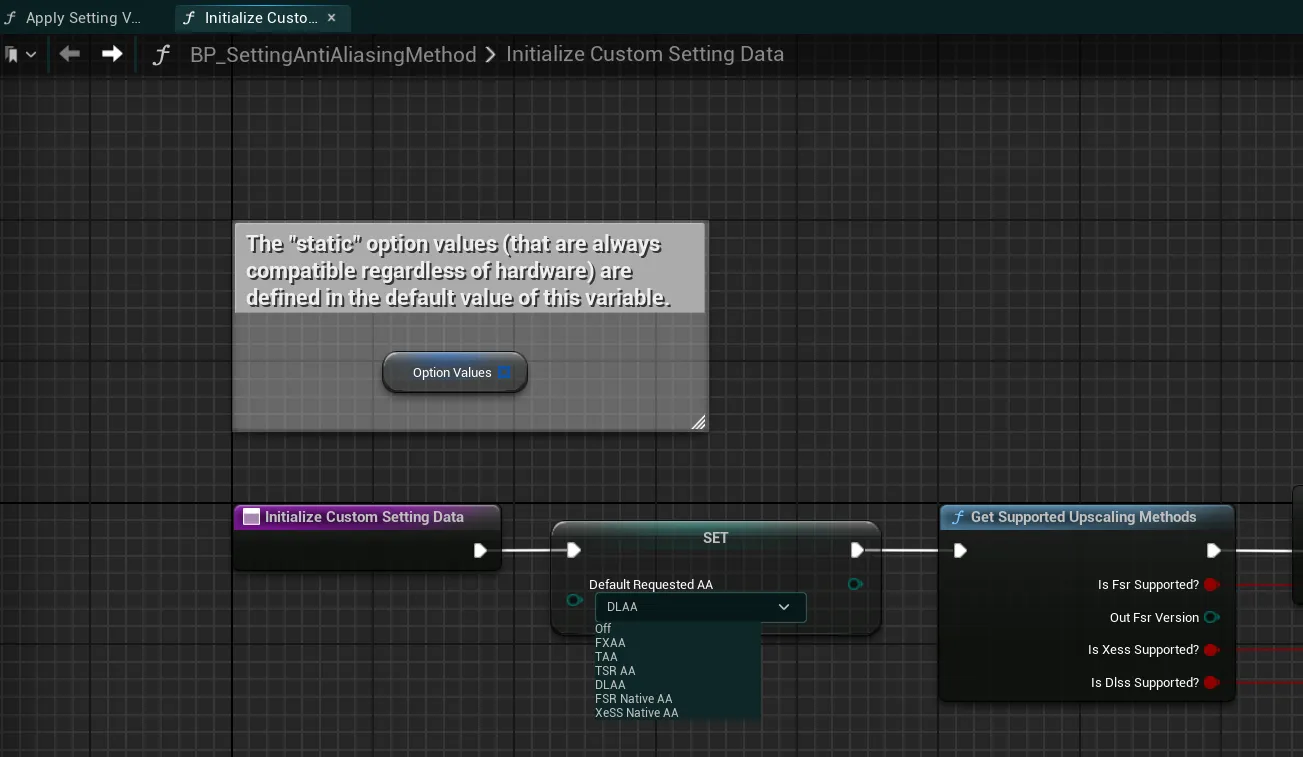
Safely remove the plugins if needed
If for any reasons you want to safely remove the plugins (such as engine upgrade, compatibility issues, etc), please follow these instructions
-
Go to the
EasyGameUI/Core/Utilitiesfolder, open theBPFL_EGUI_EasyFunctionUtilitiesblueprint and open theGet Supported Upscaling Methodsfunction -
In this function, simply disconnect any of the collapsed nodes in the comment. Do not disconnect the pin leading to the
Return Node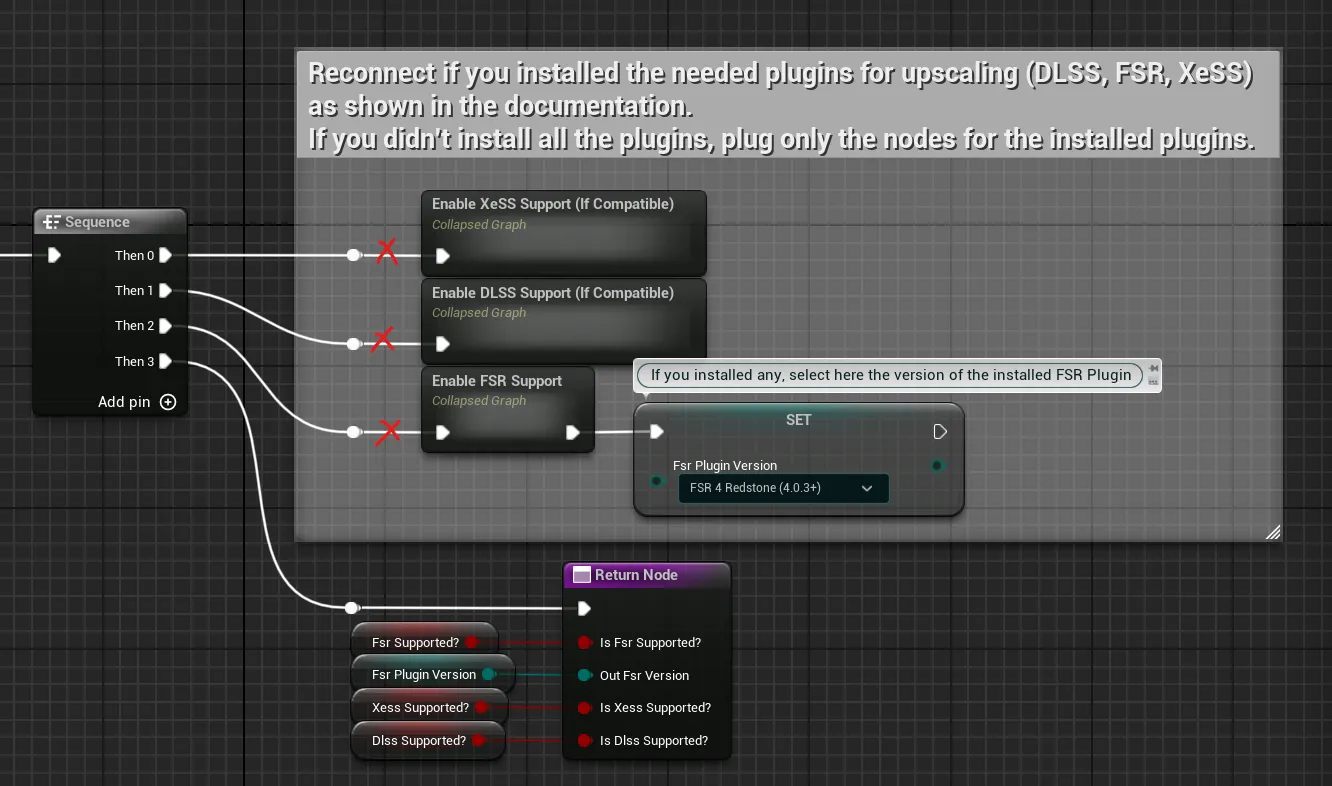
-
Compile and save
- You can now safely remove the plugins by either deleting them inside the
Pluginsfolder in your project folder (close Unreal Engine before that), or by disabling them inside the Plugins window
Benchmarking Tool Setup
The Benchmarking Tool can be a great tool to help your players test their performances in your game, this section will go through the required setup to implement it in your project. If you wish to see a demo setup for this system, you can check it out on the L_EGUI_BenchmarkDemoLevel map
-
To set up the system, you will need a level for it to run through. To do this, I would strongly suggest creating a new level made only for the benchmark run (by duplicating any of your levels for example), without any gameplay that could interfere such as a game hud, player interface or any gameplay elements that could disrupt the benchmark.
If you do not wish to create a new dedicated level, you have to make sure that none of these elements will interfere. You can do so by adding this small code to the begin play of any actor that could interfere or any elements that should be blocked during the benchmark run:
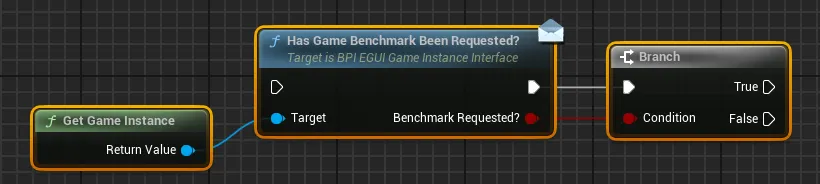
If True, the benchmark will be started and all gameplay elements should be disabled. If False, the actor can load as usual
-
Then, go to the folder
EasyGameUI/EasyOptionsMenu/EasyGameBenchmark/DemoContent/. Locate and duplicate theLS_BenchmarkTemplatelevel sequence, then drag&drop this new Level Sequence inside your world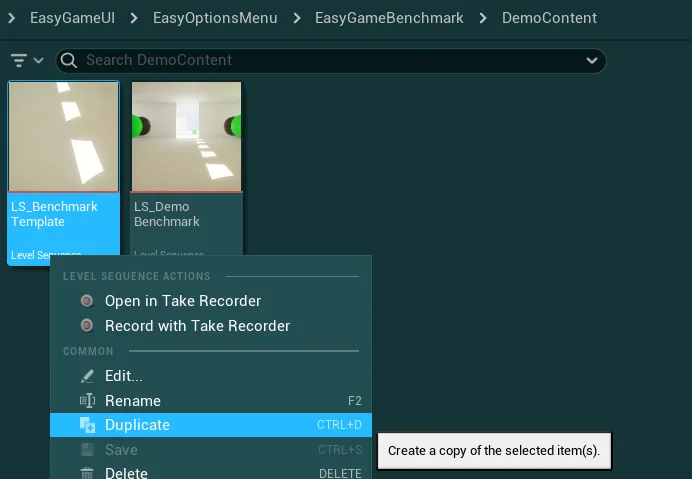
-
Then go back to the folder
EasyGameUI/EasyOptionsMenu/EasyGameBenchmark/and locate theBP_EasyGameBenchmarkHandler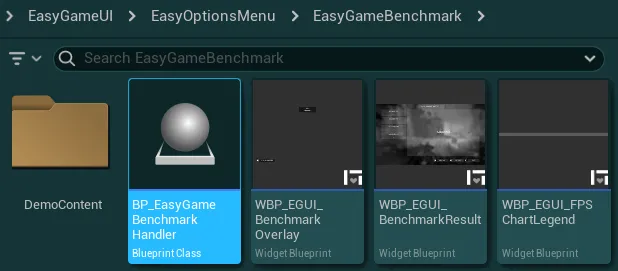
-
Place it anywhere in your world then go to the Details panel and in the
Level Sequence to Playvariable, add the reference to the level sequence you just placed in your world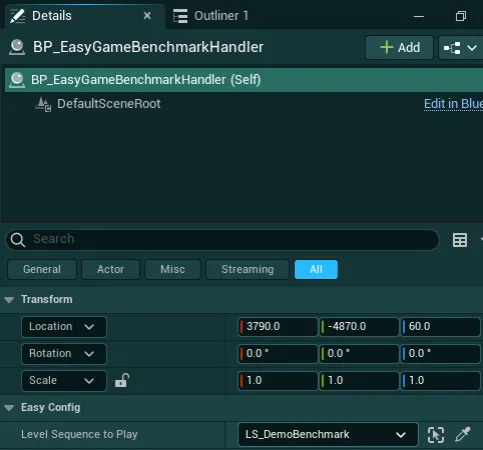
-
Then, open your Level Sequence (double click on the asset you duplicated) and proceed by adding camera positions to make the camera travel inside your world to your desired locations.
The camera path should ideally go through various areas of your map, including areas that can be expensive to run. Feel free to make the sequence longer if you wish, around 25 to 60 seconds is ideal.

-
Once this is done, click on the Events section, you will notice that 3 events are already placed for the start, end of the benchmark and a demo pause/resume event. Start by placing the start/end anywhere in your sequence that make sense.

I would strongly recommend leaving a few seconds at the begining of the sequence to allow the level to load properly before starting the benchmark.
-
You can then also use the Pause/Resume event anywhere inside your timeline. To do so, duplicate the existing
PauseOrResumeGameBenchmarkevent, then right click on it and hover thePropertiessection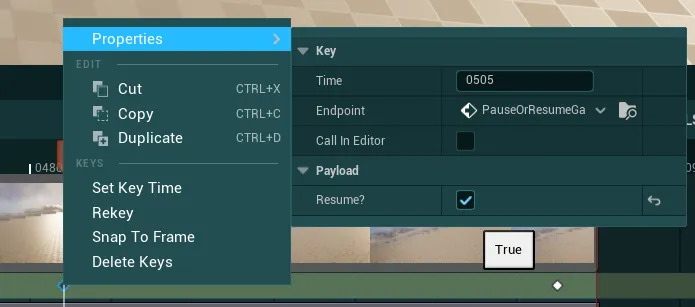
Inside this section, you can then select if that keyframe should pause or resume the benchmark capture based on the value of the variable
Resume?:- If True, the benchmark will start recording performances again (if it was paused previously)
- If False, the benchmark will stop recording performances. The Sequence will still keep running, only the FPS recording will be paused
This can be useful if you want for example to teleport to another location on the map, in which case you can pause the benchmark to avoid recording erroneous datas and then resume it once the tp is done
-
Finally, you can now open your Global Config Data Asset, set the
Enable Game Benchmarking Tool?setting to True and set yourGame Benchmarking Levelto your current benchmarking level -
Once all of this is done, you can now start the benchmark run while in game from the Options Menu with the button
Run Benchmark
Understanding the Benchmark results
Once the benchmark ended, you will be presented with a benchmark result like this image
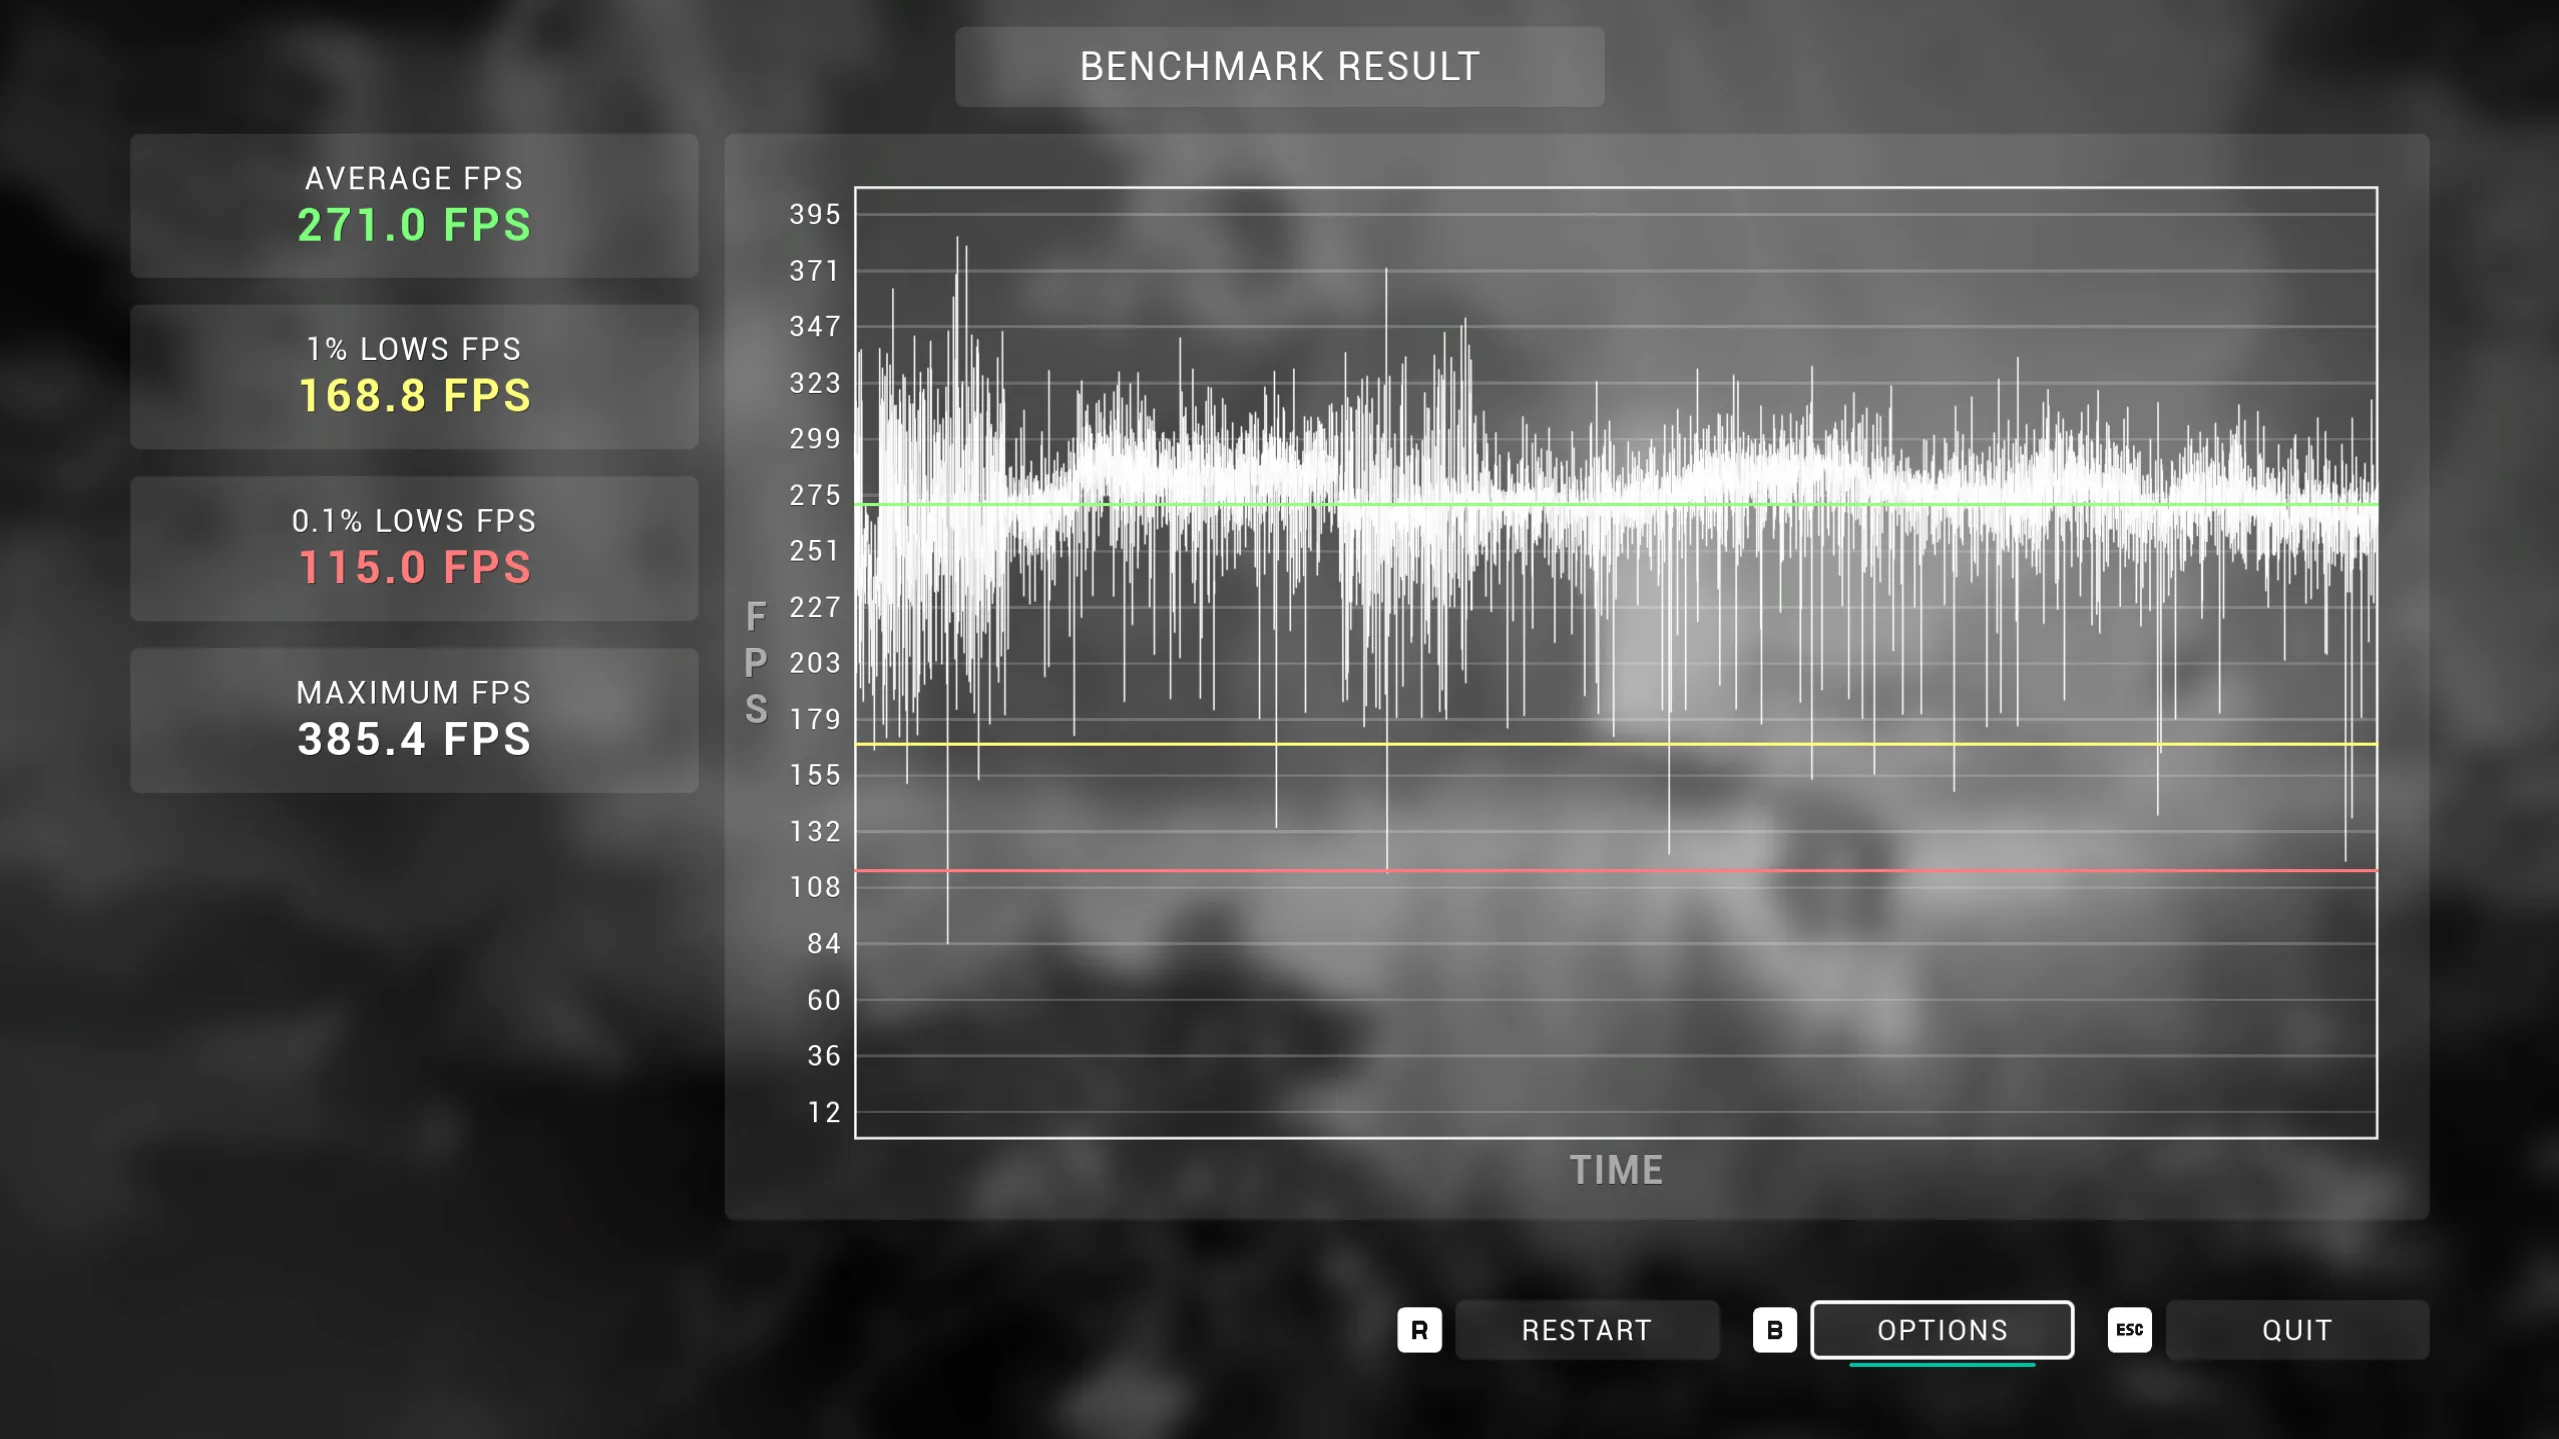
It will not look exactly like this depending on the performances characteristics of your run and hardware. It might even look like a perfectly straight line if the framerate has been perfectly stable.
This benchmark result contains various informations:
On the left side, you can see several framerate datas
Average FPSis the average framerate during the whole run, this can give a overview of the performances but can easily be biased by very high and very low framerates1% Lows FPSthis metric represent the 1% lowest framerates during the entire run. It can be a very useful to determine the overall stability of the framerate, the closer this metric is to the average, the smoother the framerate is.0.1% Lows FPSthis metric can also be used to determine the stability of the framerate, but most importantly to detect potentiel stuttering issues if this value is very low. It represent the 0.1% of lowest framerates during the whole run.Maximum FPSis very basically the single maximum framerate achieved during the benchmark run
On the right side, you can see a frametime chart that plot the framerate over the duration of the benchmark
This chart can be very useful to detect potential areas of your benchmark run that have performances issues and see the overall stability of the framerateKeep in mind that running the game at unlocked framerate will always be more stuttery than running it with a framerate cap below your GPU max capacity
From that benchmark result page, you can then access directly the options menu to tweak any settings and rerun a benchmark, or quit to the main menu.
If you enabled the benchmark in shipping builds, this tool will also be accesible to the players so that they can quickly check their performances depending on their hardware and with various graphics settings.